CA-DXJ36
Important for Laser Products
CA-DXJ36
About color system
How to Read This Manual
Introduction
Audio formats
Contents
Precautions
Connections
Supplied accessories
To assemble the AM loop antenna To connect AM/FM antenna
Powered subwoofer
~ TV/monitor
AM/FM antenna
To connect the speaker cords
⁄ Speakers
@ Auxiliary equipment
¤ Voltage selector Not applicable for Australian model
Changing the Color System
# Power cord
Cancelling the Demonstration
Preparing the Remote Control
Display Indication
To turn off standby the System
How to select a number
Connecting or putting on the headphones
Daily Operations-Playback
To select the band FM/AM
Adjusting the Volume
To tune in to a station
To select the AM tuner interval spacing
To play back disc/USB mass storage class device
To tune in to a preset station
Playing Back a Disc/USB Mass Storage
To insert discs
To return to normal playback, press DVD/CD 3 or
To select a disc
To select a chapter/track
To locate a particular portion
To insert a tape
Playing Back a Tape
To change the tape running direction deck B only
To reverse the tape automatically deck B only
Select the speaker you want to adjust
Adjusting the Speaker Output Level
Repeat steps 1 and 2 to adjust other speakers
Creating Your Own Sound
Modes-User Mode
Applying an Optimal Bass Sound Effect
Selecting the Sound Modes Remote
To select a preset picture tone
Presetting Automatic DVD Video
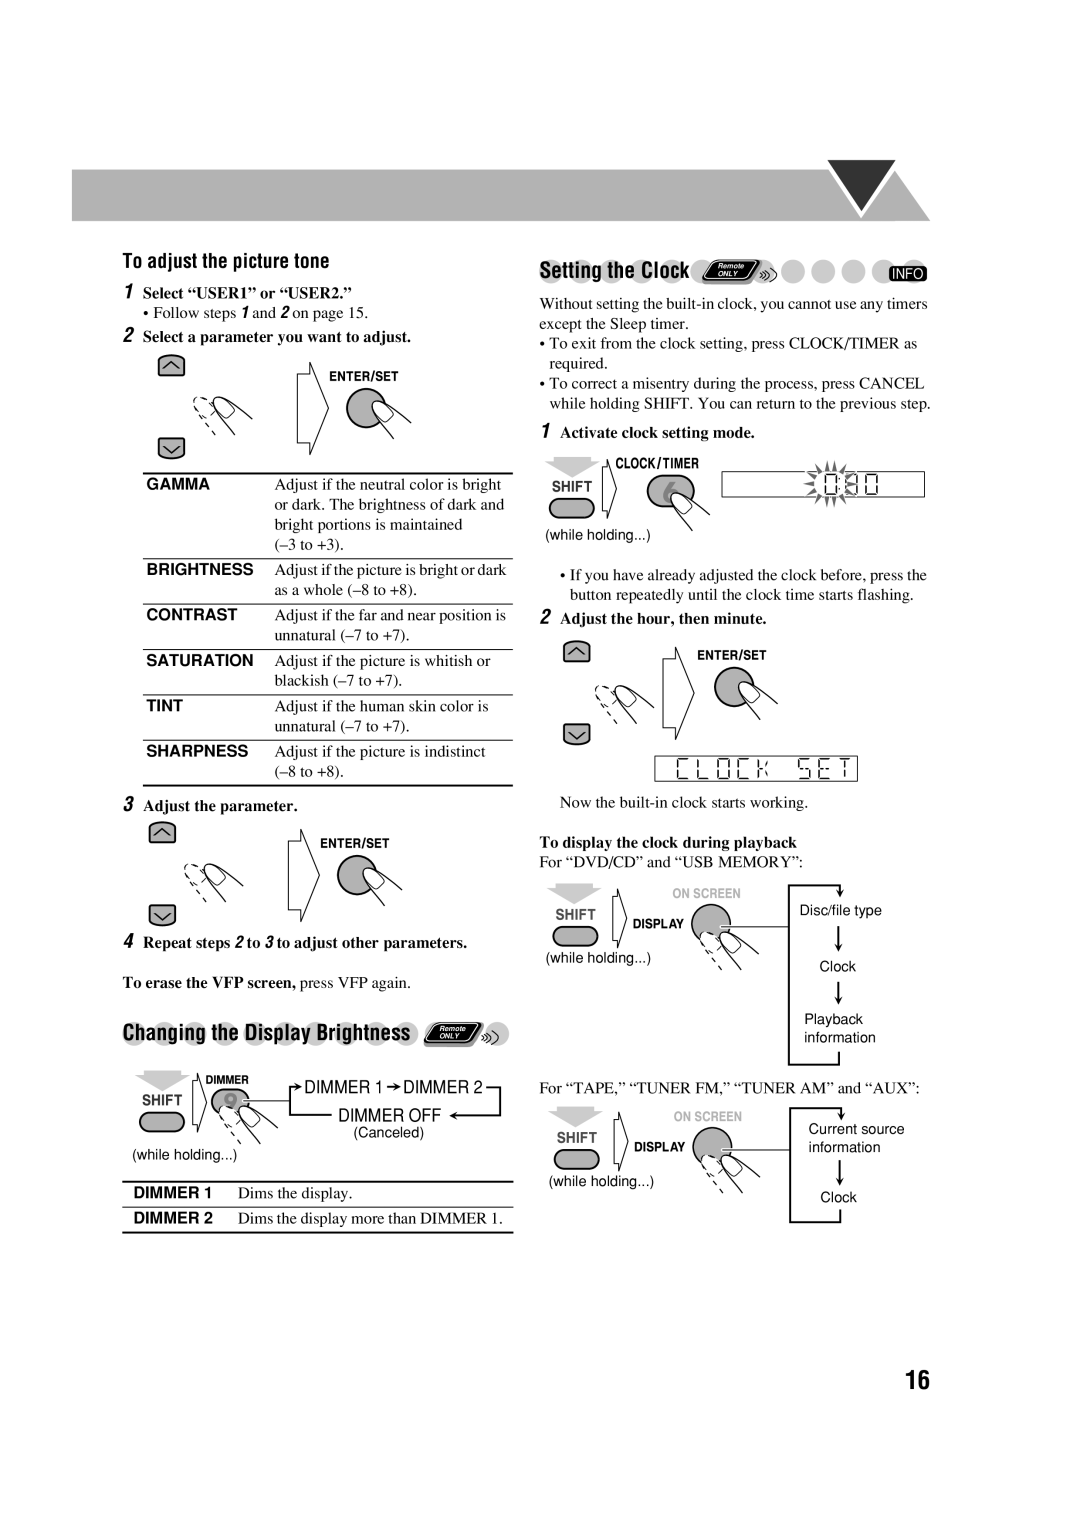
Changing the Picture Tone Remote
To adjust the picture tone
Setting the Clock
While playing DVD Video
Unique Video Disc/File Operations
While playing a DVD-VR
Selecting the View Angle
Selecting Browsable Still Pictures Remote
While playing
Slow-motion playback
Still picture playback
Frame-by-frame playback
Programming the Playing Order
Advanced Playback Operations
Program Play
To exit from Random Play
To check the programmed contents
To modify the program
To exit from Program Play
Repeat
Repeat Play
On-screen Bar Information
On-Screen Operations
On-screen bars
On-screen Bar
Operations Using
To change the time information
Examples
Time Search
Chapter/Track Search
Enter the time
Control screen for AV files/JPEG files
Operations Using the Control
Screen
Control screen for DVD-VR
To zoom in the JPEG/ASF file
To start playback
To repeat slide-show for Jpeg file
To repeat play for Video files
Insert a recordable cassette into deck B
Change the Reverse Mode if necessary
Recording Operations
Recording onto a Tape Main Unit
Synchronized Recording Main Unit
Dubbing Tapes
Singing Along Karaoke
Sing into the microphone Adjust the MIC Level and Volume
To cancel the Mic Mixing
Enjoying Karaoke
Activate Karaoke Scoring. Kscore on appears on the display
Adjusting the Sound Track for Karaoke
To return to normal playback temporarily
To return to normal playback, select OFF
To apply an echo to your voice
Changing the Karaoke Setting
Karaoke Program Play
Select the volume level
To erase the entire program, repeat the procedure
Reserving Karaoke Songs
Select an item you want to play or record as follows
Timer Operations
Setting the Timer Remote Info
Make the timer setting as you want
Timer Priority
Turning Off the Power Automatically Remote
Language menu
Setup Menu Operations
Picture menu
Audio menu
SPK. Setting menu
Others menu
Video
Operating the TV
Learning More about This System
Additional Information
Daily Operations-Playback see pages 8 to
Reinforcing the Bass Sound
Adjusting the Speaker Output Level
Creating Your Own Sound Modes-User Mode
Setting the Clock
On-Screen Operations see pages 23 to
Advanced Playback Operations see pages
Recording Operations see pages 29 to
Setup Menu Operations see pages 37 to
Troubleshooting
Maintenance
Recording Operations
Timer Operations
Disc/file Operations
Tape Operations
Language Code List
Amplifier section
Specifications
Cassette deck section
Parts Index
Remote control
Main unit
Exclude Australian Model
CA-DXJ30 CA-DXJ21 CA-DXJ11
Important for Laser Products
CA-DXJ30
Playable Disc/File Types
Adjusting the Speaker Output Balance
Illustration above is CA-DXJ30
~ From the video input of TV/monitor See
From the digital input of digital audio component
¤ Voltage selector
Digital audio component
For CA-DXJ11
¤ Voltage selector Not applicable for Australian models
For CA-DXJ30
For CA-DXJ21
For CA-DXJ11/J21 For CA-DXJ30
With surround effect is activated
FM/PLAY Mode
Select Tuner AM, then turn off standby the System
Listening to the Radio
To connect a USB mass storage class device
To select a disc
Playing Back a Tape
Reinforcing the Bass Sound
Adjusting the Speaker Output Balance Remote
Applying an Optimal Bass Sound Effect Vario Bass
Classic
Field-3D Phonic
Creating 3-Dimensional Sound
Changing the display information
AUDIO/MPX Zoom SUB Title
CA-DXJ30 only
Pause playback
Playing Back Bonus Group Remote
Advanced Playback Operations
To check the programmed contents
For DVD Audio CA-DXJ30 only While playing or before playback
Prohibiting Disc Ejection-Child Lock Main Unit
DVD Audio CA-DXJ30 only
DTS/ Lpcm
To change the time information
Time Search
Repeat Step Time
To repeat slide-show for Jpeg files
For Jpeg files
Forward 2 reverse
To stop dubbing
Karaoke Scoring Volume -,+ REC START/STOP MIC Level -,+
Your score
Calculation level is strict
To change the calculation level
To change the mic volume
Timer Operations
Turning Off the Power Automatically Remote
Basic Procedure
Digital Audio Output
Operating the TV
Additional Information
Creating 3-dimensional Sound Field-3D Phonic
On-Screen Operations see pages 23 to
Maintenance
Troubleshooting
With MP2, MP3
Optical Digital Output Signals
With Dolby Digital
Language Code List
USB storage section
Tuner section
NTSC/PAL
CA-DXJ30/CA-DXJ21/CA-DXJ11 Compact Component System
DX-J21-Consists of CA-DXJ21, SP-DXJ21F, and SP-DXJ21W
For U.S.A
Mises en garde, précautions et indications diverses
Important for Laser Products
European Union only Union européenne seulement
Front Face Side Côté
DVD Video players and DVD Video discs have their own
Playable Disc/File Types
Precautions
¤ To a wall outlet
@ From the speakers and the subwoofer See
~ TV/monitor AM/FM antenna
⁄ Auxiliary equipment
¤ Power cord
@ Speakers and the subwoofer
Select the color system Store the setting
Canceling the Demonstration
Display Indication
Daily Operations-Playback
Listening to the Radio
To connect a USB mass storage class device
To select a title/group
Push Insert Close
Daily Operations-Sound & Other Adjustments
Creating Your Own Sound Modes
User Mode
Creating 3-Dimensional Sound Field-3D Phonic
Setting the Clock
SUB Title
Selecting the View Angle
Advance the still picture frame by frame
Special Picture Playback
DVD/CD
To modify the program
For Random Play For Program Play
Video file on a disc-MPEG-1/MPEG-2/ASF file
Title
To change the time information
For DVD Video/DVD-VR only You can search for
Chapter Search
Enter the desired chapter number Examples
04/25/07 4ch 700 PM JVC DVD World 05/17/07 8ch
Track Group Disc Repeat Track Repeat Group Repeat Disc
Recording onto a Tape
Synchronized Recording
Enjoying Karaoke
OFF R Channel
Changing the Karaoke Setting
Reserving Karaoke Songs Karaoke Program Play
Timer Operations
Turning Off the Power Automatically Remote
Video To play Video files. MPEG-1/MPEG-2/ASF files
Audio menu
To turn on or
Changing the Color System
Creating Your Own Sound Modes -User Mode
On-Screen Operations see pages 23 to
Maintenance
Select 43 LB for Monitor Type see
With DTS
Language Code List
Main speaker SP-DXJ21F
Amplifier section-CA-DXJ21
Disc/File player section
Subwoofer SP-DXJ21W
Audio Karaoke
Page
Page
DX-J21 Compact Component System

 DIMMER 1
  DIMMER 2