ENTER PLUSCODE NUMBER
|
| Press OK, and a cursor |
|
| GUIDE PROG SET |
| ||||
| appears above “GUIDE |
|
|
| ||||||
|
|
|
|
|
|
|
|
| ||
4 PROG”. Then, using the |
| 1 2 3 4 5 |
|
|
|
|
| |||
|
|
|
|
| ||||||
|
|
|
|
|
|
|
| |||
| NUMBER keys, input the |
| GUIDE PROG | TV PROG |
| |||||
| PlusCode number (found | 1 |
|
| 1 |
|
| |||
| in most TV listings) of a |
|
|
|
|
|
|
|
| |
| program scheduled to be |
|
|
|
|
|
|
|
| |
| broadcast on each station |
|
|
|
|
|
|
|
| |
|
|
|
|
|
| |||||
| on the list from step 1, | [MENU] : EXIT |
|
|
| |||||
| starting at the top. If you |
| When entering a |
| ||||||
| enter the wrong number, press |
|
| |||||||
|
| PlusCode for BBC 2 |
| |||||||
| CANCEL to backspace and |
|
| |||||||
|
|
|
|
|
|
|
|
| ||
| input the correct number. |
|
|
|
|
|
|
|
| |
|
|
|
|
|
|
| ||||
|
| CONFIRM PRESET |
|
|
| |||||
|
| POSITION NUMBER |
|
|
| |||||
4 |
| Press OK and the display |
|
| GUIDE PROG SET |
| ||||
under “TV PROG” begins |
|
|
| |||||||
|
|
|
|
|
|
|
|
| ||
5 blinking. |
|
|
|
|
|
|
|
| ||
|
| If the blinking number |
| GUIDE | PROG | TV PR | OG |
| ||
|
| under “TV PROG” agrees |
| 2 |
|
| 2 |
|
| |
|
|
|
|
|
|
|
|
|
| |
|
| with the preset position . . . |
|
|
|
|
|
|
|
|
|
| . . . press OK. |
|
|
|
|
|
|
|
|
|
| If the numbers do not | [5°] = |
|
|
|
|
| ||
|
| agree . . . | [MENU] : EXIT |
|
|
| ||||
|
|
|
|
|
|
|
|
|
| |
|
| . . . input the preset |
|
|
|
|
|
|
|
|
|
| position using PUSH JOG%Þ or the NUMBER keys, |
| |||||||
| then press OK. |
|
|
|
|
|
|
|
| |
●If you input the PlusCode number of a program that has already aired, “ERROR” appears on screen for a few seconds. Input the correct PlusCode number.
●Repeat steps 4 and 5 as necessary.
CLOSE MENU
6 Press MENU and selection is complete.
If you already know the Guide Program number for a station . . .
1– After step 3, press PUSH JOG %.
●The GUIDE PROG number begins blinking.
2– Enter the Guide Program number using the NUMBER keys or PUSH JOG%Þ, then press PUSH JOG %.
●The TV PROG number begins blinking.
3– Enter the preset position using the NUMBER keys or PUSH JOG%Þ, then press PUSH JOG% .
●Repeat 2 and 3 as necessary. 4– Press MENU.
NOTES:
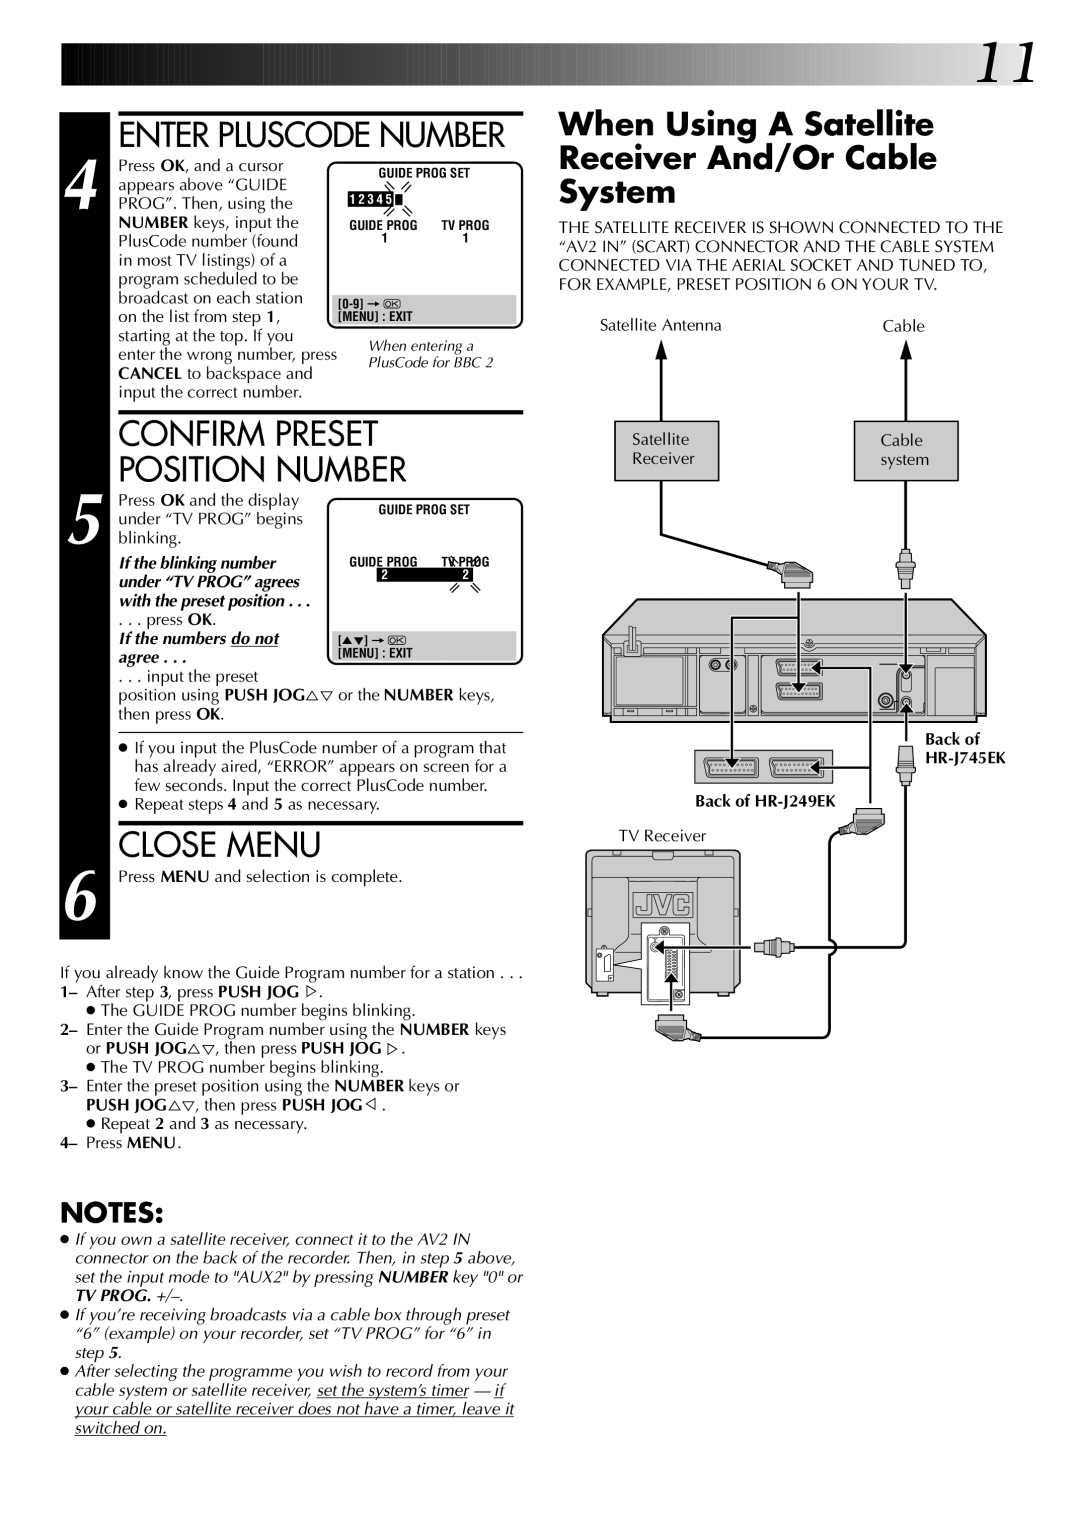
●If you own a satellite receiver, connect it to the AV2 IN connector on the back of the recorder. Then, in step 5 above, set the input mode to "AUX2" by pressing NUMBER key "0" or TV PROG.
●If you’re receiving broadcasts via a cable box through preset “6” (example) on your recorder, set “TV PROG” for “6” in step 5.
●After selecting the programme you wish to record from your cable system or satellite receiver, set the system’s timer — if your cable or satellite receiver does not have a timer, leave it switched on.
![]()
![]()
![]()
![]() 11
11![]()
When Using A Satellite
Receiver And/Or Cable
System
THE SATELLITE RECEIVER IS SHOWN CONNECTED TO THE “AV2 IN” (SCART) CONNECTOR AND THE CABLE SYSTEM CONNECTED VIA THE AERIAL SOCKET AND TUNED TO, FOR EXAMPLE, PRESET POSITION 6 ON YOUR TV.
Satellite Antenna | Cable |
|
|
|
|
|
|
|
|
|
|
|
|
|
|
|
|
|
|
Satellite |
|
|
|
|
| Cable |
| ||||||||||
Receiver |
|
|
|
|
| system |
| ||||||||||
|
|
|
|
|
|
|
|
|
|
|
|
|
|
|
|
|
|
|
|
|
|
|
|
|
|
|
|
|
|
|
|
|
|
|
|
|
|
|
|
|
|
|
|
|
|
|
|
|
|
|
|
|
|
|
|
|
|
|
|
|
|
|
|
|
|
|
|
|
|
|
|
|
|
|
|
|
|
|
|
|
|
|
|
|
|
|
|
|
|
|
|
|
|
|
|
|
|
|
|
|
|
|
|
|
|
|
|
|
|
|
|
|
|
|
|
|
|
|
|
|
|
|
|
|
|
Back of |
Back of |
TV Receiver
