Timer-Recording

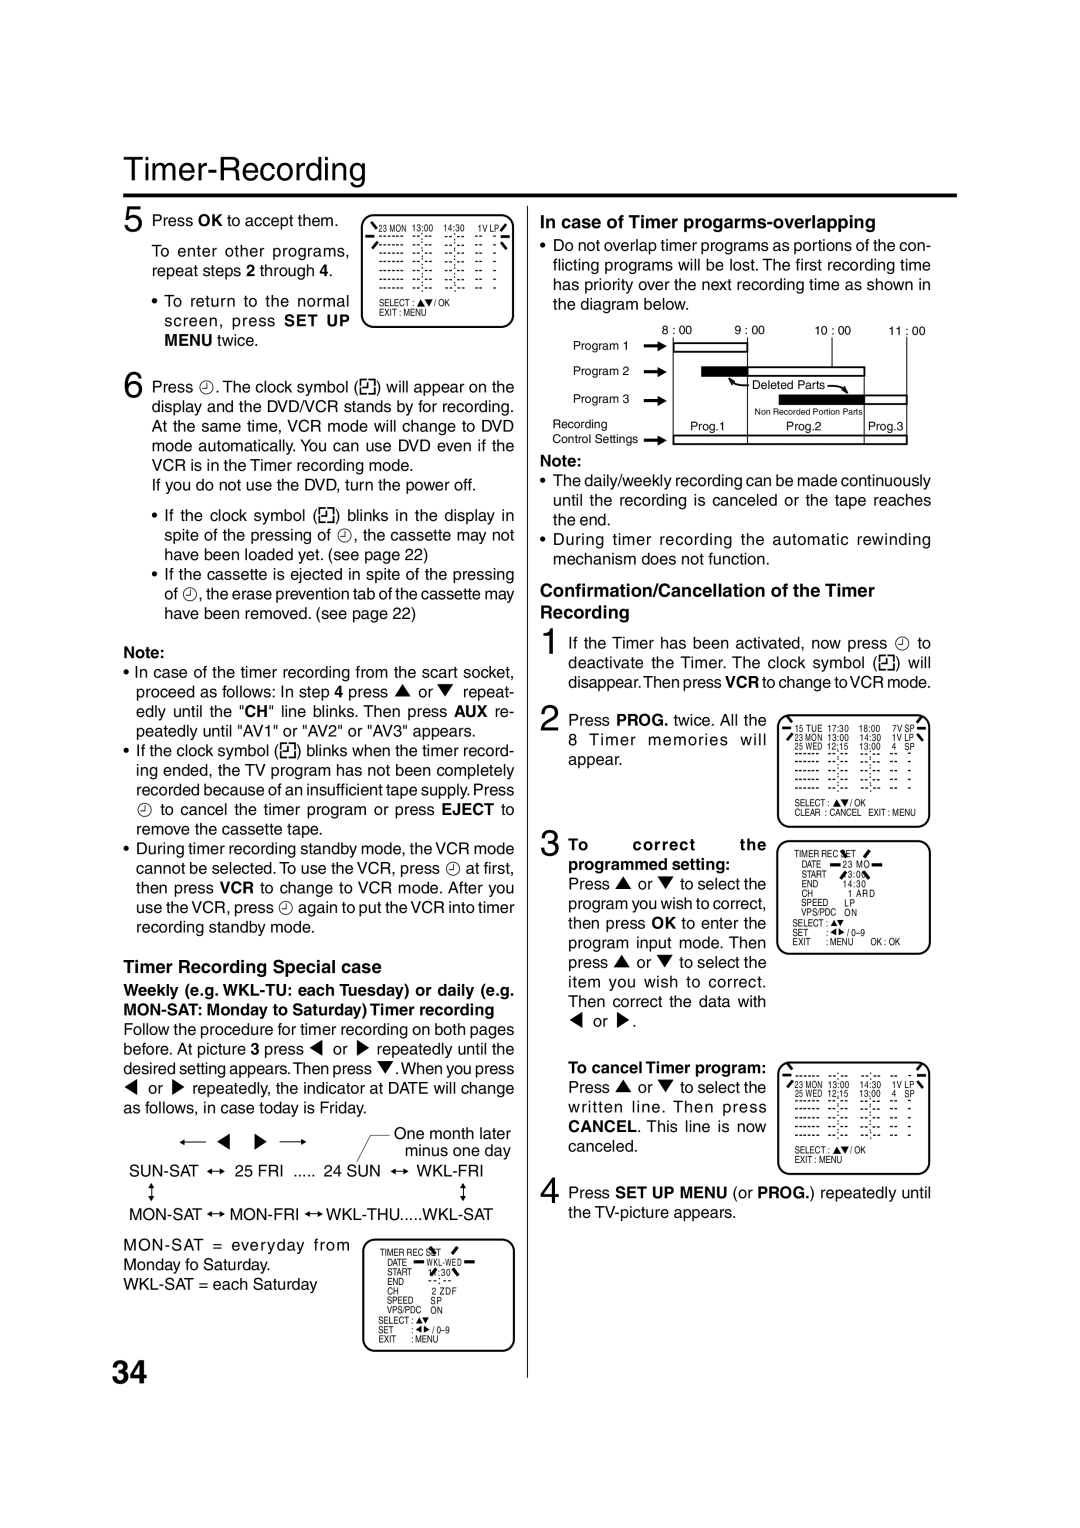
5 Press OK to accept them.

To enter other programs, repeat steps 2 through 4.

To return to the normal screen, press SET UP MENU twice.

23 MON

13:00

14:30

1V LP

------

--:--

--:--

--

-

------

--:--

--:--

--

-

------

--:--

--:--

--

-

------

--:--

--:--

--

-

------

--:--

--:--

--

-

------

--:--

--:--

--

-

------

--:--

--:--

--

-

SELECT :

/ OK


EXIT : MENU


In case of Timer progarms-overlapping

Do not overlap timer programs as portions of the con- flicting programs will be lost. The first recording time has priority over the next recording time as shown in the diagram below.

8 : 00

9 : 00

10 : 00

11 : 00

Program 1


Program 2


6 Press . The clock symbol () will appear on the display and the DVD/VCR stands by for recording. At the same time, VCR mode will change to DVD mode automatically. You can use DVD even if the VCR is in the Timer recording mode.

If you do not use the DVD, turn the power off.

If the clock symbol () blinks in the display in spite of the pressing of , the cassette may not have been loaded yet. (see page 22)

If the cassette is ejected in spite of the pressing of , the erase prevention tab of the cassette may have been removed. (see page 22)

Note:

• In case of the timer recording from the scart socket,

proceed as follows: In step 4 press

or

repeat-

edly until the "CH" line blinks. Then press AUX re-

peatedly until "AV1" or "AV2" or "AV3" appears.

• If the clock symbol ( ) blinks when the timer record-

ing ended, the TV program has not been completely

recorded because of an insufficient tape supply. Press

to cancel the timer program or press EJECT to

remove the cassette tape.


Deleted Parts


Program 3


Non Recorded Portion Parts


Recording


Prog.1


Prog.2

Prog.3

Control Settings


Note:

The daily/weekly recording can be made continuously until the recording is canceled or the tape reaches the end.

During timer recording the automatic rewinding mechanism does not function.

Confirmation/Cancellation of the Timer Recording

1 If the Timer has been activated, now press to

deactivate the Timer. The clock symbol (

) will

disappear.Then press VCR to change to VCR mode.

2 Press PROG. twice. All the

15 TUE 17:30

18:00

7V SP

8 Timer memories will

25 WED 12:15

13:00

4

SP


23 MON 13:00

14:30

1V

LP

appear.

------ --:--

--:--

--

-

------ --:--

--:--

--

-


------ --:--

--:--

--

-


------ --:--

--:--

--

-


------ --:--

--:--

--

-


SELECT :

/ OK


CLEAR : CANCEL EXIT : MENU

• During timer recording standby mode, the VCR mode

cannot be selected. To use the VCR, press at first,

then press VCR to change to VCR mode. After you

use the VCR, press again to put the VCR into timer

recording standby mode.

Timer Recording Special case

Weekly (e.g. WKL-TU: each Tuesday) or daily (e.g.

MON-SAT: Monday to Saturday) Timer recording Follow the procedure for timer recording on both pages before. At picture 3 press or repeatedly until the

3 To

correct

the

programmed setting:


Press or to select the program you wish to correct, then press OK to enter the program input mode. Then press or to select the item you wish to correct. Then correct the data with or .

TIMER REC SET

DATE

23 MO

START

13:00

END

14:30

CH

1 ARD

SPEED

LP

VPS/PDC

ON

SELECT :

SET : / 0–9

EXIT : MENU OK : OK

desired setting appears.Then press .When you press

or repeatedly, the indicator at DATE will change as follows, in case today is Friday.


One month later


minus one day

SUN-SAT


25 FRI ..... 24 SUN


WKL-FRI


MON-SAT


MON-FRI


WKL-THU.....WKL-SAT


To cancel Timer program:

------ --:--

--:--


-

Press

or

to select the

--

23 MON 13:00

14:30

1V LP

25 WED 12:15

13:00

4

SP

written line. Then press

------ --:--

--:--

--

-

------ --:--

--:--

--

-

CANCEL. This line is now

------ --:--

--:--

--

-

------ --:--

--:--

--

-

canceled.


------ --:--

--:--

--

-


SELECT :

/ OK


EXIT : MENU

4 Press SET UP MENU (or PROG.) repeatedly until the TV-picture appears.

MON-SAT = everyday from Monday fo Saturday. WKL-SAT = each Saturday

34

TIMER REC SET

DATE

WKL-WED

START

11:30

END

- - : - -

CH

2 ZDF

SPEED

SP

VPS/PDC

ON

SELECT :

SET : / 0–9

EXIT : MENU

Page 34
Image 34
JVC HR-XV1EU manual Timer-Recording, Case of Timer progarms-overlapping, Confirmation/Cancellation of the Timer Recording

HR-XV1EU specifications

The JVC HR-XV1EU is a sophisticated home video recorder that stands out for its remarkable blend of functionality, advanced technologies, and user-friendly design. Launched as part of JVC’s esteemed HR series, the HR-XV1EU combines both VHS and DVD recording capabilities, making it a versatile choice for those looking to digitize their media collection and enjoy high-quality playback.

Key features of the HR-XV1EU include its dual-format recording system that allows users to record directly onto VHS tapes or DVDs, providing flexibility for various viewing preferences. The device supports a wide range of video formats, including standard VHS as well as DVD+R and DVD-R discs, facilitating seamless playback across different platforms.

One of the standout technologies integrated into the HR-XV1EU is the Digital Auto Tracking system, which enhances the clarity and stability of recordings. This technology automatically adjusts playback and recording heads to ensure optimal tracking, minimizing the risk of tape deterioration over time. Additionally, the device boasts a built-in Time Base Corrector, which is essential for refining video output and eliminating disturbances from signal interruptions.

The HR-XV1EU is equipped with a progressive scan feature, which provides smoother video playback and improved picture quality. This feature becomes particularly valuable when viewing films or any dynamic content, enhancing the overall user experience. Furthermore, the VCR incorporates an on-screen menu for easy navigation, allowing users to access functions and settings with ease.

Another notable aspect of the HR-XV1EU is its connectivity options. It features multiple input and output ports, including HDMI, SCART, and composite video connections. This extensive range of connectivity allows users to connect the VCR to televisions, camcorders, and other external devices effortlessly.

In terms of design, the compact form factor of the HR-XV1EU enables it to fit snugly into any entertainment setup. The ergonomic layout of the control buttons and the intuitive interface contribute to ease of use, ensuring that both tech-savvy individuals and novices can operate the device effectively.

In conclusion, the JVC HR-XV1EU is an exceptional video recorder that encapsulates the essence of reliable home entertainment technology. With its dual-format recording capabilities, advanced image processing features, and diverse connectivity options, it provides users with a practical and high-quality solution for preserving and enhancing their video content. Whether you're looking to archive family memories or enjoy a casual film night, the HR-XV1EU delivers on all fronts, making it a worthy addition to any media setup.