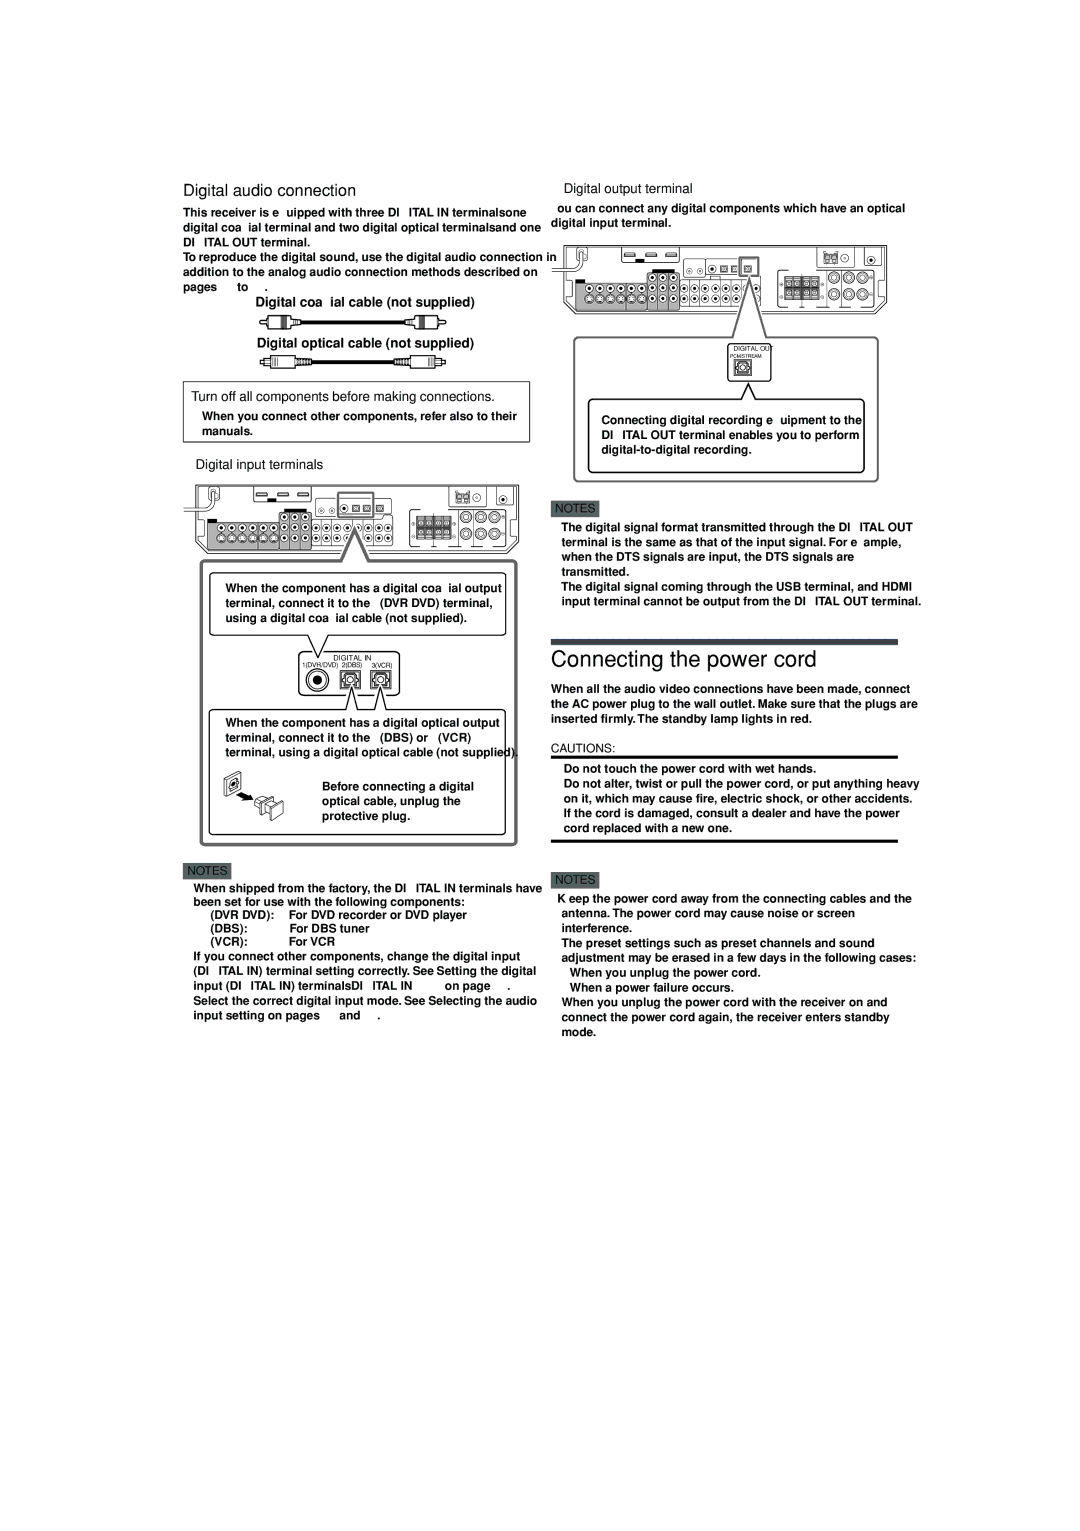
Digital audio connection

This receiver is equipped with three DIGITAL IN terminals—one digital coaxial terminal and two digital optical terminals—and one DIGITAL OUT terminal.

To reproduce the digital sound, use the digital audio connection in addition to the analog audio connection methods described on pages 10 to 13.

Digital coaxial cable (not supplied)

Digital optical cable (not supplied)

Turn off all components before making connections.

When you connect other components, refer also to their manuals.

7Digital input terminals

When the component has a digital coaxial output terminal, connect it to the 1(DVR/DVD) terminal, using a digital coaxial cable (not supplied).

DIGITAL IN

1(DVR/DVD) 2(DBS) 3(VCR)

When the component has a digital optical output terminal, connect it to the 2(DBS) or 3(VCR) terminal, using a digital optical cable (not supplied).

Before connecting a digital optical cable, unplug the protective plug.

NOTES

When shipped from the factory, the DIGITAL IN terminals have been set for use with the following components:

– 1(DVR/DVD): For DVD recorder or DVD player

– 2(DBS):

For DBS tuner

– 3(VCR):

For VCR

If you connect other components, change the digital input (DIGITAL IN) terminal setting correctly. See “Setting the digital input (DIGITAL IN) terminals—DIGITAL IN 1/2/3” on page 25.

Select the correct digital input mode. See “Selecting the audio input setting” on pages 16 and 17.

7Digital output terminal

You can connect any digital components which have an optical digital input terminal.

DIGITAL OUT

PCM/STREAM

Connecting digital recording equipment to the DIGITAL OUT terminal enables you to perform digital-to-digital recording.

NOTES

The digital signal format transmitted through the DIGITAL OUT terminal is the same as that of the input signal. For example, when the DTS signals are input, the DTS signals are transmitted.

The digital signal coming through the USB terminal, and HDMI input terminal cannot be output from the DIGITAL OUT terminal.

Connecting the power cord

When all the audio/video connections have been made, connect the AC power plug to the wall outlet. Make sure that the plugs are inserted firmly. The standby lamp lights in red.

CAUTIONS:

Do not touch the power cord with wet hands.

Do not alter, twist or pull the power cord, or put anything heavy on it, which may cause fire, electric shock, or other accidents.

If the cord is damaged, consult a dealer and have the power cord replaced with a new one.

NOTES

Keep the power cord away from the connecting cables and the antenna. The power cord may cause noise or screen interference.

The preset settings such as preset channels and sound adjustment may be erased in a few days in the following cases:

When you unplug the power cord.

When a power failure occurs.

When you unplug the power cord with the receiver on and connect the power cord again, the receiver enters standby mode.

14

Page 16
Image 16
JVC RX-D402B manual Connecting the power cord, Digital audio connection, Digital input terminals, Digital output terminal

RX-D401S, RX-D402B specifications

The JVC RX-D402B and RX-D401S are two impressive models from JVC's lineup of AV receivers, designed to elevate the audio-visual experience for home theater enthusiasts. Both units incorporate cutting-edge technologies and features aimed at delivering superior sound quality and versatility.

The RX-D402B is a robust receiver that emphasizes high-definition audio performance. It supports various audio formats, including Dolby TrueHD and DTS-HD Master Audio, ensuring an immersive surround sound experience. One of its standout features is its 4K video processing capability, allowing users to connect their latest high-resolution devices seamlessly. With multiple HDMI inputs, it can accommodate various sources, from gaming consoles to streaming devices.

Similarly, the RX-D401S provides a compelling feature set designed for audiophiles. This model supports a wide array of streaming services, making it easy to access music libraries and online content. Bluetooth connectivity is another significant advantage, allowing users to stream audio directly from smartphones and tablets without hassle. An integrated digital tuner and built-in Wi-Fi make this receiver a versatile option for entertainment.

Both models employ JVC's proprietary audio technology, designed to enhance sound clarity and fidelity. Equipped with high-quality DACs (Digital-to-Analog Converters), they ensure that audio playback remains crisp and dynamic, regardless of the source. Users can also take advantage of the advanced equalization settings, enabling them to tailor the sound profile to their liking.

Another notable aspect of these receivers is their user-friendly interface. The on-screen display simplifies navigation through various settings and options. Additionally, these models come with comprehensive remote controls that allow users to manage their entire audio-visual systems effortlessly.

In terms of build quality, both the RX-D402B and RX-D401S feature durable construction and a sleek design, making them appealing additions to any home theater setup. They are also equipped with multiple outputs, including subwoofer outputs, ensuring compatibility with a range of speaker configurations.

With support for high-definition audio formats, seamless streaming options, and robust performance features, the JVC RX-D402B and RX-D401S are excellent choices for those looking to enhance their home entertainment experience. Whether enjoying a movie night, gaming session, or listening to music, these receivers offer a high-quality audio experience that meets the demands of modern consumers.