4 ON-SCREEN/MENU SWITCHES
4-7 Contents of Menu Switches
[ ]: Factory setting | • The lower section in the items and set values columns shows what’s on the VCR’s display. | ||||
|
|
|
|
|
|
Screens |
| Items |
| Set values | Function |
|
|
|
| ||
ALARM/ | DURATION | 5 SEC | Selects the recording duration for alarm or sensor recording. | ||
|
|
| 10 SEC | 5 — 180 SEC: Alarm or sensor recording is performed for the specified | |
SENSOR |
|
|
| ||
|
|
| 15 SEC | time (5 sec. to 180 sec.) | |
MODE |
|
|
| ||
|
|
| 30 SEC | TAPE END: Alarm or sensor recording continues to the end of the tape. | |
|
|
|
| ||
|
|
|
| 60 SEC | |
|
|
|
| MANUAL: Alarm or sensor recording continues for as long as alarm | |
|
|
|
| 120 SEC | |
|
|
|
| signals are input. Set to this position when specifying the | |
|
|
|
| [180 SEC] | |
|
|
|
| alarm recording time with a switcher. | |
|
|
|
| TAPE END | |
|
|
|
| *To ensure accurate alarm search and alarm scan operation, | |
|
|
|
| MANUAL | |
|
|
|
| be sure to set the recording time to 5 seconds or more. | |
|
|
|
| 5. | |
| (VCR's display) |
| |||
| AL | SE | 3 | . |
|
| . |
| |||
|
|
|
| 180 |
|
|
|
|
| TPEN |
|
|
|
|
| NANU |
|
| TAPE END | [OFF] | Selects whether or not the Stop mode is forcibly engaged when the tape | ||
| MODE |
| STOP | ends even if there is an alarm or sensor recording. | |
|
|
|
| OFF | OFF: The forced Stop mode is not engaged. |
| AL | SE | 4 | • When the tape ends, the mode set with the menu switch <AUTO | |
|
|
|
| STOP | REW> or <REPEAT REC> on the <VTR MODE> screen is engaged. |
|
|
|
|
| STOP: The Forced Stop mode is engaged. |
|
|
|
| ||
BUZZER | TAPE END | [OFF] | Sets whether or not the buzzer sounds when the tape ends in the | ||
|
|
|
| ON | Record mode. |
| BU | 22 | 1 | OFF | OFF: The buzzer does not sound. |
| ON: The buzzer sounds when the tape ends during recording. Also, the | ||||
|
|
|
| ON | buzzer sounds when the tape reel counter value set with the menu |
|
|
|
|
| switch <CNT TAPE END> on the SRI/EXT MODE screen is reached. |
|
|
|
|
| When the mode is changed by pressing the [REW] button, |
|
|
|
|
| [EJECT] button or [OPERATE] button, the buzzer sound stops. |
|
|
|
| ||
| AL/SENSOR | [OFF] | Selects whether or not the buzzer sounds during alarm or sensor | ||
| IN |
|
| ON | recording. |
| BU | 22 | 2 | OFF | OFF: The buzzer does not sound. |
| ON: The buzzer sounds. | ||||
|
|
|
| ON | |
|
|
|
|
| |
5 PREPARATION
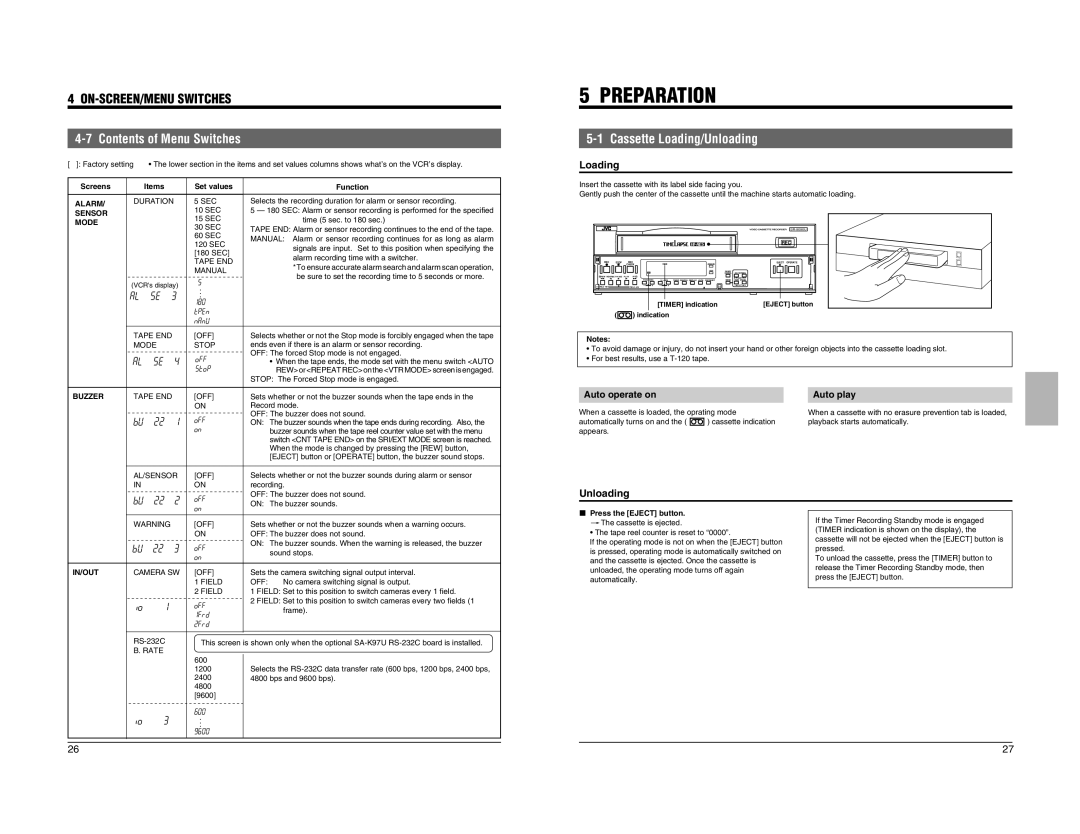
5-1 Cassette Loading/Unloading
Loading
Insert the cassette with its label side facing you.
Gently push the center of the cassette until the machine starts automatic loading.
|
|
|
|
|
|
|
|
| SR- | 9090U | |
|
|
|
|
|
|
|
|
|
| � | |
|
|
|
|
|
|
|
|
| REC |
|
|
REC | STOP | REC |
|
|
|
|
|
| EJECT OPERATE |
| |
|
| CHECK |
|
|
|
| OPERATE |
|
|
|
|
|
|
|
|
|
|
| HDR | RESET/ | ON SCREEN |
|
|
|
|
|
|
|
|
|
| CANCEL |
|
| |
REW REVERSE PAUSE PLAY FF |
|
|
|
|
|
| SHIFT |
|
| ||
|
|
| TRACKING | V. LOCK | TIMER SEARCH DISPLAY LOCK CNT RESET | MENU | TIME MODE |
|
| ||
FIELD REV |
| FIELD ADV | – | + | – | + |
|
| – S E T + |
|
|
|
|
|
|
| [TIMER] indication |
| [EJECT] button | ||||
| ( | ) indication |
|
|
|
|
| ||||
Notes: |
|
|
|
|
|
|
|
|
|
|
|
•To avoid damage or injury, do not insert your hand or other foreign objects into the cassette loading slot.
•For best results, use a
Auto operate on |
|
| Auto play |
When a cassette is loaded, the oprating mode |
| When a cassette with no erasure prevention tab is loaded, | |
automatically turns on and the ( | ) cassette indication | playback starts automatically. | |
appears. |
|
|
|
Unloading
| WARNING | [OFF] | Sets whether or not the buzzer sounds when a warning occurs. | |||
|
|
| ON | OFF: The buzzer does not sound. | ||
| BU 22 | 3 | OFF | ON: The buzzer sounds. When the warning is released, the buzzer | ||
|
| sound stops. | ||||
|
|
| ON |
| ||
|
|
|
|
| ||
|
|
|
| |||
IN/OUT | CAMERA SW | [OFF] | Sets the camera switching signal output interval. | |||
|
|
| 1 FIELD | OFF: | No camera switching signal is output. | |
|
|
| 2 FIELD | 1 FIELD: Set to this position to switch cameras every 1 field. | ||
| iO | 1 | OFF | 2 FIELD: Set to this position to switch cameras every two fields (1 | ||
|
| frame). | ||||
|
|
| 1FRD |
| ||
|
|
|
|
| ||
|
|
| 2FRD |
|
| |
|
|
| ||||
| This screen | is shown only when the optional | ||||
| B. RATE |
|
|
|
|
|
|
|
| 600 |
|
|
|
|
|
| 1200 |
| Selects the | |
|
|
| 2400 |
| 4800 bps and 9600 bps). | |
|
|
| 4800 |
|
|
|
|
|
| [9600] |
|
|
|
|
|
| 600 |
|
|
|
| iO | 3 | . |
|
|
|
| . |
|
|
| ||
|
|
| . |
|
|
|
|
|
| 9600 |
|
|
|
|
|
|
|
|
|
|
|
|
|
|
|
|
|
5Press the [EJECT] button.
[The cassette is ejected.
•The tape reel counter is reset to “0000”.
If the operating mode is not on when the [EJECT] button is pressed, operating mode is automatically switched on and the cassette is ejected. Once the cassette is unloaded, the operating mode turns off again automatically.
If the Timer Recording Standby mode is engaged (TIMER indication is shown on the display), the cassette will not be ejected when the [EJECT] button is pressed.
To unload the cassette, press the [TIMER] button to release the Timer Recording Standby mode, then press the [EJECT] button.
26 | 27 |