4 ON-SCREEN/MENU SWITCHES
4-3 Date and Time Setting
Summer Time Compensation
4 ON-SCREEN/MENU SWITCHES
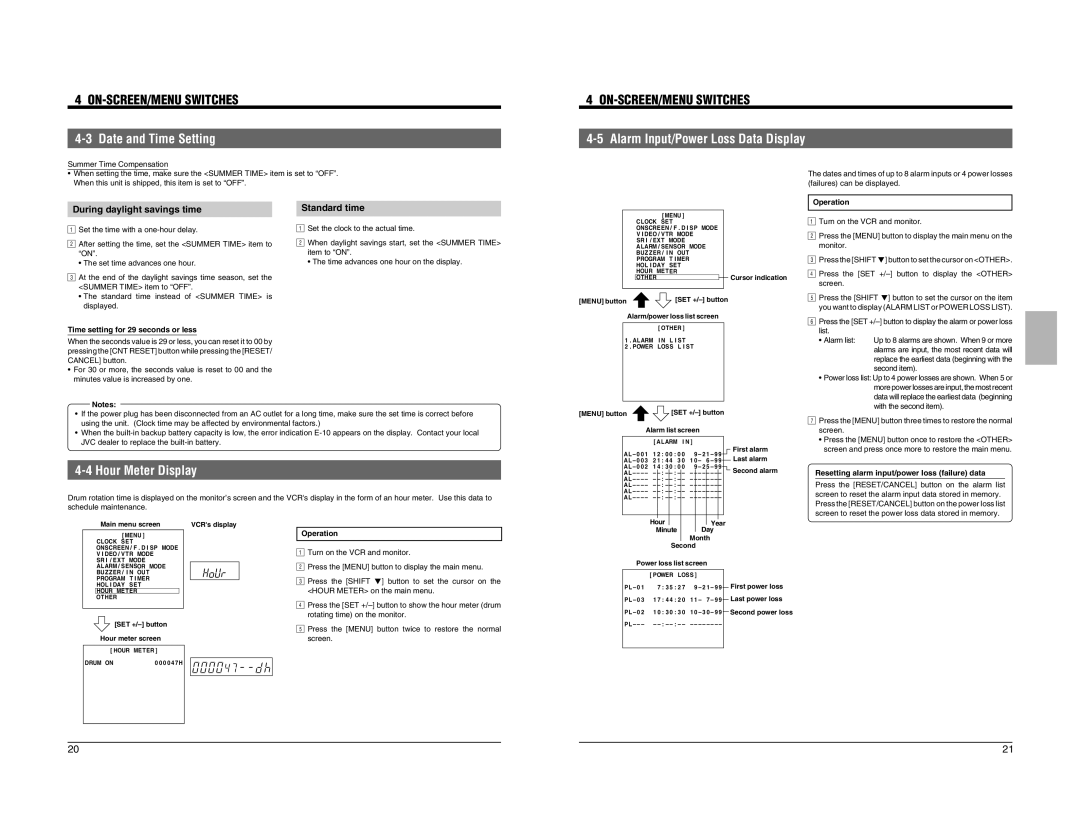
4-5 Alarm Input/Power Loss Data Display
•When setting the time, make sure the <SUMMER TIME> item is set to “OFF”. When this unit is shipped, this item is set to “OFF”.
1 |
| 1Standard time |
During daylight savings time |
|
|
* * * * * * * * * [ MENU ] * * * * * * * * *
* * * CLOCK * SE T * * * * * * * * * * * *
The dates and times of up to 8 alarm inputs or 4 power losses (failures) can be displayed.
1Operation
2Turn on the VCR and monitor. |
2Set the time with a
After setting the time, set the <SUMMER TIME> item to “ON”.
3• The set time advances one hour.
At the end of the daylight savings time season, set the <SUMMER TIME> item to “OFF”.
•The standard time instead of <SUMMER TIME> is displayed.
Time setting for 29 seconds or less
When the seconds value is 29 or less, you can reset it to 00 by pressing the [CNT RESET] button while pressing the [RESET/ CANCEL] button.
•For 30 or more, the seconds value is reset to 00 and the minutes value is increased by one.
2Set the clock to the actual time.
When daylight savings start, set the <SUMMER TIME> item to “ON”.
• The time advances one hour on the display.
* * * ONSCREEN / F . D I SP * MODE *
* * * V I DEO / V TR * MODE * * * * * * *
* * * SR I / EX T * MODE * * * * * * * * *
* * * ALARM / SENSOR * MODE * * ON
* * * BUZ Z ER / I N * OUT * * * * * * ON
* * * PROGRAM * T I MER * * * * * * * *
* * * HOL I DAY * SE T * * * * * * * * * *
* * * HOUR | ME T ER * * * * * * * * * ON | ||||
* * * |
|
|
| Cursor indication | |
OTHER * M * * * * * * | * * * * * ON | ||||
|
|
|
| ||
* 4 F I N | * ENU * * * | * * * * * * * |
| ||
[MENU] button | [SET | ||||
Alarm/power loss list screen
* * * * * * * * [ OTHER ] * * * * * * * * *
* * * * * * * * * * * * * * * * * * * * * * * *
1 . ALARM * I N * L I S T * * * * * * * * *
2 . POWER * LOSS * L I S T * * * * * * *
* * * * * * * * * * * * * * * * * * * * * * * *
* * * * * * * * * * * * * * * * * * * * * * * *
* * * * * * * * * * * * * * * * * * * * * * * *
* * * * * * * * * * * * * * * * * * * * * * * *
* * * * * * * * * * * * * * * * * * * * * * * *
* * * * * * * * * * * * * * * * * * * * * OF F
* * * * * * * * * * * * * * * * | * * * * * ** * | |
* 4 F I N | * ENU * * * | * * * * * * * |
Press the [MENU] button to display the main menu on the |
3monitor. |
4Press the [SHIFT 7] button to set the cursor on <OTHER>.
Press the [SET
5screen.
Press the [SHIFT 7] button to set the cursor on the item
6you want to display (ALARM LIST or POWER LOSS LIST).
Press the [SET
• Alarm list: Up to 8 alarms are shown. When 9 or more alarms are input, the most recent data will replace the earliest data (beginning with the second item).
•Power loss list: Up to 4 power losses are shown. When 5 or more power losses are input, the most recent
data will replace the earliest data (beginning
Notes:
7with the second item).
•If the power plug has been disconnected from an AC outlet for a long time, make sure the set time is correct before using the unit. (Clock time may be affected by environmental factors.)
•When the
4-4 Hour Meter Display
Drum rotation time is displayed on the monitor’s screen and the VCR's display in the form of an hour meter. Use this data to schedule maintenance.
First alarm Last alarm
Second alarm
Press the [MENU] button three times to restore the normal screen.
•Press the [MENU] button once to restore the <OTHER> screen and press once more to restore the main menu.
Resetting alarm input/power loss (failure) data
Press the [RESET/CANCEL] button on the alarm list screen to reset the alarm input data stored in memory. Press the [RESET/CANCEL] button on the power loss list screen to reset the power loss data stored in memory.
Main menu screen
* * * * * * * * * [ MENU ] * * * * * * * * *
* * * CLOCK * SE T * * * * * * * * * * * *
* * * ONSCREEN / F . D I SP * MODE *
* * * V I DEO / V TR * MODE * * * * * * *
* * * SR I / EX T * MODE * * * * * * * * *
* * * ALARM / SENSOR * MODE * * ON
* * * BUZ Z ER / I N * OUT * * * * * * ON
* * * PROGRAM * T I MER * * * * * * * *
* * * HOL I DAY * SE T * * * * * * * * * *
* * * |
|
|
|
|
HOUR | ME T ER * * * * * * * * * ON | |||
* * * |
|
|
| |
OTHER * M * * * * * * | * * * * * ON | |||
* 4 F I N | * ENU * * * | * * * * * * * | ||
[SET
Hour meter screen
* * * * * * [ HOUR * ME T ER ] * * * * * *
* * * * * * * * * * * * * * * * * * * * * * * *
DRUM * ON * * * * * * * * * * 0 0 0 0 4 7H
* * * * * * * * * * * * * * * * * * * * * * * *
* * * * * * * * * * * * * * * * * * * * * * * *
* * * * * * * * * * * * * * * * * * * * * * * *
* * * * * * * * * * * * * * * * * * * * * * * *
* * * * * * * * * * * * * * * * * * * * * * * *
* * * * * * * * * * * * * * * * * * * * * * * *
* * * * * * * * * * * * * * * * * * * * * OF F
* * * * * * * * * * * * * * * * * * * * * ** *
* 4 F I N | * ENU * * * * * * * * * * |
VCR's display
HOUR
1Operation
2Turn on the VCR and monitor.
3Press the [MENU] button to display the main menu.
Press the [SHIFT 7] button to set the cursor on the
4<HOUR METER> on the main menu.
Press the [SET
5rotating time) on the monitor.
Press the [MENU] button twice to restore the normal screen.
[MENU] button | [SET |
| Alarm list screen |
* * * * * * * [ ALARM * I N ] * * * * * * *
* * * * * * * * * * * * * * * * * * * * * * * *
AL – 0 0 1 * 1 2 : 0 0 : 0 0 * * 9 – 2 1 – 9 9
AL – 0 0 3 * 2 1 : 4 4 : 3 0 * 1 0 – * 6 – 9 9
AL – 0 0 2 * 1 4 : 3 0 : 0 0 * * 9 – 2 5 – 9 9 | ||||
AL – – – – * – | – * – – – – – – – | – | ||
AL – – – – * – | – * – – – – – – – | – | ||
AL – – – – * – | – * – – – – – – – | – | ||
AL – – – – * – | – * – – – – – – – | – | ||
AL – – – – * – | – * – – – – – – – | – | ||
* * * * * * * * M * | * * * | * * * * * * * ON | ||
* 4 F I N * * ENU * | * * | * * * * * * * | ||
Hour |
| Year | ||
Minute |
| Day | ||
|
|
| Month | |
| Second | |||
Power loss list screen
* * * * * * [ POWER * LOSS ] * * * * * *
* * * * * * * * * * * * * * * * * * * * * * * *
P L – 0 1 * * * 7 : 3 5 : 2 7 * * 9 – 2 1 – 9 9
* * * * * * * * * * * * : * * * * * * * * * * *
P L – 0 3 * * 1 7 : 4 4 : 2 0 * 1 1 – * 7 – 9 9
* * * * * * * * * * * * * * * * * * * * * * * *
P L – 0 2 * * 1 0 : 3 0 : 3 0 * 1 0 – 3 0 – 9 9
* * * * * * * * * * * * * * * * * * * * * * * *
P L – – – * * –
* * * * * * * * * * * * * * * * * * * * * * * *
* * * * * * * * M * * * * * * * * * * * ON * 4 F I N * * ENU * * * * * * * * * *
First power loss
Last power loss
Second power loss
20 | 21 |