EDITING EN 59


DV Dubbing (HDD & DVD Deck Only)

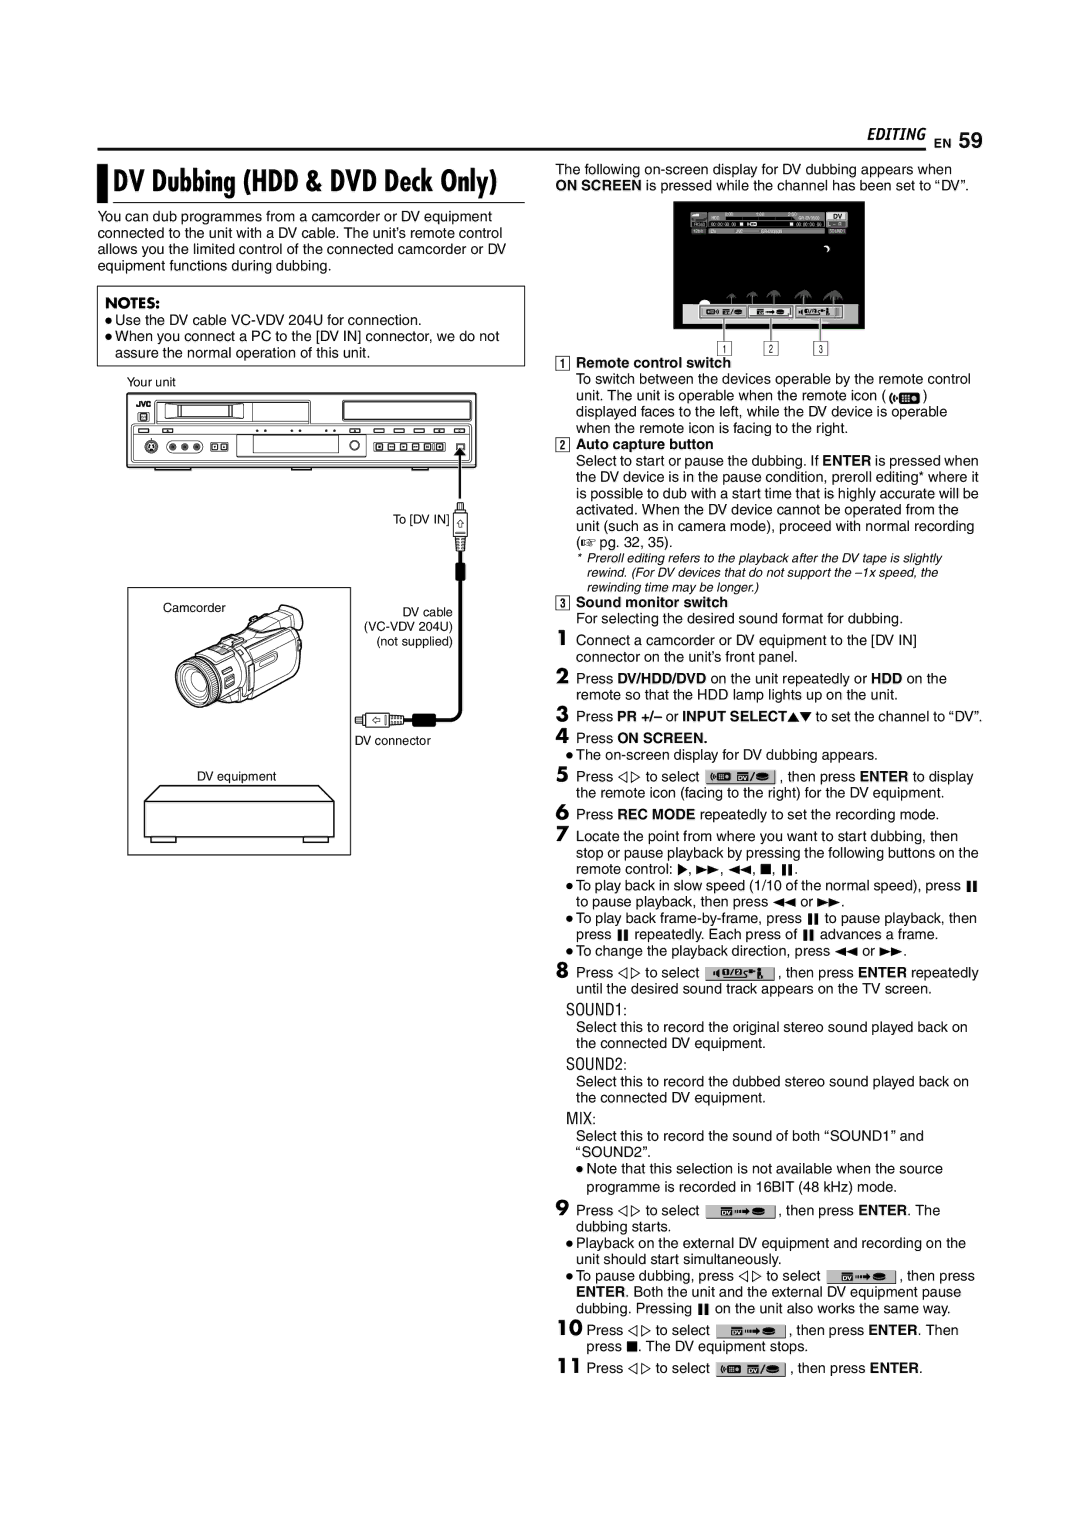
The following on-screen display for DV dubbing appears when


ON SCREEN is pressed while the channel has been set to ADVB.


You can dub programmes from a camcorder or DV equipment connected to the unit with a DV cable. The unit’s remote control allows you the limited control of the connected camcorder or DV equipment functions during dubbing.


HDD

0:00


1:00

2:00

DV


GR-DV3500

FR360

00:00:00. 00


00:00:00. 00

L – R

12bit

DV

JVC


GR-DV3500


SOUND1

NOTES:

Use the DV cable VC-VDV 204U for connection.

When you connect a PC to the [DV IN] connector, we do not assure the normal operation of this unit.

Your unit

To [DV IN]

DV

DV

1

2

A B C

ARemote control switch

To switch between the devices operable by the remote control

unit. The unit is operable when the remote icon ( ) displayed faces to the left, while the DV device is operable when the remote icon is facing to the right.

BAuto capture button

Select to start or pause the dubbing. If ENTER is pressed when the DV device is in the pause condition, preroll editing* where it is possible to dub with a start time that is highly accurate will be activated. When the DV device cannot be operated from the unit (such as in camera mode), proceed with normal recording (A pg. 32, 35).

Camcorder

DV equipment

DV cable (VC-VDV 204U)

(not supplied)

DV connector

*Preroll editing refers to the playback after the DV tape is slightly rewind. (For DV devices that do not support the –1x speed, the rewinding time may be longer.)

CSound monitor switch

For selecting the desired sound format for dubbing.

1Connect a camcorder or DV equipment to the [DV IN] connector on the unit’s front panel.

2Press DV/HDD/DVD on the unit repeatedly or HDD on the remote so that the HDD lamp lights up on the unit.

3Press PR +/– or INPUT SELECTJK to set the channel to ADVB.

4Press ON SCREEN.

The on-screen display for DV dubbing appears.

5Press DE to select , then press ENTER to display the remote icon (facing to the right) for the DV equipment.

6Press REC MODE repeatedly to set the recording mode.

7Locate the point from where you want to start dubbing, then

stop or pause playback by pressing the following buttons on the remote control: I, N, O, o, W.

To play back in slow speed (1/10 of the normal speed), press W to pause playback, then press O or N.

To play back frame-by-frame, press W to pause playback, then press W repeatedly. Each press of W advances a frame.

To change the playback direction, press O or N.

8Press DE to select , then press ENTER repeatedly until the desired sound track appears on the TV screen.

SOUND1:

Select this to record the original stereo sound played back on the connected DV equipment.

SOUND2:

Select this to record the dubbed stereo sound played back on the connected DV equipment.

MIX:

Select this to record the sound of both ASOUND1B and ASOUND2B.

Note that this selection is not available when the source programme is recorded in 16BIT (48 kHz) mode.

9Press DE to select , then press ENTER. The dubbing starts.

Playback on the external DV equipment and recording on the unit should start simultaneously.

To pause dubbing, press DE to select , then press ENTER. Both the unit and the external DV equipment pause dubbing. Pressing W on the unit also works the same way.

10Press DE to select , then press ENTER. Then press o. The DV equipment stops.

11Press DE to select , then press ENTER.

Page 59
Image 59
JVC SR-DVM70EU manual Following on-screen display for DV dubbing appears when, Remote control switch, Auto capture button

SR-DVM70EU specifications

The JVC SR-DVM70EU is a versatile and compact professional digital video recorder that has garnered attention in various video production fields, thanks to its remarkable blend of features, technologies, and user-centric design. Its primary function is to serve as both a mini-DV tape recorder and a DVD recorder, making it an essential tool for filmmakers, videographers, and archivists looking to migrate old content to modern formats.

One of the standout features of the SR-DVM70EU is its dual recording capabilities. The device is engineered to record directly onto mini-DV tapes while simultaneously creating a DVD of the same content. This dual functionality allows users to efficiently create backup copies or share media with clients and collaborators, enhancing workflow and productivity.

The SR-DVM70EU employs advanced digital processing technology to ensure high-quality video and audio playback. The integration of JVC’s proprietary digital signal processing ensures that recordings remain clear and free from distortion, crucial for preserving the integrity of audio and visual content. The unit supports a variety of media formats, including DVD-R, DVD-RW, and DVD+RW, expanding its versatility in content distribution.

Additionally, the recorder includes comprehensive connectivity options. Users can connect the device to various video sources including cameras, camcorders, and other playback devices via FireWire (I-Link) inputs and outputs, component video, and composite video inputs, ensuring compatibility with a wide range of equipment. This versatility makes it easy to integrate the SR-DVM70EU into existing production setups.

An intuitive control panel featuring a clear LCD display allows users to navigate through settings effortlessly. The control interface is designed to be user-friendly, ensuring that both seasoned professionals and newcomers can operate it with ease. The unit also features programmable functions, including customizable recording settings that allow for user-defined settings depending on the project requirements.

The JVC SR-DVM70EU is built with durability in mind, making it suitable for both studio and field use. Its robust construction helps withstand the rigors of professional environments, ensuring that it remains a reliable tool in any videographer's arsenal.

In conclusion, the JVC SR-DVM70EU is an exemplary device that embodies the essence of professional video recording. With its dual recording capabilities, advanced digital processing, flexible connectivity options, and user-friendly design, it remains a popular choice among professionals seeking quality and efficiency in their video production workflows.