EN 51

Cable Box Brand Setting

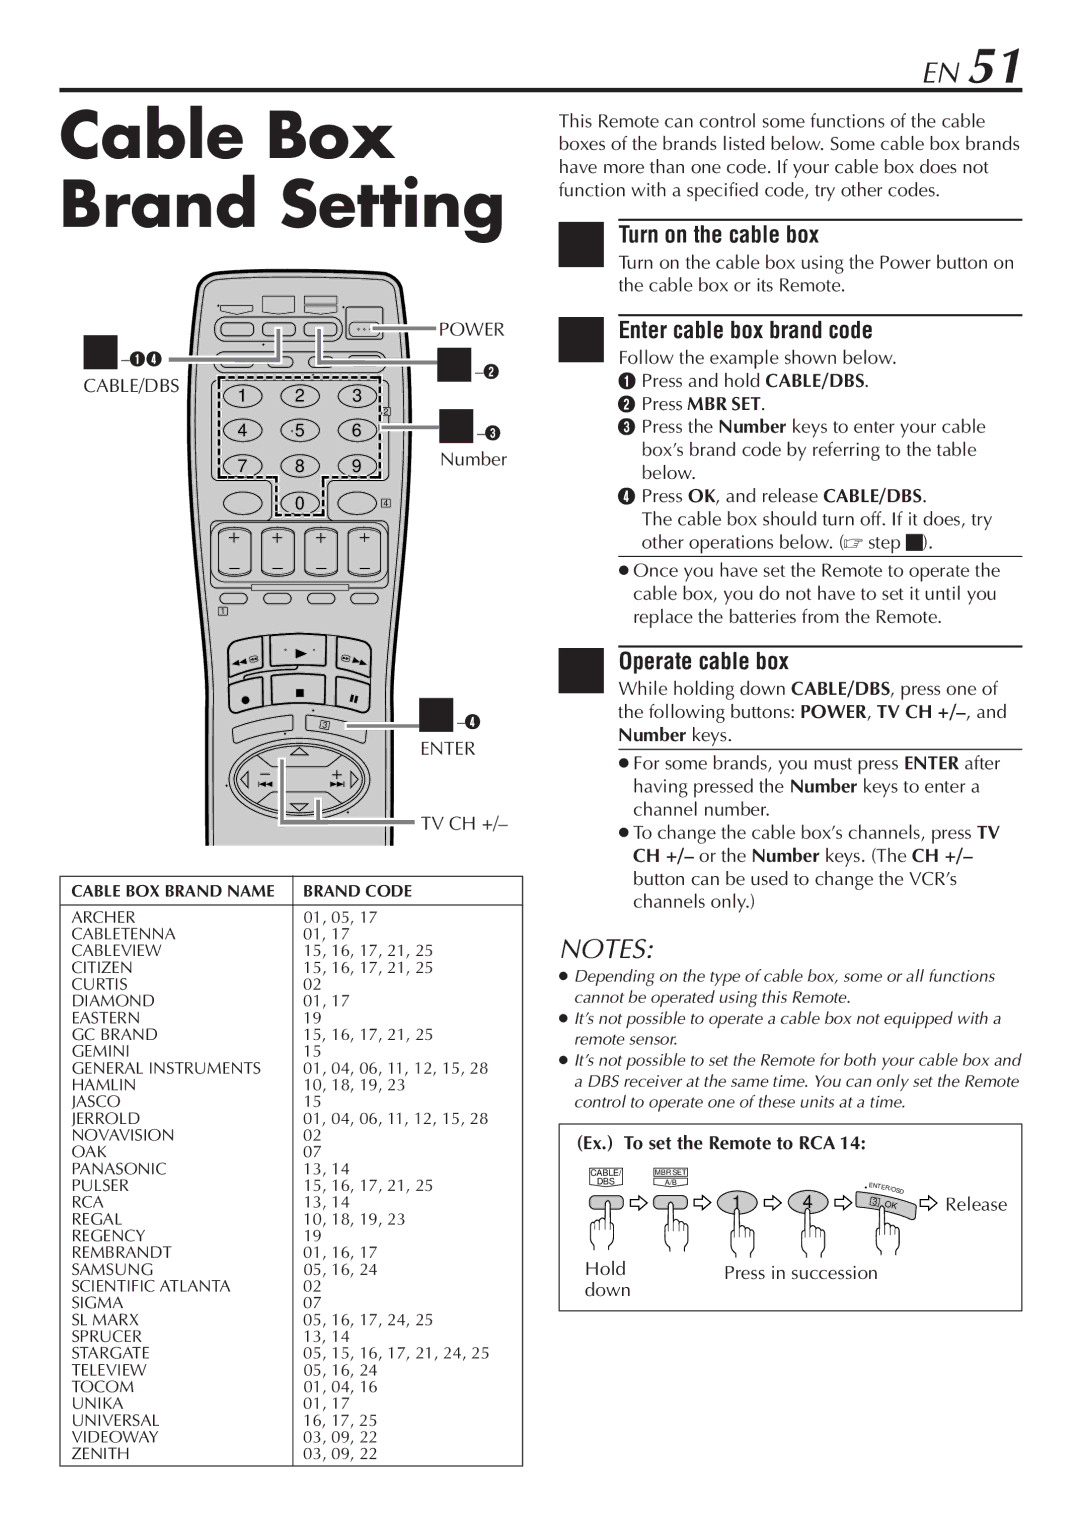
This Remote can control some functions of the cable boxes of the brands listed below. Some cable box brands have more than one code. If your cable box does not function with a specified code, try other codes.

1 Turn on the cable box

Turn on the cable box using the Power button on the cable box or its Remote.

2–14

CABLE/DBS 1

4

7

1


POWER

Enter cable box brand code


2–2

2 Follow the example shown below.

2

3


1 Press and hold CABLE/DBS.


2 Press MBR SET.


2

2–3

5

6


3 Press the Number keys to enter your cable

8

9


Number

box’s brand code by referring to the table


below.


0


4


4 Press OK, and release CABLE/DBS.

The cable box should turn off. If it does, try other operations below. (step 3).

Once you have set the Remote to operate the cable box, you do not have to set it until you replace the batteries from the Remote.


3


2–4


ENTER


TV CH +/–


CABLE BOX BRAND NAME

BRAND CODE


ARCHER

01, 05, 17


CABLETENNA

01, 17


CABLEVIEW

15, 16, 17, 21, 25

CITIZEN

15, 16, 17, 21, 25

CURTIS

02


DIAMOND

01, 17


EASTERN

19


GC BRAND

15, 16, 17, 21, 25

GEMINI

15


GENERAL INSTRUMENTS

01, 04, 06, 11, 12, 15, 28

HAMLIN

10, 18, 19, 23


JASCO

15


JERROLD

01, 04, 06, 11, 12, 15, 28

NOVAVISION

02


OAK

07


PANASONIC

13, 14


PULSER

15, 16, 17, 21, 25

RCA

13, 14


REGAL

10, 18, 19, 23


REGENCY

19


REMBRANDT

01, 16, 17


SAMSUNG

05, 16, 24


SCIENTIFIC ATLANTA

02


SIGMA

07


SL MARX

05, 16, 17, 24, 25

SPRUCER

13, 14


STARGATE

05, 15, 16, 17, 21, 24, 25

TELEVIEW

05, 16, 24


TOCOM

01, 04, 16


UNIKA

01, 17


UNIVERSAL

16, 17, 25


VIDEOWAY

03, 09, 22


ZENITH

03, 09, 22


3 Operate cable box

While holding down CABLE/DBS, press one of the following buttons: POWER, TV CH +/–, and Number keys.

For some brands, you must press ENTER after having pressed the Number keys to enter a channel number.

To change the cable box’s channels, press TV CH +/– or the Number keys. (The CH +/– button can be used to change the VCR’s channels only.)

NOTES:

Depending on the type of cable box, some or all functions cannot be operated using this Remote.

It’s not possible to operate a cable box not equipped with a remote sensor.

It’s not possible to set the Remote for both your cable box and a DBS receiver at the same time. You can only set the Remote control to operate one of these units at a time.

(Ex.) To set the Remote to RCA 14:

CABLE/

MBR SET


DBS

A/B


E


NTER/O


1

4


SD

Release


3

OK

Hold

Press in succession


down


Page 51
Image 51
JVC SR-V10U manual Cable Box Brand Setting, Turn on the cable box, Enter cable box brand code, Operate cable box

SR-V10U specifications

The JVC SR-V10U is a professional digital video recorder that stands out in the realm of multimedia production due to its robust features and advanced technology. Designed for a variety of applications, including broadcasting, documentary production, and archiving, the SR-V10U offers impressive capabilities that cater to the needs of professionals in the field.

One of the key features of the JVC SR-V10U is its ability to record in both DV and VHS formats. This dual-format functionality allows users to transition seamlessly between digital and analog recording. With a high-quality digital video recording capability, users can expect sharp images and crisp audio, making it an excellent choice for video production where quality is paramount.

The SR-V10U utilizes a professional-grade digital signal processing system, ensuring exceptional image stability and clarity. Advanced image processing techniques enhance colors and reduce noise, contributing to a polished final product. Additionally, the device boasts a built-in time base corrector, which helps maintain video quality during playback and recording, further enhancing its reliability for professional use.

The device is equipped with versatile input and output options, including IEEE 1394 (FireWire) connectivity that enables easy digital transfers to computers or other digital editing systems. This ensures a smooth workflow for editors and producers who require fast and efficient data management.

In terms of usability, the JVC SR-V10U features an intuitive interface that simplifies the operation of the recording device. Users can easily navigate menus and settings, providing a user-friendly experience even in high-pressure production environments. The multifunctional LCD display offers clear visual feedback on settings and recording status.

Another notable characteristic of the SR-V10U is its extended recording capability. The device can record up to six hours on a single DV tape and up to two hours in VHS mode, making it practical for events or lengthy projects where changing tapes frequently is not feasible.

In conclusion, the JVC SR-V10U combines professional-grade recording features, versatile connectivity options, and user-friendly operation that make it a valuable asset for media professionals. Its dual-format recording, advanced image processing, and extended recording capacity solidify its place as a preferred choice for those looking to capture high-quality video content efficiently. Whether for field use or studio production, the SR-V10U continues to meet the evolving demands of the video production industry.