English

Basic and Common Operations (continued)

Selecting the Source

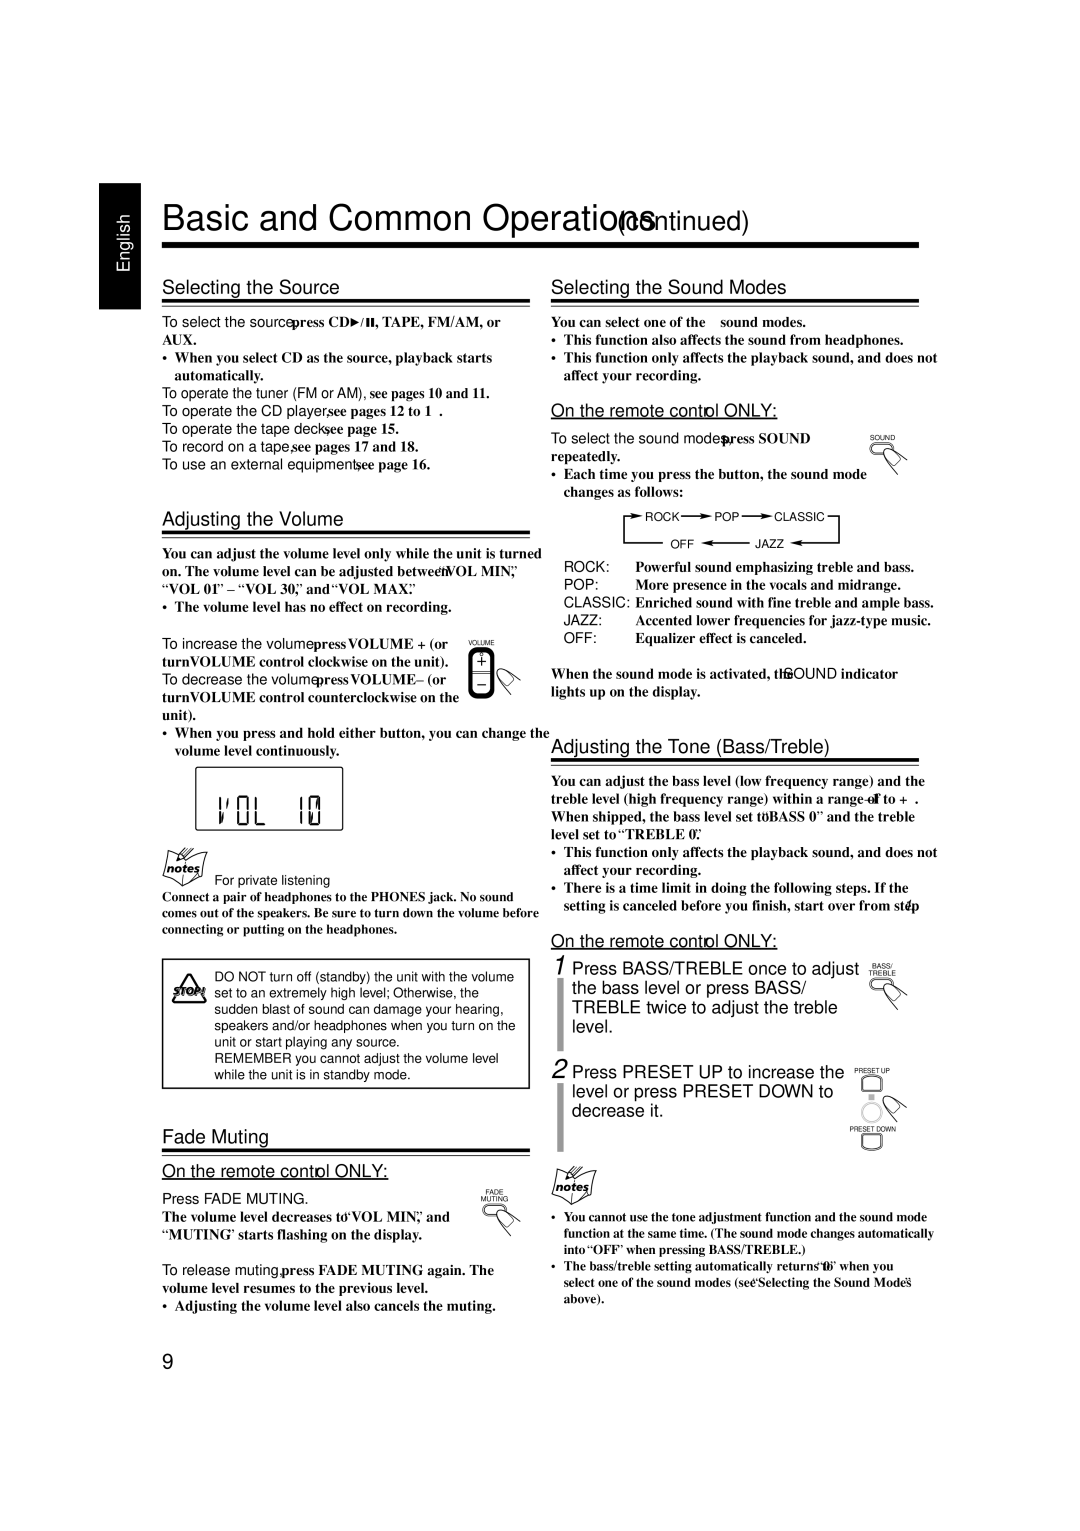
To select the source, press CD 6, TAPE, FM/AM, or AUX.

When you select CD as the source, playback starts automatically.

To operate the tuner (FM or AM), see pages 10 and 11. To operate the CD player, see pages 12 to 14.

To operate the tape deck, see page 15. To record on a tape, see pages 17 and 18. To use an external equipment, see page 16.

Adjusting the Volume

You can adjust the volume level only while the unit is turned on. The volume level can be adjusted between “VOL MIN,” “VOL 01” – “VOL 30,” and “VOL MAX.”

The volume level has no effect on recording.

To increase the volume, press VOLUME + (or

VOLUME

turn VOLUME control clockwise on the unit).


To decrease the volume, press VOLUME – (or


turn VOLUME control counterclockwise on the


unit).


When you press and hold either button, you can change the volume level continuously.

For private listening

Connect a pair of headphones to the PHONES jack. No sound comes out of the speakers. Be sure to turn down the volume before connecting or putting on the headphones.

Selecting the Sound Modes

You can select one of the 4 sound modes.

This function also affects the sound from headphones.

This function only affects the playback sound, and does not affect your recording.

On the remote control ONLY:

To select the sound modes, press SOUND

SOUND


repeatedly.


Each time you press the button, the sound mode changes as follows:

ROCK POP CLASSIC

OFF JAZZ

ROCK: Powerful sound emphasizing treble and bass.

POP: More presence in the vocals and midrange.

CLASSIC: Enriched sound with fine treble and ample bass.

JAZZ: Accented lower frequencies for jazz-type music.

OFF: Equalizer effect is canceled.

When the sound mode is activated, the SOUND indicator lights up on the display.

Adjusting the Tone (Bass/Treble)

You can adjust the bass level (low frequency range) and the treble level (high frequency range) within a range of –1 to +4. When shipped, the bass level set to “BASS 0” and the treble level set to “TREBLE 0.”

This function only affects the playback sound, and does not affect your recording.

There is a time limit in doing the following steps. If the setting is canceled before you finish, start over from step 1.

On the remote control ONLY:

DO NOT turn off (standby) the unit with the volume set to an extremely high level; Otherwise, the sudden blast of sound can damage your hearing, speakers and/or headphones when you turn on the unit or start playing any source.

REMEMBER you cannot adjust the volume level while the unit is in standby mode.

Fade Muting

On the remote control ONLY:

Press FADE MUTING.

FADE

MUTING

The volume level decreases to “VOL MIN,” and “MUTING” starts flashing on the display.

To release muting, press FADE MUTING again. The volume level resumes to the previous level.

Adjusting the volume level also cancels the muting.

1 Press BASS/TREBLE once to adjust TREBLE


BASS/

the bass level or press BASS/


TREBLE twice to adjust the treble


level.


2 Press PRESET UP to increase the

PRESET UP


level or press PRESET DOWN to


decrease it.


PRESET DOWN

You cannot use the tone adjustment function and the sound mode function at the same time. (The sound mode changes automatically into “OFF” when pressing BASS/TREBLE.)

The bass/treble setting automatically returns to “0” when you select one of the sound modes (see “Selecting the Sound Modes” above).

9

Page 40
Image 40
JVC SP-UXH100, UX-H100, CA-UXH100 manual Selecting the Source

CA-UXH100, SP-UXH100, UX-H100 specifications

The JVC SP-UXH100, UX-H100, and CA-UXH100 are an impressive trio of compact audio systems designed to deliver powerful sound while saving on space. Ideal for music enthusiasts who appreciate quality without the bulk, these systems cater to diverse audio needs in various settings, whether it's at home, in the office, or during social gatherings.

One of the standout features of the JVC UX-H100 series is its robust sound performance. Utilizing advanced speaker technologies, this audio system delivers crystal-clear highs, rich midrange, and deep bass, allowing listeners to fully immerse themselves in their favorite tracks. The inclusion of a powerful built-in amplifier ensures that audio output remains distortion-free, even at high volumes.

The UX-H100 and CA-UXH100 models are particularly versatile, with multiple playback options that cater to varying preferences. These systems are equipped with CD players, FM/AM tuners, and auxiliary inputs, enabling users to enjoy their music from a variety of sources. The USB port is a modern touch, allowing playback of digital music files directly from USB flash drives. Compatibility with different formats adds another layer of convenience, making it easy to enjoy a wide range of audio content.

Design-wise, the JVC SP-UXH100 series emphasizes aesthetics as much as functionality. Its sleek and compact design fits seamlessly into any space, whether on a shelf or as part of a larger entertainment setup. The intuitive user interface and included remote control contribute to a hassle-free user experience, allowing easy access to all features without the need to get up from the couch.

Additionally, the JVC systems come equipped with features like preset equalizers, allowing users to customize their listening experience according to personal preferences or the type of music being played. The built-in clock and programmable timer offer added convenience for users who wish to set their audio system to turn on or off at specific times.

Overall, the JVC SP-UXH100, UX-H100, and CA-UXH100 present an appealing combination of performance, versatility, and design, making them an excellent choice for anyone in search of a reliable and stylish audio solution. Whether for casual listening or a lively gathering, these compact systems stand out as reliable companions that prioritize sound quality and user experience.