Preparations
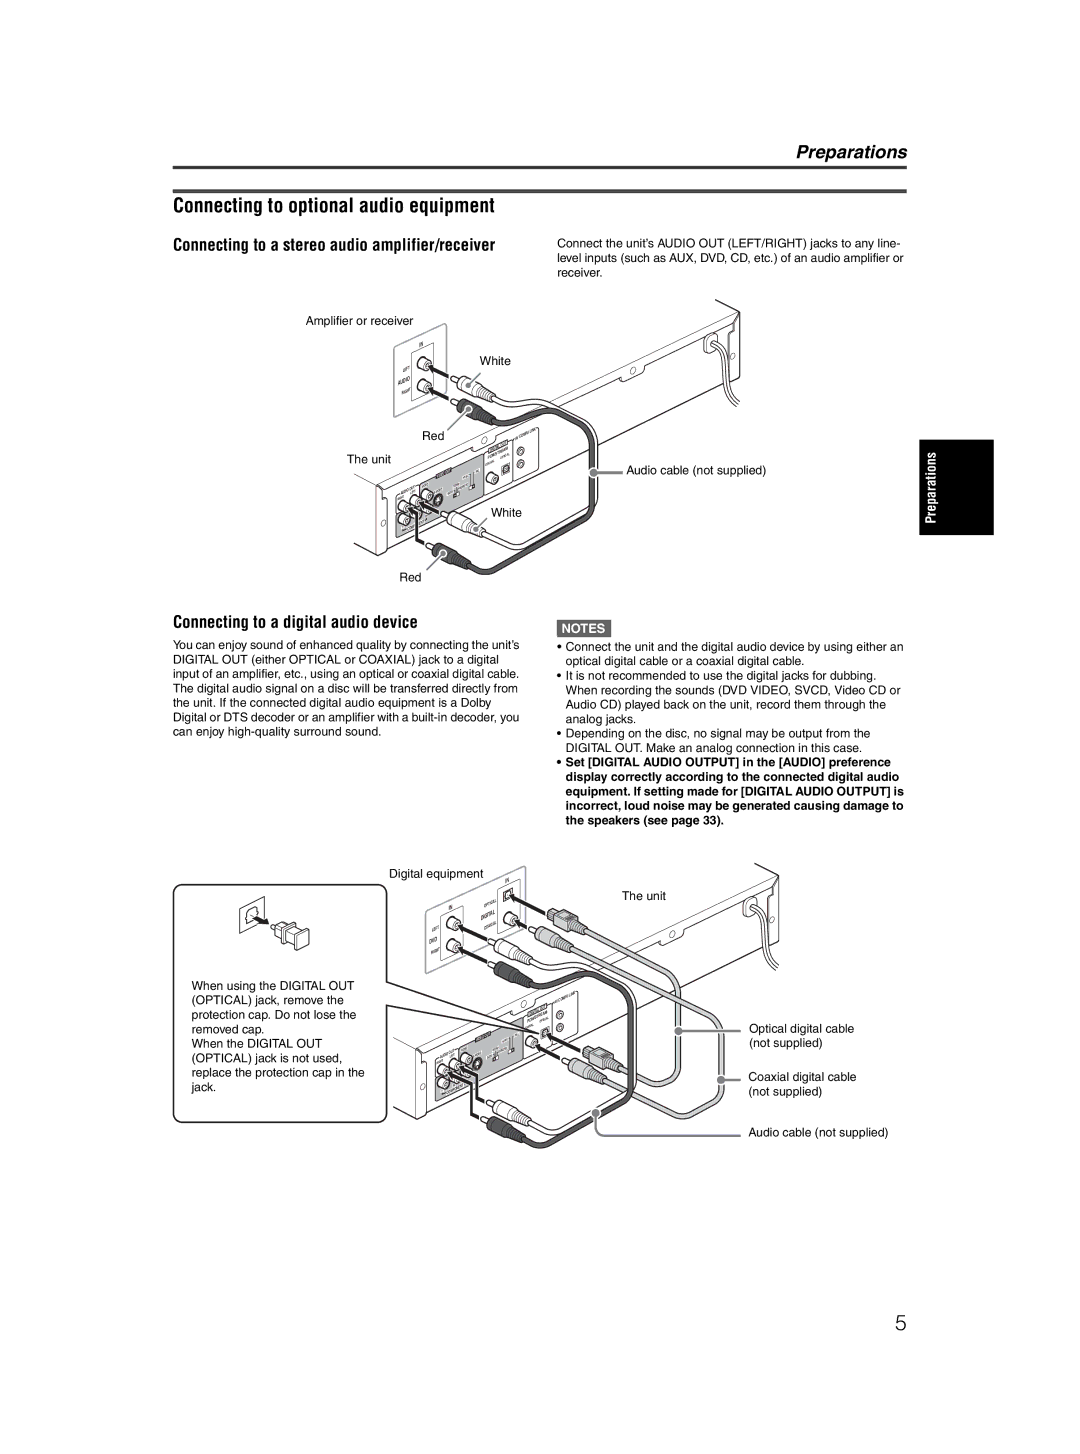
Connecting to optional audio equipment
Connecting to a stereo audio amplifier/receiver
Amplifier or receiver
IN
White
LEFT | |
AUD | IO |
| |
RIGHT | |
Connect the unit’s AUDIO OUT (LEFT/RIGHT) jacks to any line- level inputs (such as AUX, DVD, CD, etc.) of an audio amplifier or receiver.
| Red |
|
|
|
|
| PU | LIN | K | ||
|
|
|
|
| V COM |
|
| ||||
|
|
|
|
|
|
|
| ||||
|
|
|
|
| A |
|
|
| |||
|
|
|
|
|
|
|
| OUT |
|
|
|
|
|
|
|
|
|
|
| DIGITAL |
|
|
|
|
|
|
|
|
|
|
| L |
|
|
|
The unit |
|
|
|
|
|
|
| PCM/STREAMOPTIC |
|
|
|
|
|
|
|
|
|
| COAXIAL |
|
| Audio cable (not supplied) | |
|
|
|
| O | UT |
| PAL |
|
|
| |
|
| VIDEO |
|
| NTSC |
|
|
| |||
|
|
|
|
|
|
|
|
| |||
| O |
|
|
|
| 525p | OTE |
|
|
|
|
OUT | VIDE | EO |
|
| REM |
|
|
|
|
| |
AUDIO LEFT | S |
|
| 525i |
|
|
|
|
|
| |
|
|
|
|
|
|
|
|
| |||
HT |
|
|
|
|
|
|
|
|
|
|
|
Preparations
RIG |
|
|
|
| PR | White |
|
| P | NEN | T |
|
Y | CO | M |
|
| |
|
|
| |||
|
|
|
|
|
Red
Connecting to a digital audio device
You can enjoy sound of enhanced quality by connecting the unit’s DIGITAL OUT (either OPTICAL or COAXIAL) jack to a digital input of an amplifier, etc., using an optical or coaxial digital cable. The digital audio signal on a disc will be transferred directly from the unit. If the connected digital audio equipment is a Dolby Digital or DTS decoder or an amplifier with a
| Digital equipment |
|
| IN |
| |||||||
|
|
|
|
|
|
|
|
|
|
| ||
|
|
| IN |
|
|
|
| OPTICAL |
|
|
| |
|
|
|
|
|
|
|
|
|
|
|
| |
|
|
|
|
|
|
| DIG | ITAL |
|
|
| |
|
|
|
|
|
|
|
|
|
|
| ||
| LEFT |
|
|
|
|
|
| COAXIAL |
|
|
| |
|
|
|
|
|
|
|
|
|
|
|
| |
| DVD |
|
|
|
|
|
|
|
|
|
|
|
| RIGHT |
|
|
|
|
|
|
|
|
|
|
|
When using the DIGITAL OUT |
|
|
|
|
|
|
|
|
|
|
|
|
(OPTICAL) jack, remove the |
|
|
|
|
|
|
|
|
|
|
| OUT |
protection cap. Do not lose the |
|
|
|
|
|
|
|
|
|
|
| |
|
|
|
|
|
|
|
|
|
|
| DIGITAL | |
removed cap. |
|
|
|
|
|
|
|
|
|
| PCM/STREAMOTICAL | |
|
|
|
|
|
|
|
|
|
| COA | XIAL | |
|
|
|
|
|
|
|
|
|
|
|
| |
When the DIGITAL OUT |
|
|
|
|
|
| VIDEO | OUT | NTS | PAL |
| |
|
|
|
|
|
|
|
| C |
| |||
|
| OUT |
| VIDEO |
|
| 525p | OTE |
| |||
(OPTICAL) jack is not used, |
| IO |
|
| S |
| REM |
|
|
| ||
RIGHT | LEFT |
| 525i |
|
|
| ||||||
| AUD |
|
|
|
|
| ||||||
replace the protection cap in the |
|
|
|
|
|
|
|
|
|
|
|
|
jack. | Y | COMP |
| EN | T |
|
|
|
|
|
| |
|
|
| PB |
|
|
|
|
|
| |||
|
|
|
| ON |
|
|
|
|
|
|
|
|
NOTES![]()
•Connect the unit and the digital audio device by using either an optical digital cable or a coaxial digital cable.
•It is not recommended to use the digital jacks for dubbing. When recording the sounds (DVD VIDEO, SVCD, Video CD or Audio CD) played back on the unit, record them through the analog jacks.
•Depending on the disc, no signal may be output from the DIGITAL OUT. Make an analog connection in this case.
•Set [DIGITAL AUDIO OUTPUT] in the [AUDIO] preference display correctly according to the connected digital audio equipment. If setting made for [DIGITAL AUDIO OUTPUT] is incorrect, loud noise may be generated causing damage to the speakers (see page 33).
The unit
|
| MP | U L | INK |
| CO |
| ||
AV |
|
| ||
|
|
|
|
Optical digital cable (not supplied)
Coaxial digital cable (not supplied)
Audio cable (not supplied)
5