Broiling
TO SET BROIL
1.Press BROIL. "HI" and "BROIL" appear In display, 2, Press BROIL again to set LO broil, You can alternate
between HI(550°F) and LO(450°F) by pressing
BROIL.
3, Press START,
4.Press CLEAR/OFF when broiling is complete. Most foods can be broiled at the HI broil setting Select the LO Broil setting to avoid excessive browning or drying of foods that should be cooked to the
BROILING TIPS
•YourlowerovendoorshouldbeopentotheBROIL STOP position while broiling.
Use only the broiler pan and grid that came with your range for broiling° They are designed for proper drainage of fat and liquids and hetp prevent spatter, smoke or fire.
. Do not prehea_ when broiling. Preheating may cause the thermostat to cycle the broil element oft al_d on, For even broiling on both sides, start the food on a cold pan°
Trim the outer layer of fat from steaks and chops° Slit the fatty edges to keep the meat from curling.
•For maximum juiciness, salt the first side just be- fore turning the meal Salt the second side just before serving,
,Brush chicken and fish with butter several times as they broil. When broiling fish, grease the grid to prevent sticking and broil with skin side down, It is not necessary to turn fish,
Never leave a soiled broiler pan in the range.
Grease in the pan may smoke or burn the next tlme the oven Is used.
Be sure you know the correct procedure for putting out a grease fire. See the section on safety,
Do not cover the entire broiler grid with foil. Poor drainage
of hot fat may cause a broiler fire.
If a fire starts, close the oven door and turn controls off. if
fire continues, throw baking
soda on the fire. Do not put water on the fire.
PO$1TBONIHG BROBLER PAN
Broiling is cooktng by direct heat from the broil element. Tender cuts of meat or marinated meat should be se-
lected for broiling. For best results steaks and chops should be at least 3/4" thick,
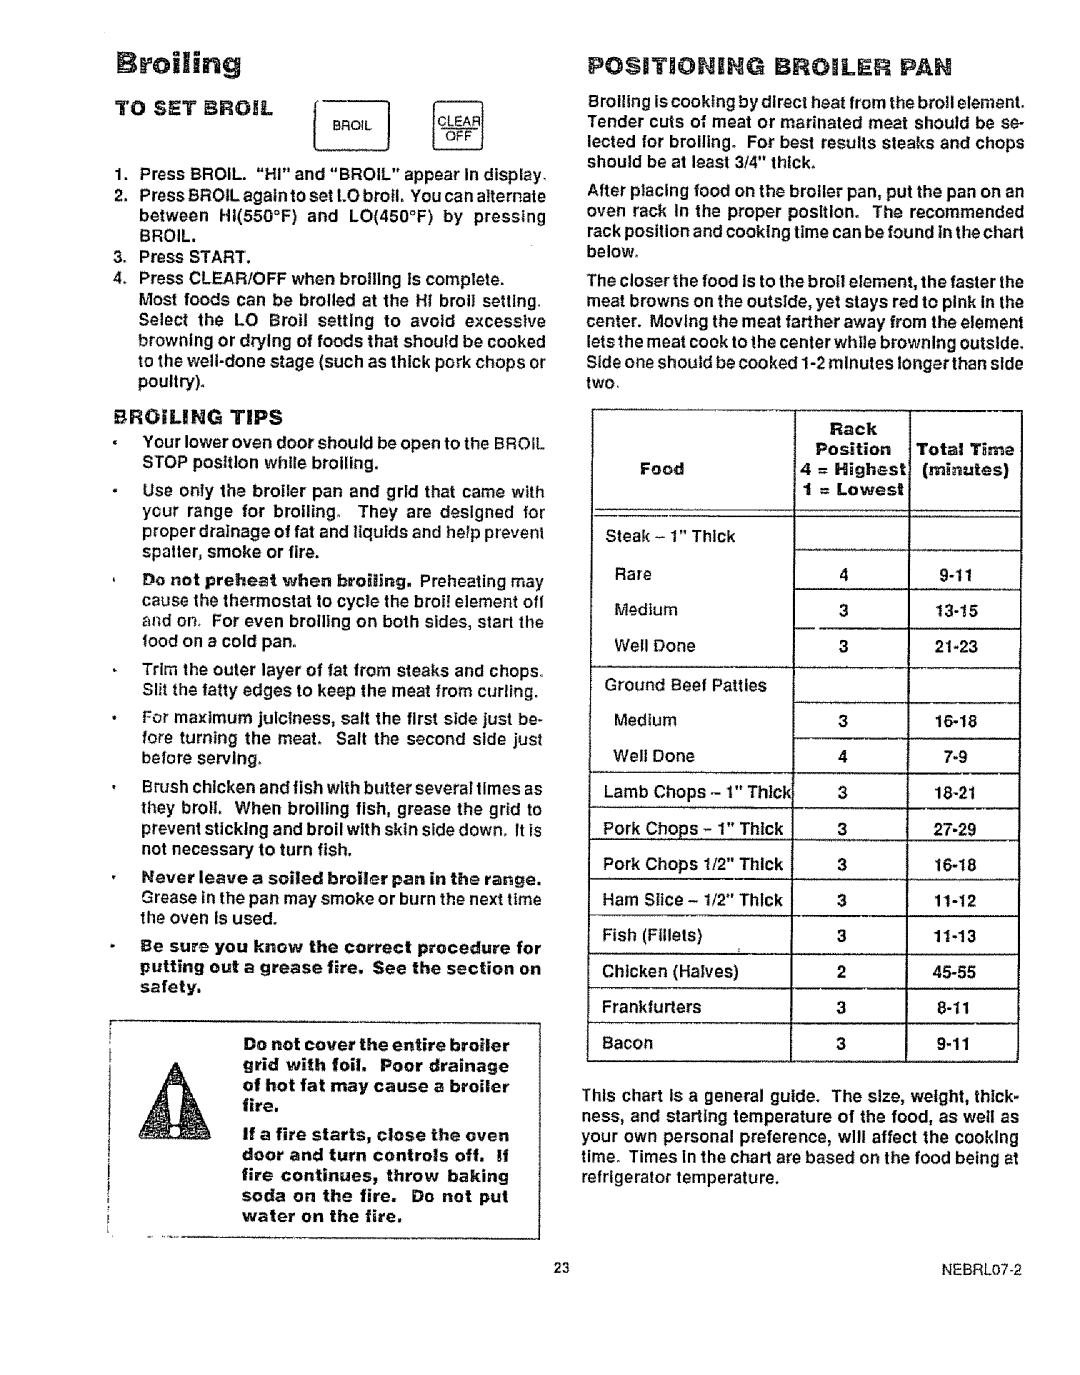
After placing food on the broiler pan. put the pan on an oven rack In the proper posltlom The recommended
rack position and cooking time can be found In the chart below°
The closer the food is to the b roll element, the faster the meat browns on the outside, yet stays red to pink In the center. Moving the meat farther away from the element lets the meat cook to the center while browning outside.
Side one should be cooked
|
|
|
| Rack |
|
|
|
|
| Position | Total Time |
Food |
| 4 | = Highest | (minutes) | |
|
|
| t | = Lowest |
|
Steak | - 1" Thick |
|
| ||
Rare |
|
| 4 | ||
Medium |
|
| 3 | ||
Well Done |
|
| 3 | ||
Ground Beef | Patties |
|
| ||
Medium |
|
| 3 | ||
Well | Done |
|
| 4 | |
Lamb | Chops | - | 1" Thick | 3 | |
Pork | Chops | - | 1" Thick | 3 | |
Pork | Chops | t/2" Thick | 3 | ||
Ham Slice - t/2" Thick | 3 | ||||
Fish (Fillets) |
|
| 3 | ||
Chicken (Halves) | 2 | ||||
Frankfurters |
|
| 3 | ||
Bacon |
|
| 3 | ||
This chart Is a general guide. The size, weight, thick- ness, and starting temperature of the food, as well as your own personal preference, will affect the cooking timer Times in the chart are based on the food being at refrigerator temperature.
23 |
