Setting Oven Controls
Setting Broil
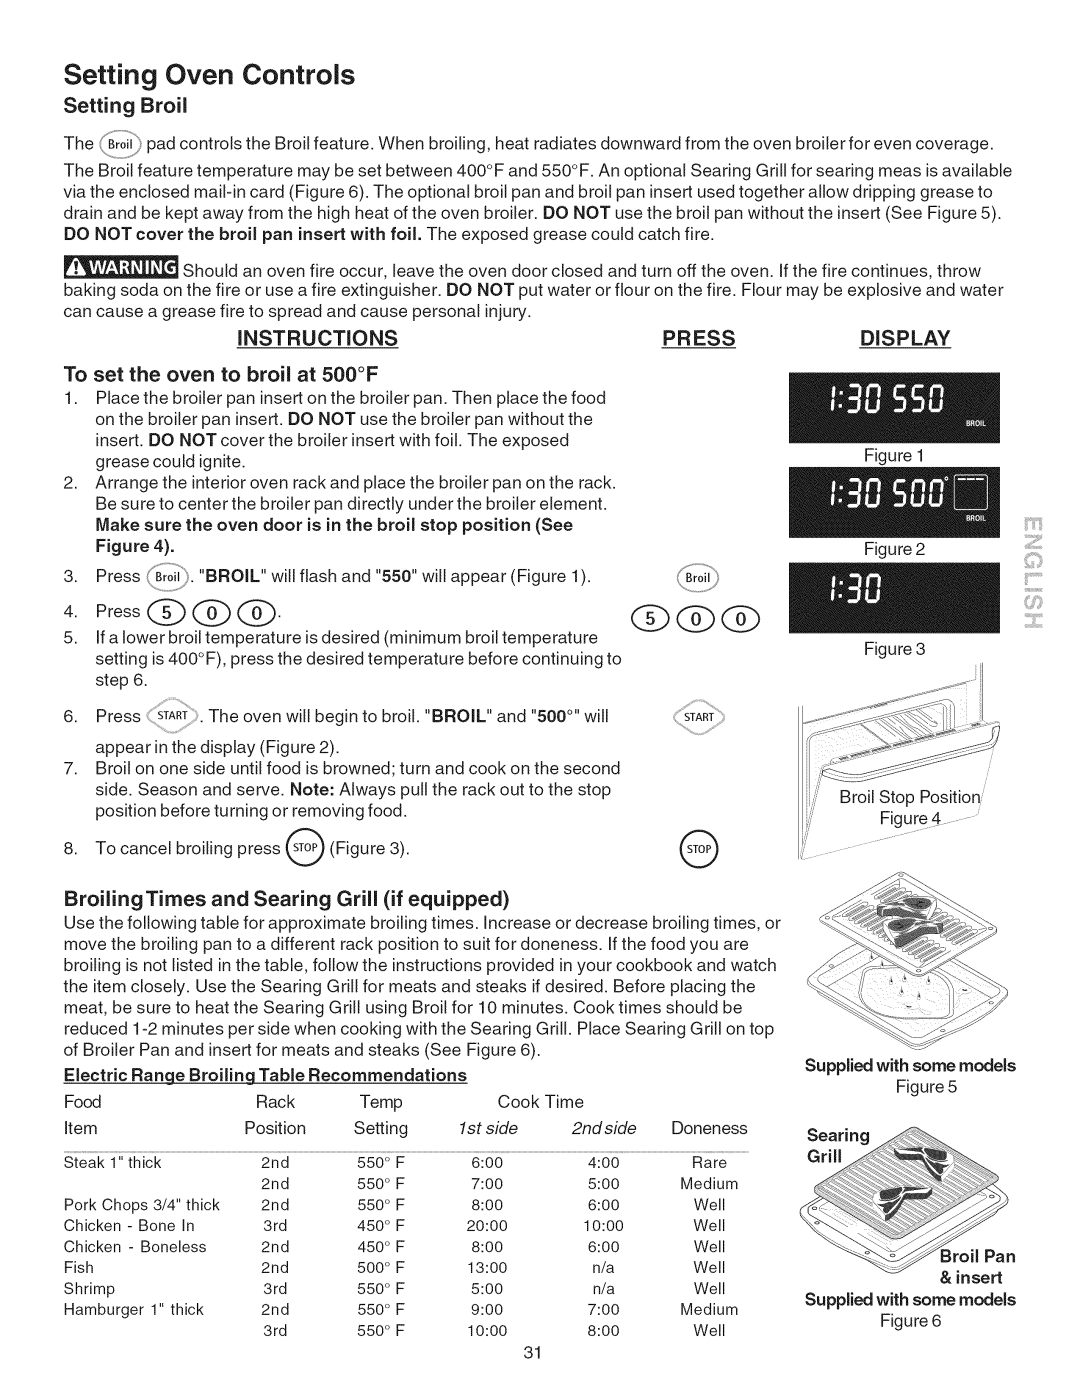
The/,B!.0.'!l pad controls the Broil feature. When broiling, heat radiates downward from the oven broiler for even coverage. The Broil feature temperature may be set between 400°F and 550°F. An optional Searing Grill for searing meas is available via the enclosed
Should an oven fire occur, leave the oven door closed and turn off the oven. If the fire continues, throw baking soda on the fire or use a fire extinguisher. DO NOT put water or flour on the fire. Flour may be explosive and water can cause a grease fire to spread and cause personal injury.
INSTRUCTIONS | PR ESS | DISPLAY |
To set the oven to broil at 500°F
1.Place the broiler pan insert on the broiler pan. Then place the food on the broiler pan insert. DO NOT use the broiler pan without the insert. DO NOT cover the broiler insert with foil. The exposed
grease could ignite. | Figure 1 |
|
2.Arrange the interior oven rack and place the broiler pan on the rack. Be sure to center the broiler pan directly under the broiler element. Make sure the oven door is in the broil stop position (See
Figure 4). | Figure 2 |
f...................
3.Press \B_oj![)."BROIL'"will flash and "550" will appear (Figure 1).
4. | Press@@@. |
| Q@@ | |
|
| |||
5. | If a lower broil temperature is desired | (minimum broil temperature | Figure 3 | |
| setting is 400°F), press the desired temperature before continuing to | |||
|
| |||
| step 6. |
|
|
|
6. | Press | The oven will begin to broil. "BROIL" and "500 °''will |
| |
| appear in the display (Figure 2). |
|
| |
7. | Broil on one side until food is browned; turn and cook on the second |
| ||
| side. Season and serve. Note: Always pull the rack out to the stop | Broil Stop Position | ||
| position before turning or removing food. | |||
| Figure 4 | |||
|
|
|
| |
8. | To cancel | broiling press _tO_ (Figure | 3). | @ |
|
_!ii?iiiii_
!!!CI
........iii
BroilingTimes and Searing Grill (if equipped)
Use the following table for approximate broiling times, increase or decrease broiling times, or move the broiling pan to a different rack position to suit for doneness. If the food you are broiling is not listed in the table, follow the instructions provided in your cookbook and watch the item closely. Use the Searing Grill for meats and steaks if desired. Before placing the meat, be sure to heat the Searing Grill using Broil for 10 minutes. Cook times should be reduced
Electric Range Broiling Table Recommendations |
|
|
| |||||
Food |
|
| Rack | Temp | Cook Time |
| ||
item |
|
| Position | Setting | 1st side | 2ndside | Doneness | |
Steak 1" thick | 2nd | 550° F | 6:00 | 4:00 | Rare | |||
|
|
| 2nd | 550° F | 7:00 | 5:00 | Medium | |
Pork Chops | 3/4" thick | 2nd | 550 ° F | 8:00 | 6:00 | Well | ||
Chicken | - Bone In | 3rd | 450 | ° F | 20:00 | 10:00 | Well | |
Chicken | - Boneless | 2nd | 450 | ° F | 8:00 | 6:00 | Well | |
Fish |
|
| 2nd | 500 | ° F | 13:00 | n/a | Well |
Shrimp |
|
| 3rd | 550 | ° F | 5:00 | n/a | Well |
Hamburger | 1" thick | 2nd | 550 ° F | 9:00 | 7:00 | Medium | ||
|
|
| 3rd | 550 ° F | 10:00 | 8:00 | Well |
Supplied with some models Figure 5
Searing _
Gril
......'_.._,_
Broil Pan
& insert
Supplied with some models Figure 6
31