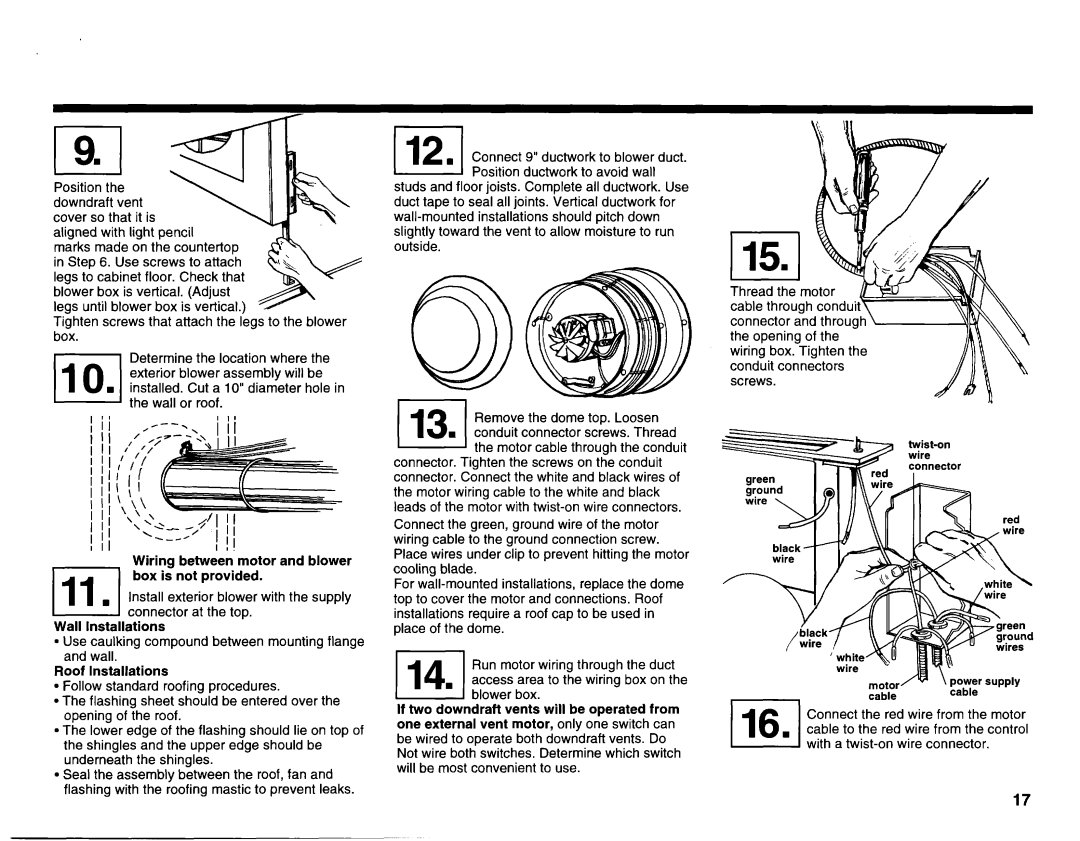
Position the downdraft vent cover so that it is aligned with light pencil

marks made on the countertop in Step 6. Use screws to attach legs to cabinet floor. Check that blower box is vertical. (Adjust legs until blower box is vertical.)

Tighten screws that attach the legs to the blower box.

Determine the location where the exterior blower assembly will be installed. Cut a 10” diameter hole in the wall or roof.

Wiring between motor and blower box is not provided.

11. Install exterior blower with the supply

Elconnector at the top. Wall Installations

. Use caulking compound between mounting flange and wall.

Roof Installations

. Follow standard roofing procedures.

. The flashing sheet should be entered over the opening of the roof.

. The lower edge of the flashing should lie on top of the shingles and the upper edge should be underneath the shingles.

l Seal the assembly between the roof, fan and flashing with the roofing mastic to prevent leaks.

112. Connect 9” ductwork to blower duct. Position ductwork to avoid wall

studs and floor joists. Complete all ductwork. Use duct tape to seal all joints. Vertical ductwork for wall-mounted installations should pitch down slightly toward the vent to allow moisture to run outside.

II

WI Remove the dome top. Loosen

n conduit connector screws. Thread the motor cable through the conduit

connector. Tighten the screws on the conduit connector. Connect the white and black wires of the motor wiring cable to the white and black leads of the motor with twist-on wire connectors.

Connect the green, ground wire of the motor wiring cable to the ground connection screw. Place wires under clip to prevent hitting the motor cooling blade.

For wall-mounted installations, replace the dome top to cover the motor and connections. Roof installations require a roof cap to be used in place of the dome.


14

Run motor wiring through the duct


access area to the wiring box on the

1

blower box.

If two downdraft vents will be operated from one external vent motor, only one switch can be wired to operate both downdraft vents. Do Not wire both switches. Determine which switch will be most convenient to use.

Thread the motor cable through

screws.

green ground wire

l2red

black

-


wire


I


/


reen


black


round


wire


/

2iy

wires


cable

Connect the red wire from the motor cable to the red wire from the control with a twist-on wire connector.

17

Page 17
Image 17
KitchenAid 3182048 installation instructions Blower box

3182048 specifications

The KitchenAid 3182048 is an essential component renowned for its durability and versatility, an integral part for any home chef equipped with KitchenAid appliances. A genuine part that ensures seamless compatibility with various KitchenAid stand mixers, this model represents the brand's commitment to quality and performance.

One of the main features of the KitchenAid 3182048 is its robust build quality. Made from high-grade materials, it guarantees longevity, resisting wear and tear even with regular, heavy use. This is critical for home cooks who rely on their kitchen tools day in and day out, assuring them that a replacement part won’t falter under pressure.

The KitchenAid 3182048 showcases an innovative design that enhances functionality. It is engineered to work effectively with various attachments, making it a versatile choice for preparing a wide range of dishes. Whether whipping cream, mixing dough, or blending ingredients, this component is designed to facilitate a smooth and efficient process.

This part also benefits from KitchenAid's renowned technological advancements. For instance, the compatibility with the brand's multi-purpose attachments allows users to transform their stand mixer into an even more valuable kitchen tool. Attachments like food grinders, pasta makers, and spiralizers can easily connect, expanding the culinary possibilities.

Furthermore, the KitchenAid 3182048 is easy to install and remove, making it user-friendly for both novice and experienced cooks alike. This simplicity encourages more experimentation in the kitchen, as users can quickly shift between tasks without hassle.

Another key characteristic of the KitchenAid 3182048 is its ease of maintenance. It is designed for quick cleaning, either by hand or in the dishwasher, ensuring that it remains hygienic and ready for use in minimal time. This focus on hygiene is particularly important for today's health-conscious consumers.

In conclusion, the KitchenAid 3182048 stands out as a robust and versatile component tailored for KitchenAid stand mixers. With its durable construction, innovative design, compatibility with numerous attachments, and ease of maintenance, it is an exemplary choice for anyone looking to enhance their kitchen experience. Whether you're a home chef or just someone who enjoys cooking occasionally, this part ensures that your KitchenAid mixer remains a dependable ally in culinary adventures.