Lenovo B460
Read the safety notices and important tips in the
User Guide
New World. New Thinking.TM
DO NOT RETURN IT TO THE STORE
If your product is not working correctly
http//consumersupport.lenovo.com
Contents
B460 User Guide V1.0en.book Page ii Thursday, March 25, 2010 206 PM
Chapter 1. Getting to know your computer
Top view
hi j g
d Speakers e Power button f OneKey Rescue system button
b Wireless module antennas c Computer display
g System status indicators h Built-in microphone
Chapter 1. Getting to know your computer
Chapter 1. Getting to know your computer
Left-side view
c d e f g h
VGA port
Chapter 1. Getting to know your computer
Right-side view
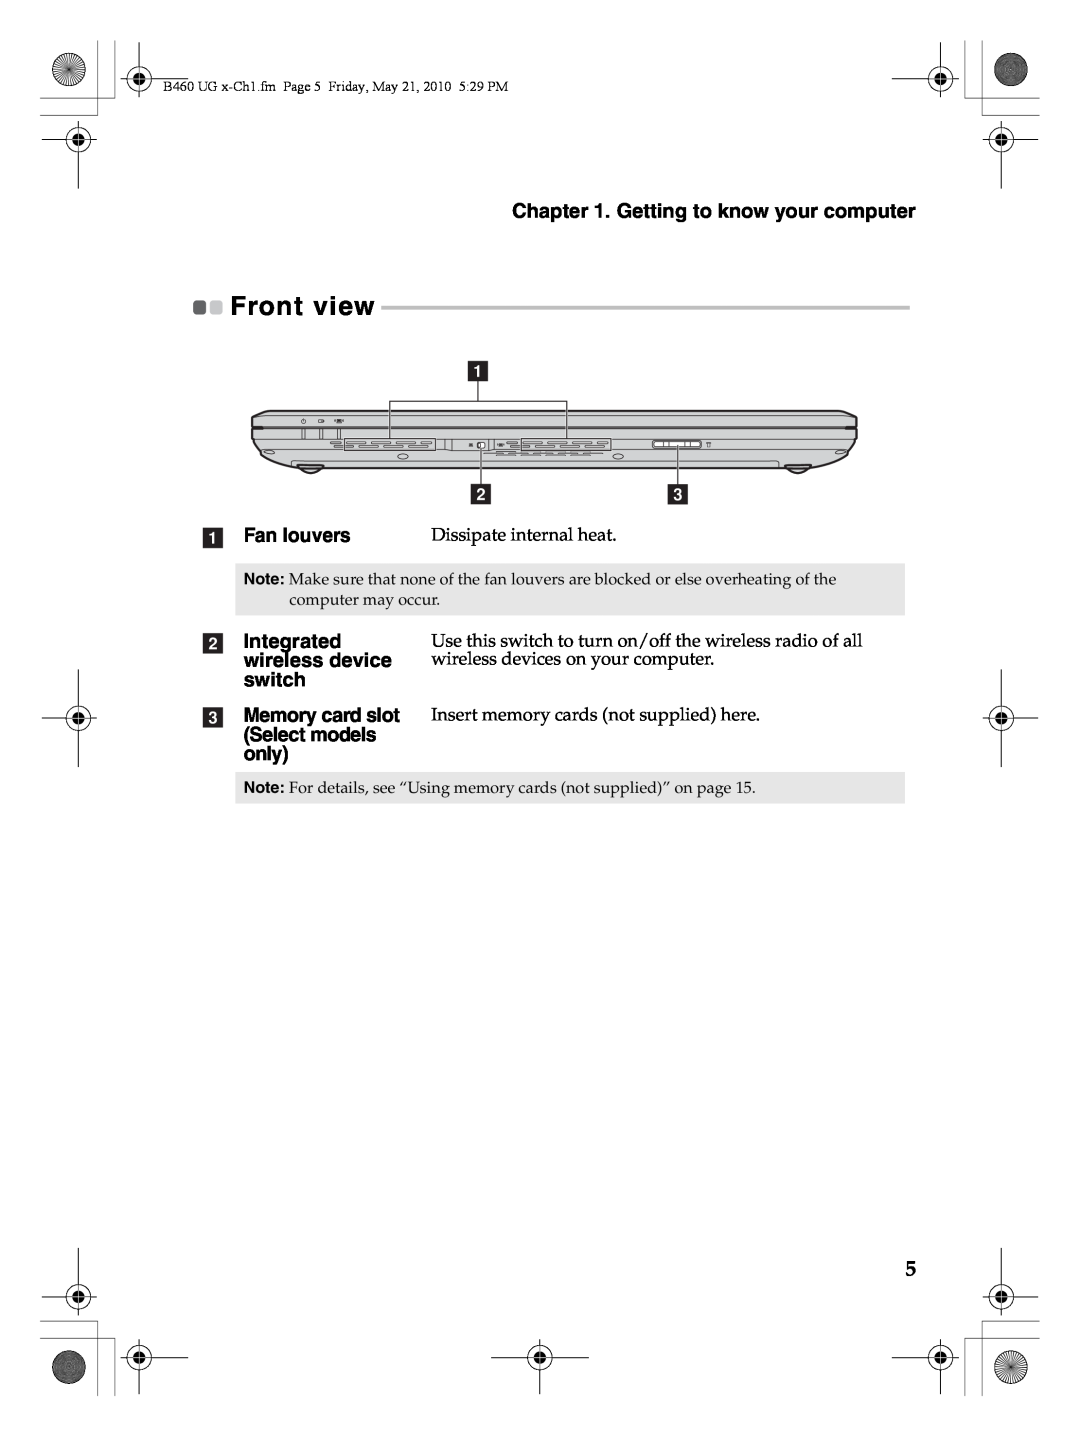
a ExpressCard
slot Select
switch
wireless device
Front view
Chapter 1. Getting to know your computer
Bottom view
b Battery latch - manual c Battery pack
Chapter 1. Getting to know your computer
b c e
d Hard disk drive HDD/Memory/ Mini PCI Express Card slot compartment
e Battery latch - spring loaded
Chapter 1. Getting to know your computer
B460 User Guide V1.0en.book Page 7 Thursday, March 25, 2010 206 PM
„ Configuring the operating system
„ Conncting to the power
Installing the battery pack
Connecting the computer to an electrical outlet
„ Shutting down your computer
„ Putting your computer into sleep state or shutting it down
Putting your computer into sleep state
Chapter 2. Learning the basics
„ Checking battery status
Using AC adapter and battery
„ Charging the battery
Chapter 2. Learning the basics
„ Removing the battery pack
„ Handling the battery
Chapter 2. Learning the basics
Chapter 2. Learning the basics
Using the touchpad
a b c
a Touchpad
„ Numeric keypad
Using the keyboard
„ Function key combinations
Chapter 2. Learning the basics
Chapter 2. Learning the basics
Fn + ↑ / ↓ Fn + → / ←
Enter sleep mode Turn on/off the backlight of the LCD screen
„ Using memory cards not supplied
Connecting external devices
Inserting a memory card
Removing a memory card
„ Connecting an ExpressCard device Select models only
„ Connecting a universal serial bus USB device
Inserting an ExpressCard/34 device
Removing an ExpressCard/34 device
„ Connecting a Bluetooth device Select models only
Enabling Bluetooth communications on your computer
Chapter 2. Learning the basics
Special keys and buttons
OneKey Rescue system button
Chapter 2. Learning the basics
a Hard disk drive indicator b Scroll lock indicator
System status indicators
c Caps lock indicator d Power status indicator
e Battery status indicator f Wireless communication indicator
Securing your computer
„ Using passwords
„ Attaching a security lock not supplied
„ Fingerprint reader
Wired connection
Chapter 3. Connecting to the Internet
Chapter 3. Connecting to the Internet
„ Software configuration
„ Hardware connection
Cable
Chapter 3. Connecting to the Internet
Wireless connection
Wi-Fi
WiMAX
Software configuration
„ Using Wi-Fi/WiMAX Select models only Enabling wireless connection
Chapter 3. Connecting to the Internet
Hardware connection
Chapter 3. Connecting to the Internet
„ Using Mobile Broadband Select models only
Inserting the SIM card
Chapter 3. Connecting to the Internet
Chapter 3. Connecting to the Internet
Removing the SIM card
B460 User Guide V1.0en.book Page 27 Thursday, March 25, 2010 206 PM
For more instructions, see the Help file of Lenovo OneKey Recovery
„ Using Lenovo OneKey Recovery within Windows operating system
Chapter 4. OneKey Rescue system
OneKey Rescue system
Chapter 4. OneKey Rescue system
„ Using Lenovo OneKey Rescue system without Windows operating system
Appendix A. CRU instructions
Replacing the battery
Replacing the hard disk drive
Appendix A. CRU instructions
Handling a hard disk drive
B460 User Guide V1.0en.book Page 32 Thursday, March 25, 2010 206 PM
Appendix A. CRU instructions
5 Remove the frame fixing screw c
Appendix A. CRU instructions
6 Pull the tab in the direction shown by arrow d
B460 User Guide V1.0en.book Page 33 Thursday, March 25, 2010 206 PM
7 Take out the hard disk drive secured in a metal frame e. e
Appendix A. CRU instructions
Replacing memory
Appendix A. CRU instructions
B460 User Guide V1.0en.book Page 35 Thursday, March 25, 2010 206 PM
7 Insert the notched end of the DIMM into the socket
Appendix A. CRU instructions
Appendix A. CRU instructions
To make sure that the SO-DIMM is installed correctly, do as follows
1 Turn the computer on
B460 User Guide V1.0en.book Page 37 Thursday, March 25, 2010 206 PM
Appendix A. CRU instructions
Removing the optical drive
„ What this warranty covers
Appendix B. Lenovo limited warranty
„ How to obtain warranty service
„ What your service provider will do to correct problems
Appendix B. Lenovo limited warranty
„ Replacement of a product or part
Appendix B. Lenovo limited warranty
„ Your additional responsibilities
„ What this warranty does not cover
Appendix B. Lenovo limited warranty
„ Use of personal information
Appendix B. Lenovo limited warranty
„ Limitation of liability
B460 User Guide V1.0en.book Page 43 Thursday, March 25, 2010 206 PM
Appendix B. Lenovo limited warranty
„ Dispute resolution
„ Other rights
„ European Economic Area EEA
Appendix B. Lenovo limited warranty
Warranty information
Appendix B. Lenovo limited warranty
„ Types of warranty service
4 Customer Carry-In or Mail-In Service
Appendix B. Lenovo limited warranty
Energy star information
Appendix C. Product specific Notices
Windows
Appendix C. Product specific Notices
Electronic emissions notices
„ Federal Communications Commission FCC Statement
Appendix C. Product specific Notices
„ Avis de conformité à la réglementation d’Industrie Canada
„ Industry Canada Class B Emission Compliance Statement
„ German Class B Compliance Statement
Appendix C. Product specific Notices
Deutschland
Appendix C. Product specific Notices
„ European Union Compliance Statement Class B Compliance
Appendix C. Product specific Notices
B460 User Guide V1.0en.book Page 53 Thursday, March 25, 2010 206 PM
Model Name B460
Appendix D. Specifications
Machine Type 20047/0875
Form Factor
Index
B460 User Guide V1.0en.book Page 56 Thursday, March 25, 2010 206 PM


 Front view