Manuals
/
Lexmark
/
Computer Equipment
/
All in One Printer
Lexmark
E234N
manual
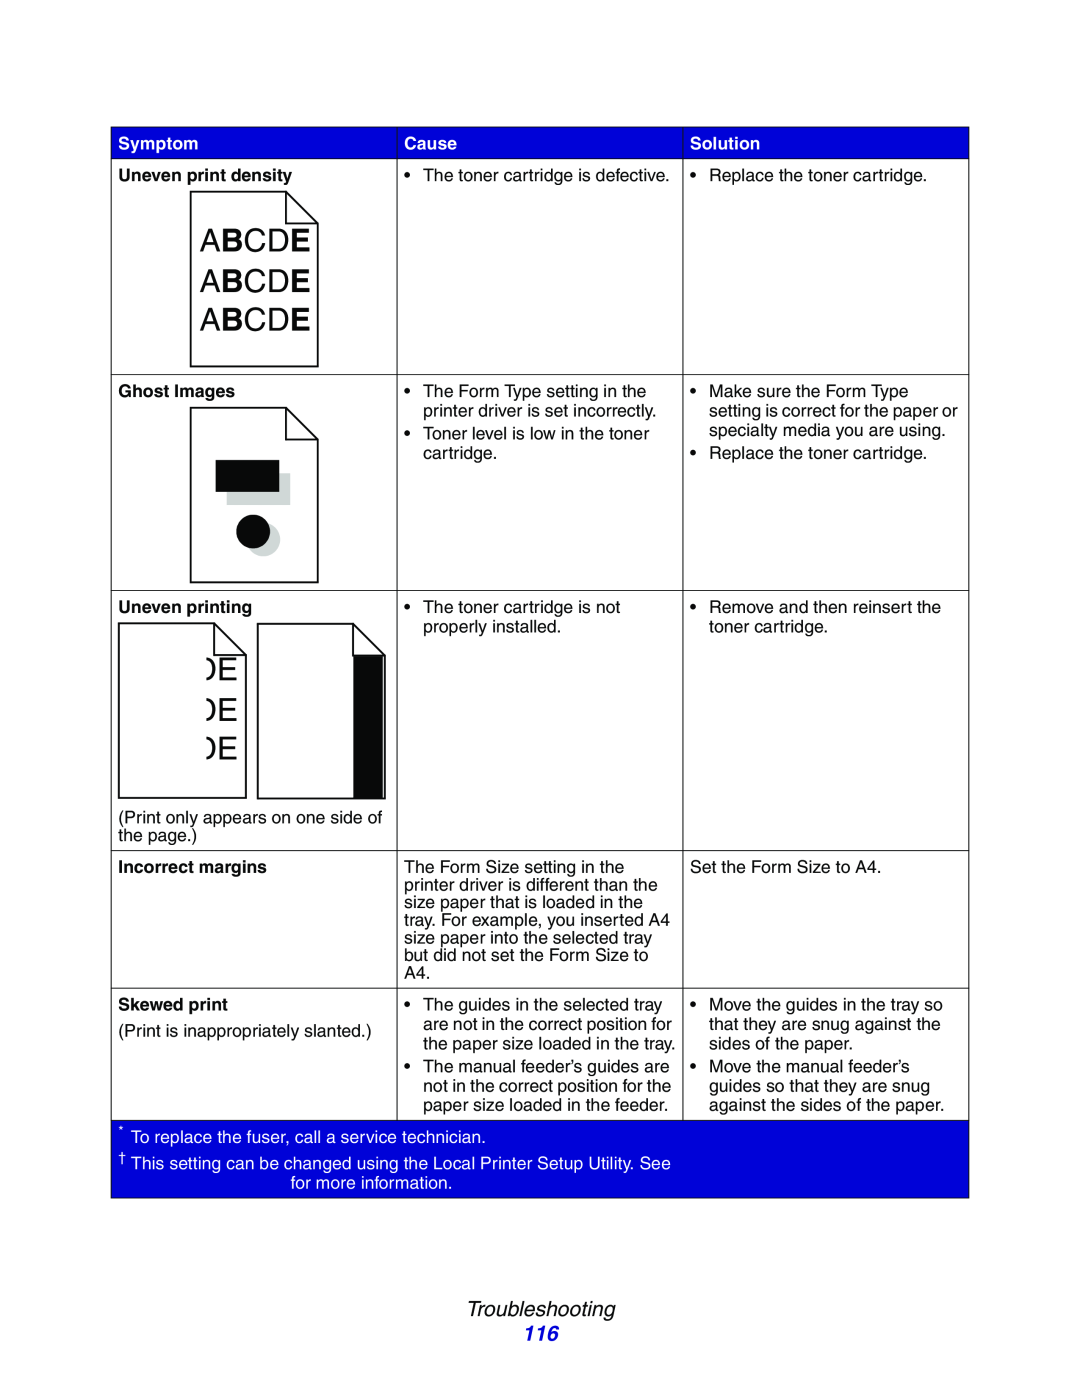
Abcde, Troubleshooting, Symptom, Cause, Solution, Uneven print density
Models:
E234
E234N
1
116
123
123
Download
123 pages
45.29 Kb
113
114
115
116
117
118
119
120
Page 116
Image 116
Page 115
Page 117
Page 116
Image 116
Page 115
Page 117
Contents
E234, E234n
User’s Reference
Contents
Contents
Chapter 1: Printer overview
Chapter 2: Print media tasks and tips
Chapter 3 Printing tasks
Chapter 4: How to install options
Chapter 5: Using the operator panel
Chapter 8 Supplies information
Chapter 9 Troubleshooting
Chapter 7: Software and network tasks
How to clean the printhead lens
Index
Notices
Edition notice
Trademarks
Notices
Safety information
Licensing notice
Laser notice
The United Kingdom Telecommunications Act
Industry Canada compliance statement
European Community EC directives conformity
Japanese VCCI notice
Korean MIC statement
Statement of Limited Warranty
Printer energy consumption
Power Saver
Warranty
Additional rights
Extent of warranty
Limitation of liability
1 Printer overview
Printer overview
Power button Dust cover some models
150-sheetoutput bin Paper support Front cover
The operator panel has 5 lights and 2 buttons
2 Print media tasks and tips
Print media tasks and tips
What types of print media can be loaded?
Weight
Source
Sizes
Where can print media be loaded in the printer?
150-sheetoutput bin Front paper support
Front cover Operator panel Manual feeder
250-sheettray Optional 550-sheetdrawer
Tips on choosing the right print media
Paper
Preprinted forms and letterhead
Transparencies
Envelopes
Labels
Tips on storing print media and supplies
Card stock
Storing paper
Storing supplies
Tips on preventing jams
How to load the 250-sheetand 550-sheettrays
3Load the paper in the tray with the print side facing down
5Insert the tray
6Extend the paper support on the output bin
Extending the tray for legal or folio size paper
Attaching the dust cover
How to load the manual feeder
How to use the rear exit
How to clear paper jams
2Open the front cover and remove the print cartridge assembly
5Open the rear exit and remove any jams
3 Printing tasks
Printing tasks
How to manually feed a print job
8Place a sheet of the selected print media, print side facing up, at the center of the manual feeder, but only to the point where its leading edge can contact the paper guides
To manually duplex a print job
4Select either Long Edge or Short Edge
5Select Manual 2-sidedprinting
5Click OK
How to print a booklet
How to print a poster
How to print on letterhead
How to cancel a print job
1Click Start Æ Settings Æ Printers
From the printer operator panel
From a Windows computer
4 How to install options
How to install options
How to access the system board
2Open the rear exit
4Remove the two screws at the top and side of the metal plate covering the system board
How to reattach the system board cover
How to add a memory card
How to install a 550-sheetdrawer
4Click the Install Options tab
3Click File Æ Properties
5 Using the operator panel
Using the operator panel
Overview of the operator panel
Understanding the operator panel lights
Common light sequences
Common light sequences continued
Error
Continue
Ready
Secondary errors
Secondary Error codes
Secondary Error codes continued
Ready / Power Saver
Operator panel codes
Primary codes
Light sequence
Busy
Hex Trace Ready
Waiting
Flushing / Resolution reduced
Not ready
Close door
Load media
Load manual feeder
Print side two of a duplex job
Invalid engine code / Invalid network code
Toner low
Photoconductor kit near full
Replace photoconductor kit
Replace photoconductor kit printer hard stop
Change invalid toner cartridge
Programming engine code / Programming system code
Cancel job / Reset printer
Service error
Printer error
Paper jam printer error
Secondary error codes
Paper jam at the input sensor
Paper jam in the manual feeder
Paper jams as it exits the tray into the printer
Paper jams as a printed job exits the printer
Paper jam in Tray
Complex page
Insufficient printer memory
Insufficient collation area
Font error
Network interface errors
Error communicating with the host computer
Host interface disabled
Memory full
Short paper
Invalid engine code
Invalid network code
6 Understandingmenus the printer configuration
Printing the Printer Settings Configuration sheet
Understanding the printer configuration menus
Configuration menus overview
Network menu
Setting
Use this setting to
Factory default
Setup menu
Parallel menu
USB menu
Utilities menu
7 Software and network tasks
Software and network tasks
How to install drivers for local printing
2Click Install Software
Windows
3Click Printer and Software
5Select Suggested, and then click Next
Macintosh Web
Creating a desktop printer icon Mac OS 8.6–9.x
Mac OS 8.6–9.0:Open Apple LaserWriter
3Double-click Desktop Printer Utility
dClick Agree to accept the license agreement
Linux
How to print a test page
3Click File Æ Properties 4Click Print Test Page
Assigning a printer IP address
How to configure for TCP/IP
Verifying the IP settings
Supported network printer ports
How to set up the printer for network printing
Supported printer drivers
aClick Add Port
3Click File Æ Sharing
Step 1: Install a custom printer driver
Step 2: Share the printer on the network
Using the peer-to-peermethod
3Click Network Print Server
Using the point and print method
\\ server host name \ shared printer name
How to print a network setup page
How to print a test page
Mac OS 8.6 to
Step 2: Create a desktop printer
Step 1: Install a custom PPD file
Mac OS
Step 2: Create a print queue in Print Center
2Click Add Printer
a Click Applications Æ TextEdit
Using the printer resident Web page
Using the Local Printer Settings Utility
Finishing Settings
Paper Settings
Parallel Settings
8 Supplies information
Supplies information
How to conserve supplies
What supplies do I need and how do I order them?
How to know when you need new supplies
Checking the toner and photoconductor levels
Recognizing the operator panel light sequences
Toner Low
Replace PC Kit
Load Paper
How to change a toner cartridge
2Remove the toner cartridge
6Close the front cover
Refilled toner cartridge notice
Lexmark Return Program
Recycling Lexmark products
How to change a photoconductor kit
3Remove the toner cartridge
7Close the front cover
9 Troubleshooting
Troubleshooting
General problems
Problem / Question
Solution / Answer
Click Printer Software
I want to manually
ABCDE
when you handle the sheets
Print too light
Print too dark
Transparency print quality is
Uneven print density
The toner cartridge is defective
• Replace the toner cartridge
Ghost Images
Blank pages
Solid black pages
Paper curls badly once it prints
and exits to the bin
How to clean the printhead lens
3Remove the print cartridge assembly out of the printer by pulling on the toner cartridge handle
7Close the front cover 8Turn the printer on
Index
Numerics
Index
Index
Top
Page
Image
Contents