Introduction
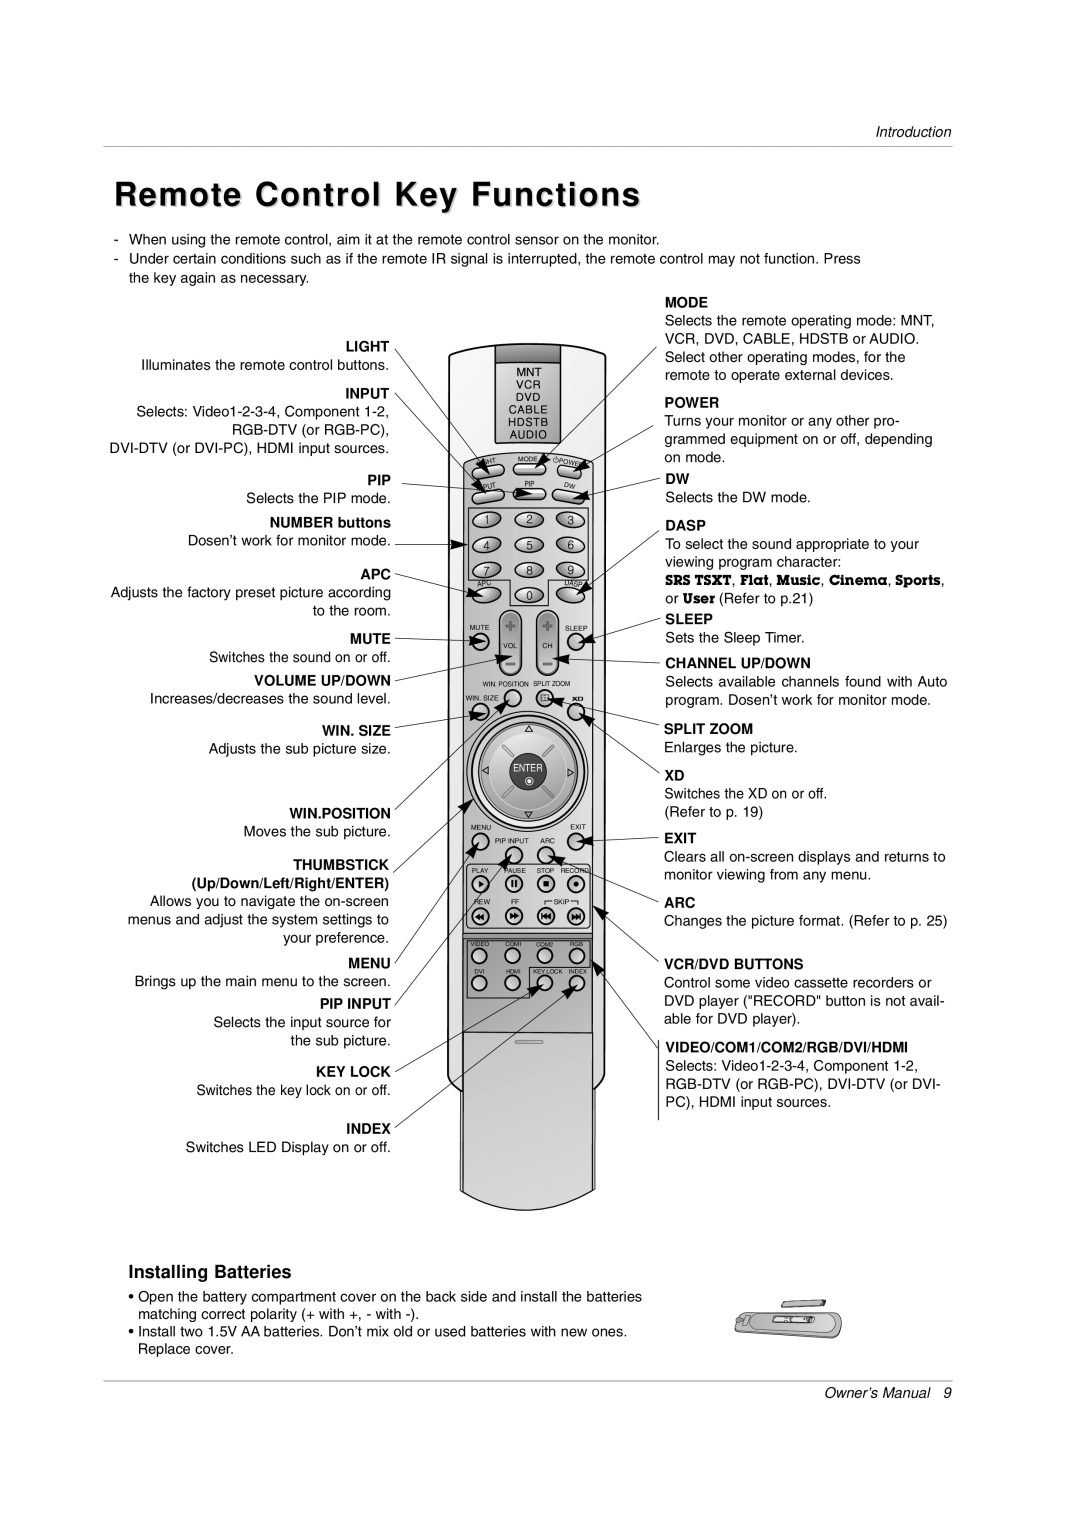
Remote Control Key Functions
-When using the remote control, aim it at the remote control sensor on the monitor.
-Under certain conditions such as if the remote IR signal is interrupted, the remote control may not function. Press the key again as necessary.
LIGHT
Illuminates the remote control buttons.
INPUT
Selects:
PIP
Selects the PIP mode.
LIGHT
INPUT
MODE
PIP
![]() POWER DW
POWER DW
MODE
Selects the remote operating mode: MNT, VCR, DVD, CABLE, HDSTB or AUDIO. Select other operating modes, for the remote to operate external devices.
POWER
Turns your monitor or any other pro- grammed equipment on or off, depending on mode.
DW
Selects the DW mode.
NUMBER buttons |
|
Dosen’t work for monitor mode. |
|
APC | DASP |
APC | |
Adjusts the factory preset picture according |
|
to the room. |
|
DASP
To select the sound appropriate to your viewing program character:
SRS TSXT, Flat, Music, Cinema, Sports,
or User (Refer to p.21)
SLEEP
MUTE
Switches the sound on or off.
VOLUME UP/DOWN
Increases/decreases the sound level.
WIN. SIZE
Adjusts the sub picture size.
WIN.POSITION
Moves the sub picture.
THUMBSTICK (Up/Down/Left/Right/ENTER)
Allows you to navigate the
MENU
Brings up the main menu to the screen.
PIP INPUT
Selects the input source for the sub picture.
KEY LOCK
Switches the key lock on or off.
INDEX
Switches LED Display on or off.
MUTE | SLEEP |
VOL | CH |
WIN. POSITION | SPLIT ZOOM |
WIN. SIZE
ENTER
MENU |
|
| EXIT |
| PIP INPUT | ARC |
|
PLAY | PAUSE | STOP RECORD | |
REW | FF | SKIP | |
VIDEO | COM1 | COM2 | RGB |
DVI | HDMI | KEY LOCK | INDEX |
Sets the Sleep Timer.
CHANNEL UP/DOWN
Selects available channels found with Auto program. Dosen’t work for monitor mode.
SPLIT ZOOM
Enlarges the picture.
XD
Switches the XD on or off. (Refer to p. 19)
![]() EXIT
EXIT
Clears all
ARC
Changes the picture format. (Refer to p. 25)
VCR/DVD BUTTONS
Control some video cassette recorders or DVD player ("RECORD" button is not avail- able for DVD player).
VIDEO/COM1/COM2/RGB/DVI/HDMI
Selects:
Installing Batteries
•Open the battery compartment cover on the back side and install the batteries matching correct polarity (+ with +, - with
•Install two 1.5V AA batteries. Don’t mix old or used batteries with new ones. Replace cover.
Owner’s Manual 9
