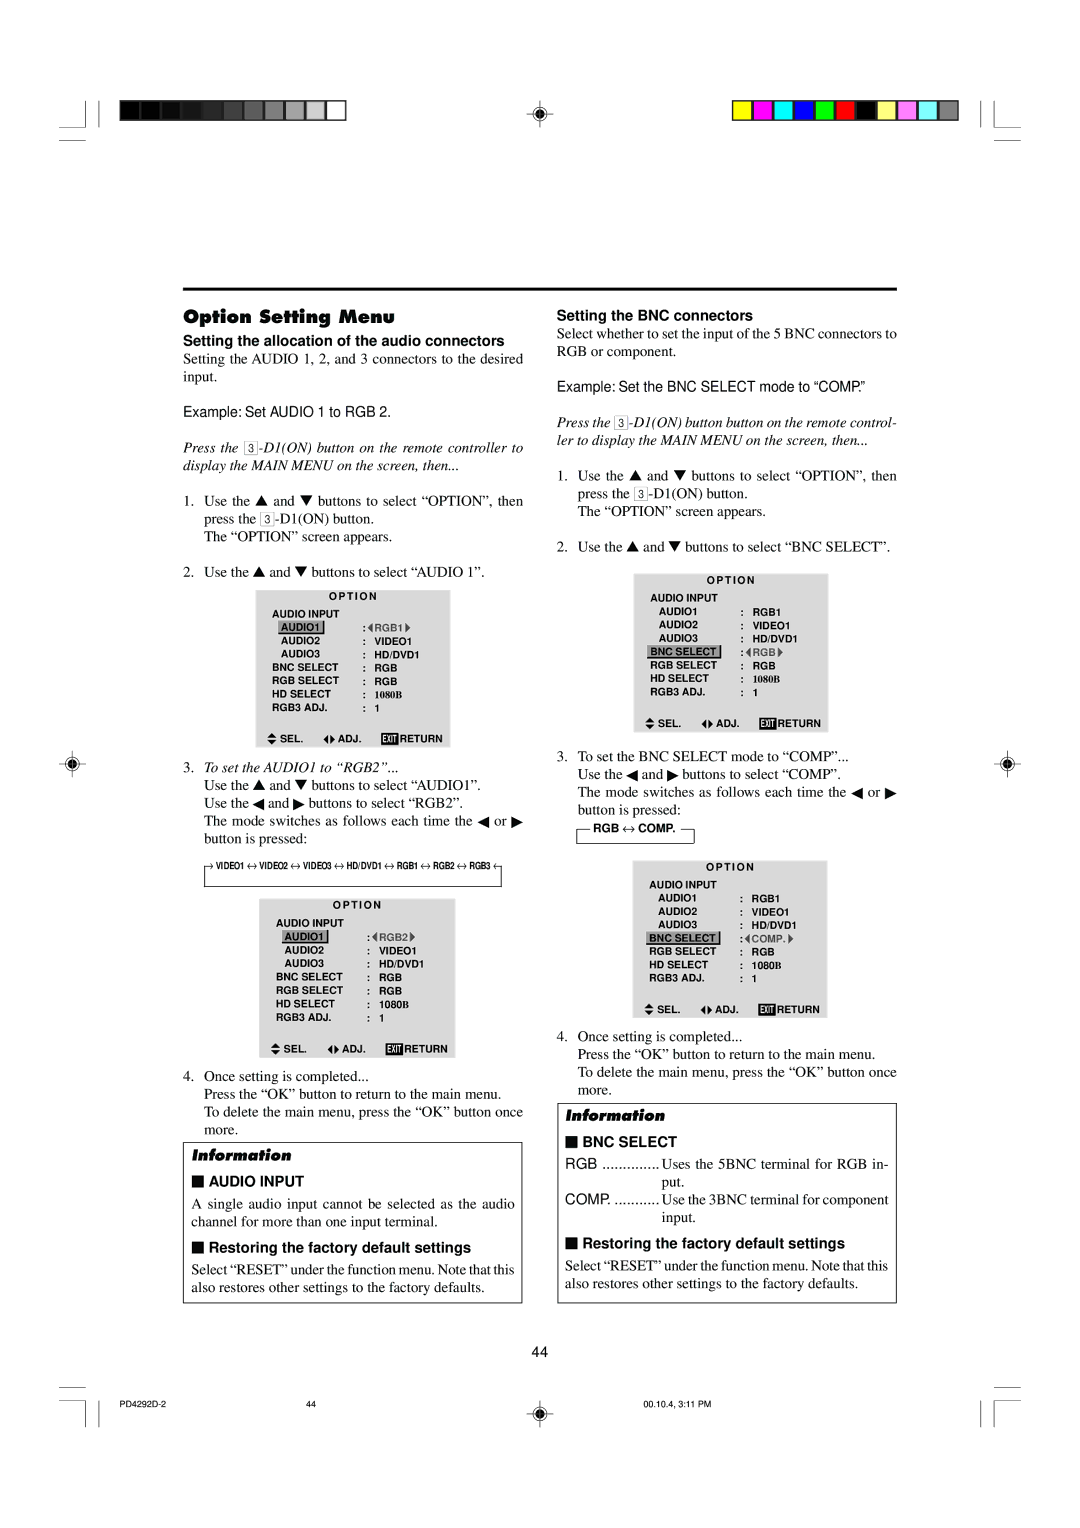
Option Setting Menu

Setting the allocation of the audio connectors

Setting the AUDIO 1, 2, and 3 connectors to the desired input.

Example: Set AUDIO 1 to RGB 2.

Press the 3-D1(ON) button on the remote controller to

display the MAIN MENU on the screen, then...

1.Use the and buttons to select “OPTION”, then press the 3-D1(ON) button.

The “OPTION” screen appears.

2.Use the and buttons to select “AUDIO 1”.


O P T I O N

AUDIO INPUT


AUDIO1


: RGB1


AUDIO2


: VIDEO1


AUDIO3


: HD/DVD1

BNC SELECT

: RGB

RGB SELECT

: RGB

HD SELECT

:

1080B

RGB3 ADJ.


:

1


SEL.

ADJ.


RETURN


EXIT

3.To set the AUDIO1 to “RGB2”...

Use the and buttons to select “AUDIO1”. Use the and buttons to select “RGB2”.

The mode switches as follows each time the or button is pressed:

VIDEO1 VIDEO2 VIDEO3 HD/DVD1 RGB1 RGB2 RGB3

O P T I O N

AUDIO INPUT


AUDIO1

: RGB2

AUDIO2

: VIDEO1

AUDIO3

: HD/DVD1

BNC SELECT

: RGB

RGB SELECT

: RGB

HD SELECT

:

1080B

RGB3 ADJ.

:

1

SEL.

ADJ.

EXIT

RETURN

4.Once setting is completed...

Press the “OK” button to return to the main menu.

To delete the main menu, press the “OK” button once more.

Information

AUDIO INPUT

A single audio input cannot be selected as the audio channel for more than one input terminal.

Restoring the factory default settings

Select “RESET” under the function menu. Note that this also restores other settings to the factory defaults.

44

Setting the BNC connectors

Select whether to set the input of the 5 BNC connectors to RGB or component.

Example: Set the BNC SELECT mode to “COMP.”

Press the 3-D1(ON) button button on the remote control-

ler to display the MAIN MENU on the screen, then...

1.Use the and buttons to select “OPTION”, then press the 3-D1(ON) button.

The “OPTION” screen appears.

2.Use the and buttons to select “BNC SELECT”.


O P T I O N


AUDIO INPUT


AUDIO1


: RGB1


AUDIO2


: VIDEO1


AUDIO3


: HD/DVD1


BNC SELECT


: RGB


RGB SELECT

: RGB


HD SELECT

:

1080B


RGB3 ADJ.


:

1


SEL.

ADJ.


RETURN


EXIT

3.To set the BNC SELECT mode to “COMP”...

Use the and buttons to select “COMP”.

The mode switches as follows each time the or button is pressed:

RGB COMP.


O P T I O N


AUDIO INPUT


AUDIO1


: RGB1


AUDIO2


: VIDEO1


AUDIO3


: HD/DVD1


BNC SELECT


: COMP.


RGB SELECT

: RGB


HD SELECT

:

1080B


RGB3 ADJ.


:

1


SEL.

ADJ.


RETURN


EXIT

4.Once setting is completed...

Press the “OK” button to return to the main menu.

To delete the main menu, press the “OK” button once more.

Information

BNC SELECT

RGB

Uses the 5BNC terminal for RGB in-


put.

COMP

Use the 3BNC terminal for component


input.

Restoring the factory default settings

Select “RESET” under the function menu. Note that this also restores other settings to the factory defaults.

PD4292D-2

44

00.10.4, 3:11 PM

Page 50
Image 50
Marantz PD4292D manual Option Setting Menu, Setting the allocation of the audio connectors, Example Set Audio 1 to RGB

PD4292D specifications

The Marantz PD4292D is a high-performance DVD player that reflects the brand’s commitment to delivering exceptional audio and visual quality. Designed for home theater enthusiasts, this player offers a comprehensive array of features and advanced technologies, making it a standout in the world of multimedia playback.

One of the primary characteristics of the PD4292D is its support for a wide range of media formats. It is compatible with DVD-Video, DVD-Audio, CD, MP3, JPEG, and various other formats, allowing users to enjoy multimedia content from a single device. This versatility means that whether you want to watch movies, listen to music, or view photo slideshows, the PD4292D has you covered.

The imaging technology in the Marantz PD4292D is truly impressive. It includes advanced video processing capabilities that enhance picture quality, making use of progressive scan output for a clearer and sharper image. The player’s compatibility with high-definition formats ensures that users can experience their favorite films and videos in stunning detail, with vibrant colors and deep contrast ratios that enhance visual immersion.

Audio performance is another major feature of the PD4292D. The player supports high-quality audio formats, including Dolby Digital and DTS, allowing for a rich and dynamic sound experience. Additionally, the inclusion of discrete power amplifiers contributes to the overall audio fidelity, giving users an enjoyable listening experience whether they are playing CDs or DVDs.

Connectivity is also markedly robust in the PD4292D. It features multiple outputs, including HDMI, optical, and coaxial outputs, making it easy to connect to a variety of audio and video systems. The HDMI output provides a seamless digital connection to modern televisions and receivers, ensuring that users can enjoy high-definition audio and video without any quality compromise.

User-friendly operation is another hallmark of the Marantz PD4292D. The interface is designed for ease of use, with intuitive controls that allow quick navigation through menus. Furthermore, the player supports various remote control options, making it convenient for users to manage playback from a distance.

In conclusion, the Marantz PD4292D DVD player encapsulates the brand’s philosophy of superior sound and picture quality, combined with versatility and ease of use. Whether you are an avid movie watcher, music lover, or just looking for an all-in-one media solution, the PD4292D offers an impressive range of features that meet the demands of today’s multimedia consumption. With this player, Marantz continues to set a standard for excellence in home entertainment.