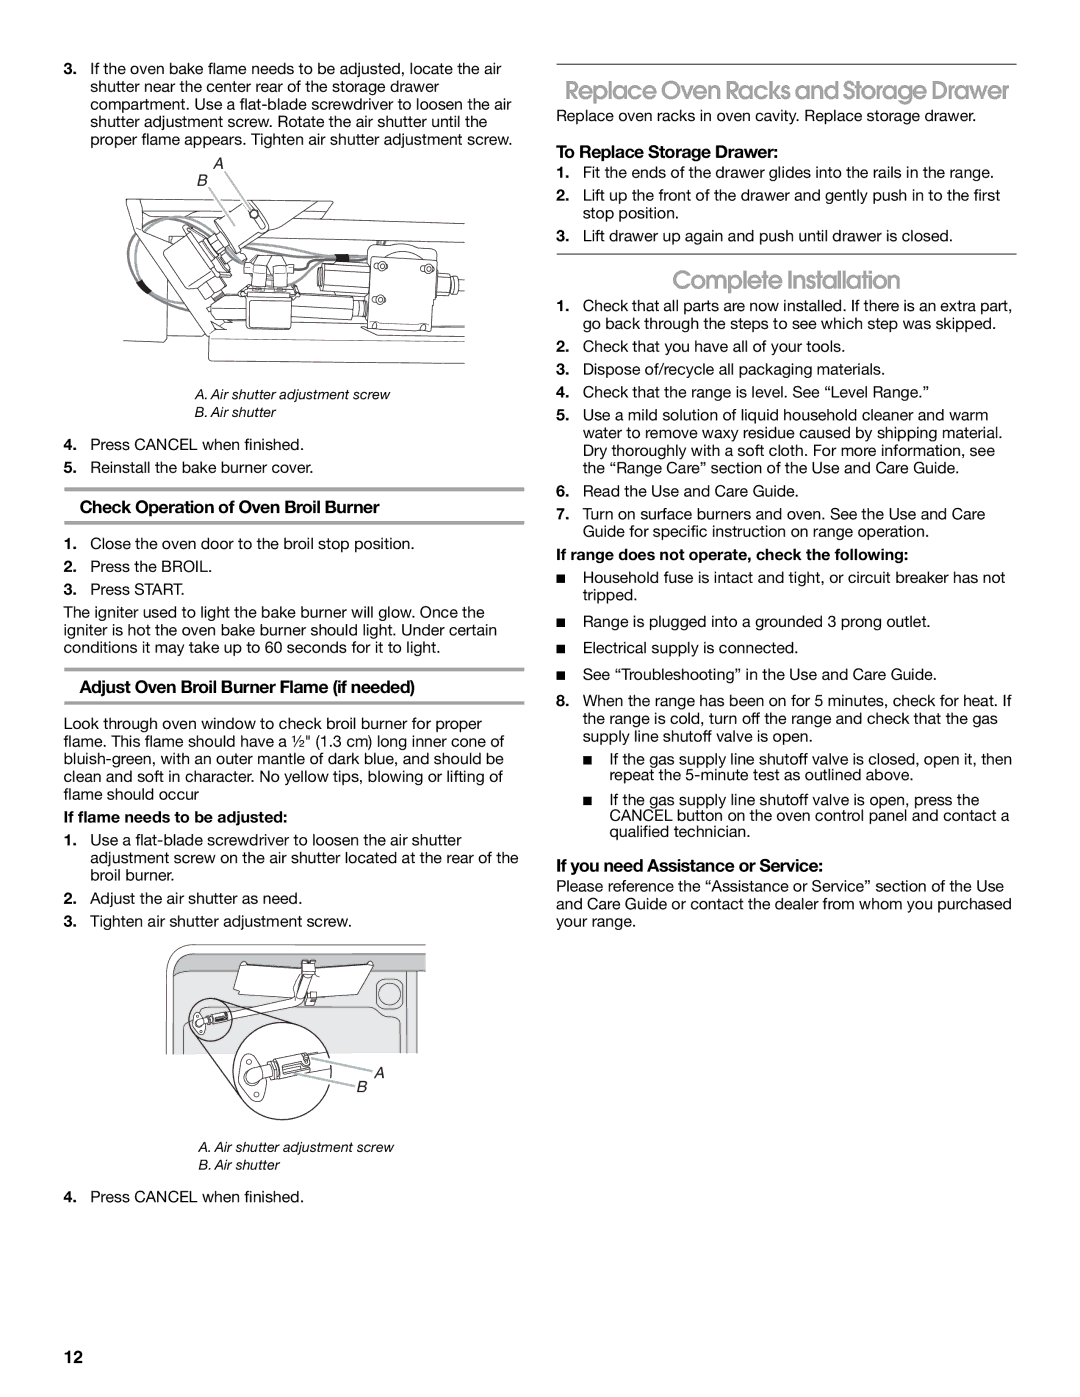
3.If the oven bake flame needs to be adjusted, locate the air shutter near the center rear of the storage drawer compartment. Use a flat-blade screwdriver to loosen the air shutter adjustment screw. Rotate the air shutter until the proper flame appears. Tighten air shutter adjustment screw.

A

B

A. Air shutter adjustment screw

B. Air shutter

4.Press CANCEL when finished.

5.Reinstall the bake burner cover.

Check Operation of Oven Broil Burner

1.Close the oven door to the broil stop position.

2.Press the BROIL.

3.Press START.

The igniter used to light the bake burner will glow. Once the igniter is hot the oven bake burner should light. Under certain conditions it may take up to 60 seconds for it to light.

Adjust Oven Broil Burner Flame (if needed)

Look through oven window to check broil burner for proper flame. This flame should have a ½" (1.3 cm) long inner cone of bluish-green, with an outer mantle of dark blue, and should be clean and soft in character. No yellow tips, blowing or lifting of flame should occur

If flame needs to be adjusted:

1.Use a flat-blade screwdriver to loosen the air shutter adjustment screw on the air shutter located at the rear of the broil burner.

2.Adjust the air shutter as need.

3.Tighten air shutter adjustment screw.

Replace Oven Racks and Storage Drawer

Replace oven racks in oven cavity. Replace storage drawer.

To Replace Storage Drawer:

1.Fit the ends of the drawer glides into the rails in the range.

2.Lift up the front of the drawer and gently push in to the first stop position.

3.Lift drawer up again and push until drawer is closed.

Complete Installation

1.Check that all parts are now installed. If there is an extra part, go back through the steps to see which step was skipped.

2.Check that you have all of your tools.

3.Dispose of/recycle all packaging materials.

4.Check that the range is level. See “Level Range.”

5.Use a mild solution of liquid household cleaner and warm water to remove waxy residue caused by shipping material. Dry thoroughly with a soft cloth. For more information, see the “Range Care” section of the Use and Care Guide.

6.Read the Use and Care Guide.

7.Turn on surface burners and oven. See the Use and Care Guide for specific instruction on range operation.

If range does not operate, check the following:

Household fuse is intact and tight, or circuit breaker has not tripped.

Range is plugged into a grounded 3 prong outlet.

Electrical supply is connected.

See “Troubleshooting” in the Use and Care Guide.

8.When the range has been on for 5 minutes, check for heat. If the range is cold, turn off the range and check that the gas supply line shutoff valve is open.

If the gas supply line shutoff valve is closed, open it, then repeat the 5-minute test as outlined above.

If the gas supply line shutoff valve is open, press the CANCEL button on the oven control panel and contact a qualified technician.

If you need Assistance or Service:

Please reference the “Assistance or Service” section of the Use and Care Guide or contact the dealer from whom you purchased your range.

A

B

A. Air shutter adjustment screw

B. Air shutter

4.Press CANCEL when finished.

12

Page 12
Image 12
Maytag W10258096A installation instructions Replace Oven Racks and Storage Drawer, Complete Installation

W10258096A specifications

The Maytag W10258096A is a high-quality appliance part designed specifically for Maytag washing machines. This vital component serves as a replacement for worn-out or damaged parts, ensuring the longevity and efficiency of your laundry appliance. As a reputable brand in the home appliance industry, Maytag is known for its commitment to durability and performance, and the W10258096A is no exception.

One of the main features of the Maytag W10258096A is its compatibility with a range of Maytag washing machine models. This versatility makes it a convenient choice for many consumers, as it can effectively replace various parts across different units. This is particularly beneficial for households with older machines that may require updated components to maintain functionality.

In terms of technology, the W10258096A is engineered with precision to ensure seamless integration with existing washing machine systems. It features high-grade materials that contribute to its resilience against wear and tear. This robust construction not only enhances the part's durability but also improves the overall performance of the washing machine, allowing it to operate at optimal efficiency.

Another characteristic of the Maytag W10258096A is its user-friendly installation process. Designed with the average homeowner in mind, this component allows for easy replacement without the need for extensive technical knowledge. Clear instructions accompany the part, helping users to complete the installation efficiently.

Moreover, the W10258096A is backed by Maytag’s reputation for quality service and support, which gives consumers peace of mind. Whether you're dealing with water leaks, drainage issues, or other common washing machine problems, this part can address those challenges effectively, restoring your machine to its full capability.

Overall, the Maytag W10258096A stands out as a reliable replacement part that embodies the values of quality, efficiency, and ease of use that Maytag is known for. This replacement component not only extends the life of your washing machine but also promotes better cleaning performance, making laundry day a much smoother experience. When maintenance needs arise, choosing the W10258096A is a practical decision for any Maytag appliance owner looking to keep their machine in top shape.