Handle Installation

Parts Included: Handles (3)

Install Door Handles

1.Remove the handles from the packaging inside the refrigerator.

NOTE: To avoid damaging the handles, place them on a towel or other soft surface.

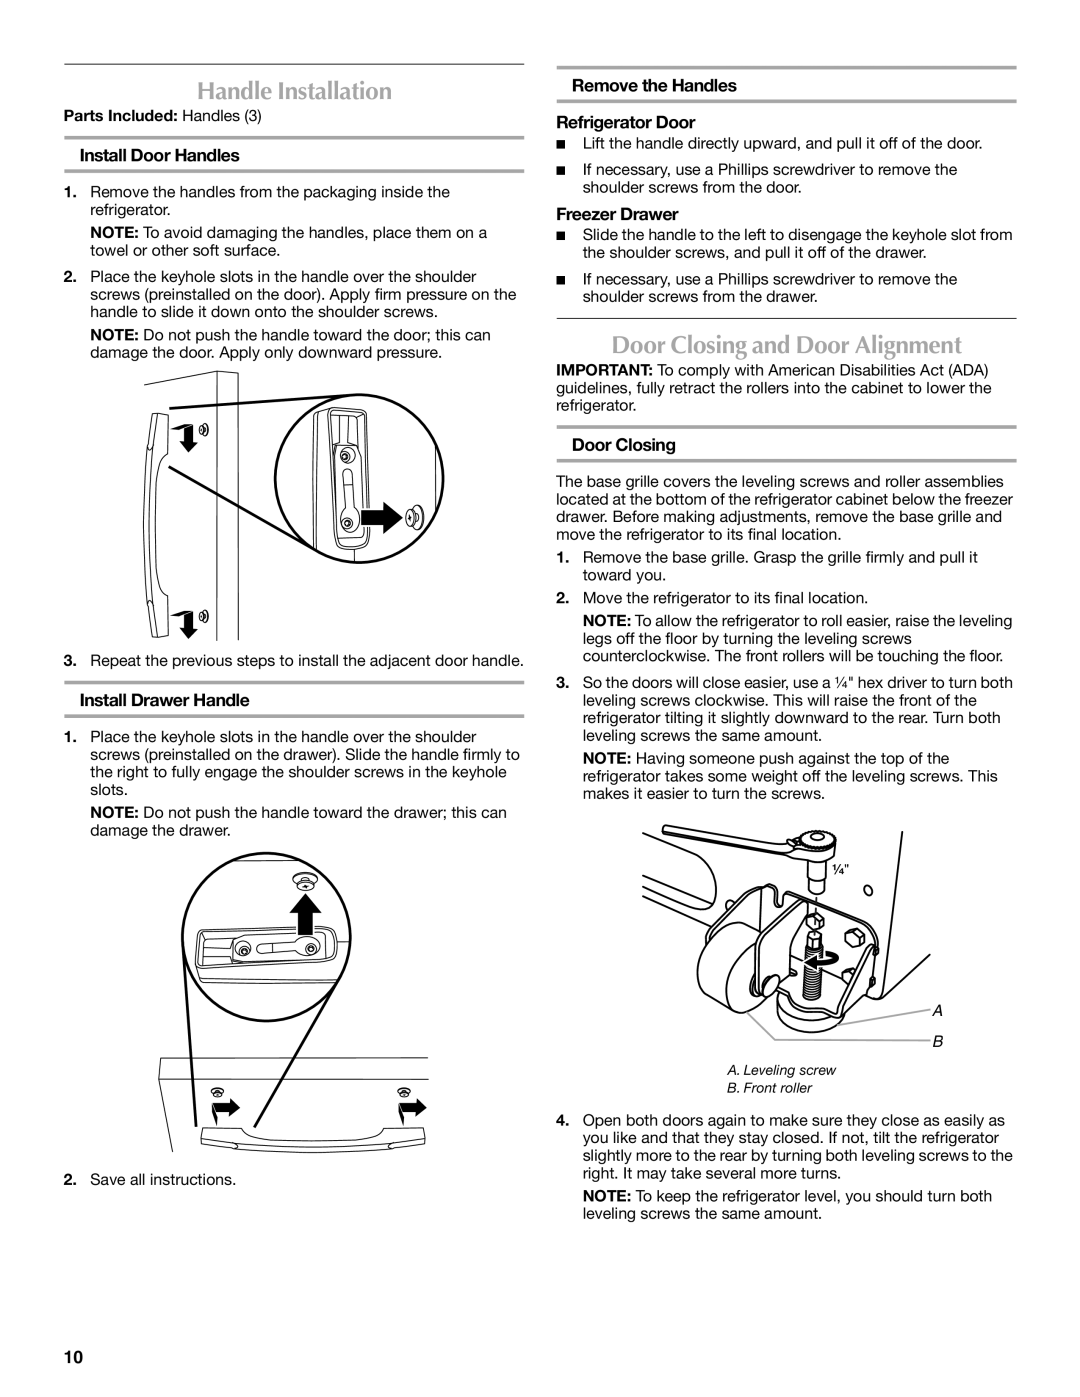
2.Place the keyhole slots in the handle over the shoulder screws (preinstalled on the door). Apply firm pressure on the handle to slide it down onto the shoulder screws.

NOTE: Do not push the handle toward the door; this can damage the door. Apply only downward pressure.

3.Repeat the previous steps to install the adjacent door handle.

Install Drawer Handle

1.Place the keyhole slots in the handle over the shoulder screws (preinstalled on the drawer). Slide the handle firmly to the right to fully engage the shoulder screws in the keyhole slots.

NOTE: Do not push the handle toward the drawer; this can damage the drawer.

2.Save all instructions.

Remove the Handles

Refrigerator Door

Lift the handle directly upward, and pull it off of the door.

If necessary, use a Phillips screwdriver to remove the shoulder screws from the door.

Freezer Drawer

Slide the handle to the left to disengage the keyhole slot from the shoulder screws, and pull it off of the drawer.

If necessary, use a Phillips screwdriver to remove the shoulder screws from the drawer.

Door Closing and Door Alignment

IMPORTANT: To comply with American Disabilities Act (ADA) guidelines, fully retract the rollers into the cabinet to lower the refrigerator.

Door Closing

The base grille covers the leveling screws and roller assemblies located at the bottom of the refrigerator cabinet below the freezer drawer. Before making adjustments, remove the base grille and move the refrigerator to its final location.

1.Remove the base grille. Grasp the grille firmly and pull it toward you.

2.Move the refrigerator to its final location.

NOTE: To allow the refrigerator to roll easier, raise the leveling legs off the floor by turning the leveling screws counterclockwise. The front rollers will be touching the floor.

3.So the doors will close easier, use a ¹⁄₄" hex driver to turn both leveling screws clockwise. This will raise the front of the refrigerator tilting it slightly downward to the rear. Turn both leveling screws the same amount.

NOTE: Having someone push against the top of the refrigerator takes some weight off the leveling screws. This makes it easier to turn the screws.

¹⁄₄"

A

B

A. Leveling screw

B. Front roller

4.Open both doors again to make sure they close as easily as you like and that they stay closed. If not, tilt the refrigerator slightly more to the rear by turning both leveling screws to the right. It may take several more turns.

NOTE: To keep the refrigerator level, you should turn both leveling screws the same amount.

10

Page 10
Image 10
Maytag W10400978A installation instructions Handle Installation, Door Closing and Door Alignment

W10400978A specifications

The Maytag W10400978A is a versatile and innovative appliance that reflects the brand's commitment to quality and efficiency. This replacement part, commonly associated with various Maytag machines, underscores the brand's focus on enhancing user experience through reliable and effective solutions.

One of the standout features of the W10400978A is its compatibility with a range of Maytag appliances. Designed to fit seamlessly into various models, this part is an excellent choice for anyone looking to maintain their appliance's performance. Its precise engineering ensures that it not only fits well but also functions optimally, delivering the performance users expect from Maytag products.

The W10400978A is built with durable materials that contribute to its longevity. Maytag is known for its rugged construction and this part is no exception. It can withstand the wear and tear of everyday use, ensuring that your appliance remains operational for years to come. This durability is complemented by an innovative design that makes installation straightforward, an essential consideration for users looking to perform DIY repairs.

Technologically, the W10400978A incorporates features that improve efficiency and effectiveness. Depending on its application, it enhances the appliance’s ability to deliver superior cleaning and washing results. This feature is integral in helping users save time and energy. Moreover, the part helps sustain optimal operating conditions, reducing the risk of breakdowns and expensive repairs in the future.

Energy efficiency is another significant attribute associated with the Maytag brand. Appliances that utilize the W10400978A are often designed with smart technologies that maximize water and energy savings. This not only benefits the environment but also translates into lower utility bills, making it a financially prudent choice for homeowners.

In summary, the Maytag W10400978A exemplifies the brand's dedication to quality, durability, and efficiency. Its compatibility with multiple Maytag models, robust construction, and user-friendly design make it a valuable component for maintaining appliance performance. With energy-saving features and superior reliability, it stands out as a must-have for anyone looking to extend the life of their Maytag appliances while enjoying the benefits of advanced technology. Whether it's used in a washer, dryer, or refrigerator, the W10400978A serves as a perfect testament to Maytag's storied commitment to excellence.