Electrical Requirements

WARNING

Electrical Shock Hazard

Plug into a grounded 3 prong outlet.

Do not remove ground prong.

Do not use an adapter.

Do not use an extension cord.

Failure to follow these instructions can result in death, fire, or electrical shock.

Before you move your refrigerator into its final location, it is important to make sure you have the proper electrical connection.

Recommended Grounding Method

A115 volt, 60 Hz., AC only 15- or 20-amp fused, grounded electrical supply is required. It is recommended that a separate circuit serving only your refrigerator be provided. Use an outlet that cannot be turned off by a switch. Do not use an extension cord.

NOTE: Before performing any type of installation, cleaning, or removing a light bulb, turn Cooling OFF, and then disconnect the refrigerator from the electrical source. When you are finished, reconnect the refrigerator to the electrical source and turn Cooling ON. See “Using the Control(s).”

Water Supply Requirements

A cold water supply with water pressure between 30 and 120 psi (207 and 827 kPa) is required to operate the water dispenser and ice maker. If you have questions about your water pressure, call a licensed, qualified plumber.

Reverse Osmosis Water Supply

IMPORTANT: The pressure of the water supply coming out of a reverse osmosis system going to the water inlet valve of the refrigerator needs to be between 30 and 120 psi (207 and

827 kPa).

If a reverse osmosis water filtration system is connected to your cold water supply, the water pressure to the reverse osmosis system needs to be a minimum of 40 to 60 psi (276 to 414 kPa).

If the water pressure to the reverse osmosis system is less than

40 to 60 psi (276 to 414 kPa):

Check to see whether the sediment filter in the reverse osmosis system is blocked. Replace the filter if necessary.

Allow the storage tank on the reverse osmosis system to refill after heavy usage. The tank capacity could be too low to keep up with the requirements of the refrigerator.

If your refrigerator has a water filter, it may further reduce the water pressure when used in conjunction with a reverse osmosis system. Remove the water filter. See “Water Filtration System.”

If you have questions about your water pressure, call a licensed, qualified plumber.

Connect the Water Supply

Read all directions before you begin.

IMPORTANT:

All installations must meet local plumbing code requirements.

Use copper tubing or Whirlpool supply line, Part Number 8212547RP, and check for leaks.

Install copper tubing only in areas where the temperatures will remain above freezing.

TOOLS NEEDED:

Gather the required tools and parts before starting installation. Read and follow the instructions provided with any tools listed here.

Flat-blade screwdriver

¹⁄₄" Nut driver

⁷⁄₁₆" and ¹⁄₂" Open-end or two

¹⁄₄" Drill bit


adjustable wrenches

Cordless drill


NOTE: Your refrigerator dealer has a kit available with a ¹⁄₄"

(6.35 mm) saddle-type shutoff valve, a union, and copper tubing. Before purchasing, make sure a saddle-type valve complies with your local plumbing codes. Do not use a piercing-type or ³⁄₁₆"

(4.76 mm) saddle valve which reduces water flow and clogs more easily.

Connect to Water Line

Style 1

1.Unplug refrigerator or disconnect power.

2.Turn OFF main water supply. Turn ON nearest faucet long enough to clear line of water.

3.Locate a ½" to 1¹⁄₄" (1.25 cm to 3.18 cm) vertical cold water pipe near the refrigerator.

IMPORTANT:

Make sure it is a cold water pipe.

Horizontal pipe will work, but drill on the top side of the pipe, not the bottom. This will help keep water away from the drill and normal sediment from collecting in the valve.

4.Determine the length of copper tubing you need. Measure from the connection on the lower left rear of refrigerator to the water pipe. Add 7 ft (2.1 m) to allow for cleaning. Use ¹⁄₄" (6.35 mm) O.D. (outside diameter) copper tubing. Be sure both ends of copper tubing are cut square.

5.Using a cordless drill, drill a ¹⁄₄" hole in the cold water pipe you have selected.


A

G

B


C

F E

D

A. Cold water pipe

E. Compression sleeve

B. Pipe clamp

F. Shutoff valve

C. Copper tubing

G. Packing nut

D. Compression nut


6.Fasten the shutoff valve to the cold water pipe with the pipe clamp. Be sure the outlet end is solidly in the ¹⁄₄" (6.35 mm) drilled hole in the water pipe and that the washer is under the pipe clamp. Tighten the packing nut. Tighten the pipe clamp screws slowly and evenly so washer makes a watertight seal. Do not overtighten or you may crush the copper tubing.

8

Page 8
Image 8
Maytag W10400978A installation instructions Electrical Requirements, Water Supply Requirements, Connect the Water Supply

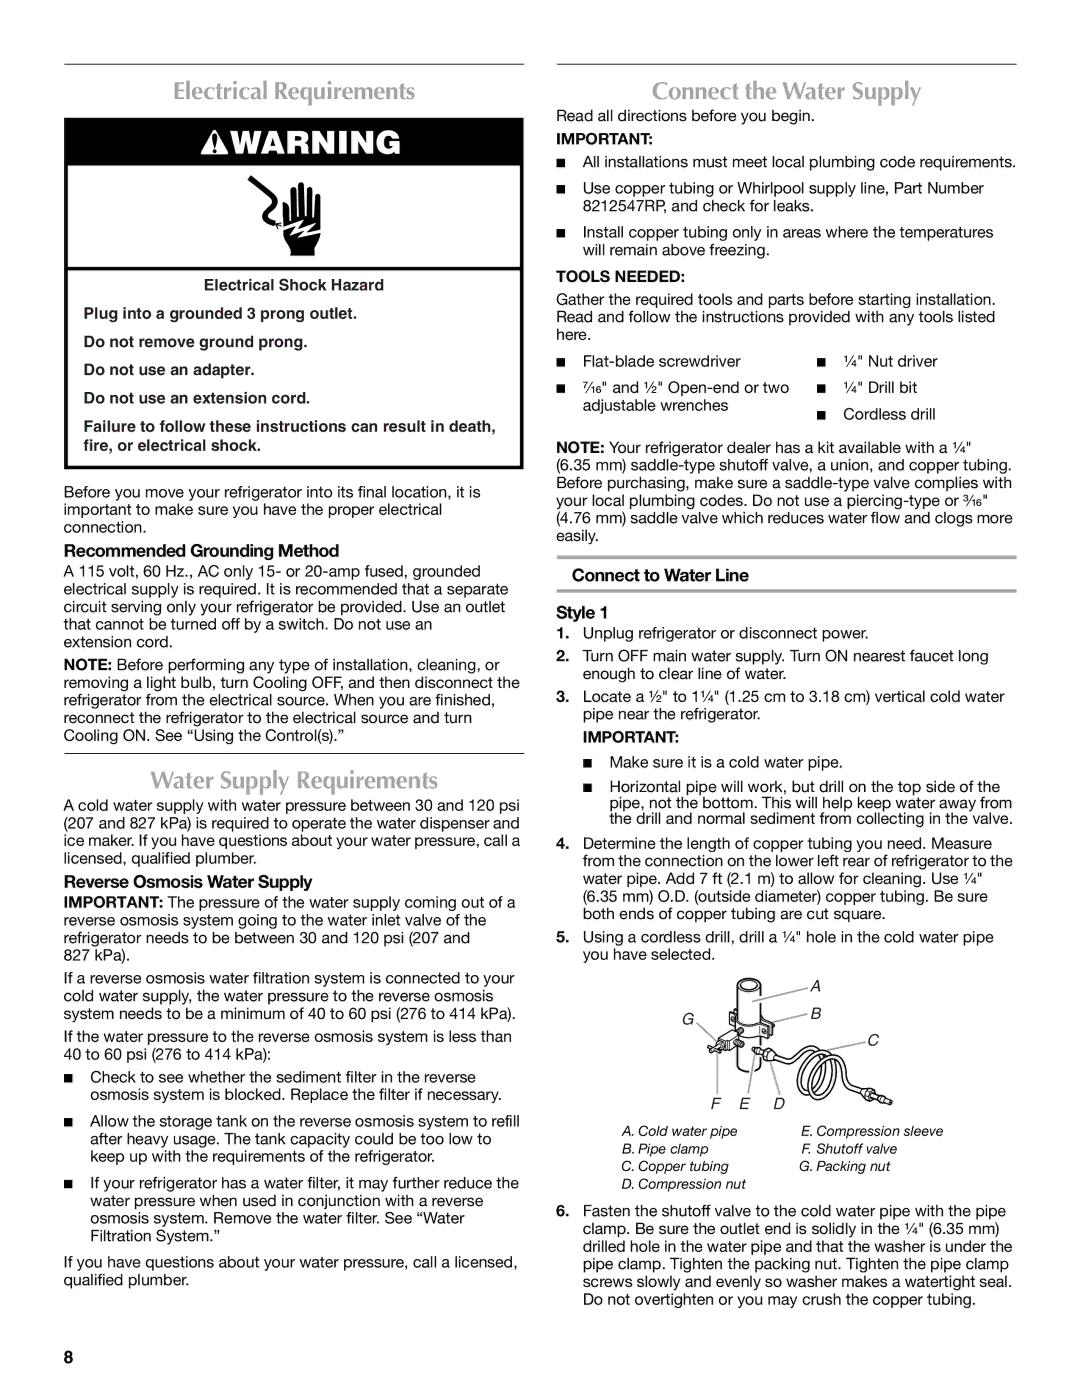
W10400978A specifications

The Maytag W10400978A is a versatile and innovative appliance that reflects the brand's commitment to quality and efficiency. This replacement part, commonly associated with various Maytag machines, underscores the brand's focus on enhancing user experience through reliable and effective solutions.

One of the standout features of the W10400978A is its compatibility with a range of Maytag appliances. Designed to fit seamlessly into various models, this part is an excellent choice for anyone looking to maintain their appliance's performance. Its precise engineering ensures that it not only fits well but also functions optimally, delivering the performance users expect from Maytag products.

The W10400978A is built with durable materials that contribute to its longevity. Maytag is known for its rugged construction and this part is no exception. It can withstand the wear and tear of everyday use, ensuring that your appliance remains operational for years to come. This durability is complemented by an innovative design that makes installation straightforward, an essential consideration for users looking to perform DIY repairs.

Technologically, the W10400978A incorporates features that improve efficiency and effectiveness. Depending on its application, it enhances the appliance’s ability to deliver superior cleaning and washing results. This feature is integral in helping users save time and energy. Moreover, the part helps sustain optimal operating conditions, reducing the risk of breakdowns and expensive repairs in the future.

Energy efficiency is another significant attribute associated with the Maytag brand. Appliances that utilize the W10400978A are often designed with smart technologies that maximize water and energy savings. This not only benefits the environment but also translates into lower utility bills, making it a financially prudent choice for homeowners.

In summary, the Maytag W10400978A exemplifies the brand's dedication to quality, durability, and efficiency. Its compatibility with multiple Maytag models, robust construction, and user-friendly design make it a valuable component for maintaining appliance performance. With energy-saving features and superior reliability, it stands out as a must-have for anyone looking to extend the life of their Maytag appliances while enjoying the benefits of advanced technology. Whether it's used in a washer, dryer, or refrigerator, the W10400978A serves as a perfect testament to Maytag's storied commitment to excellence.