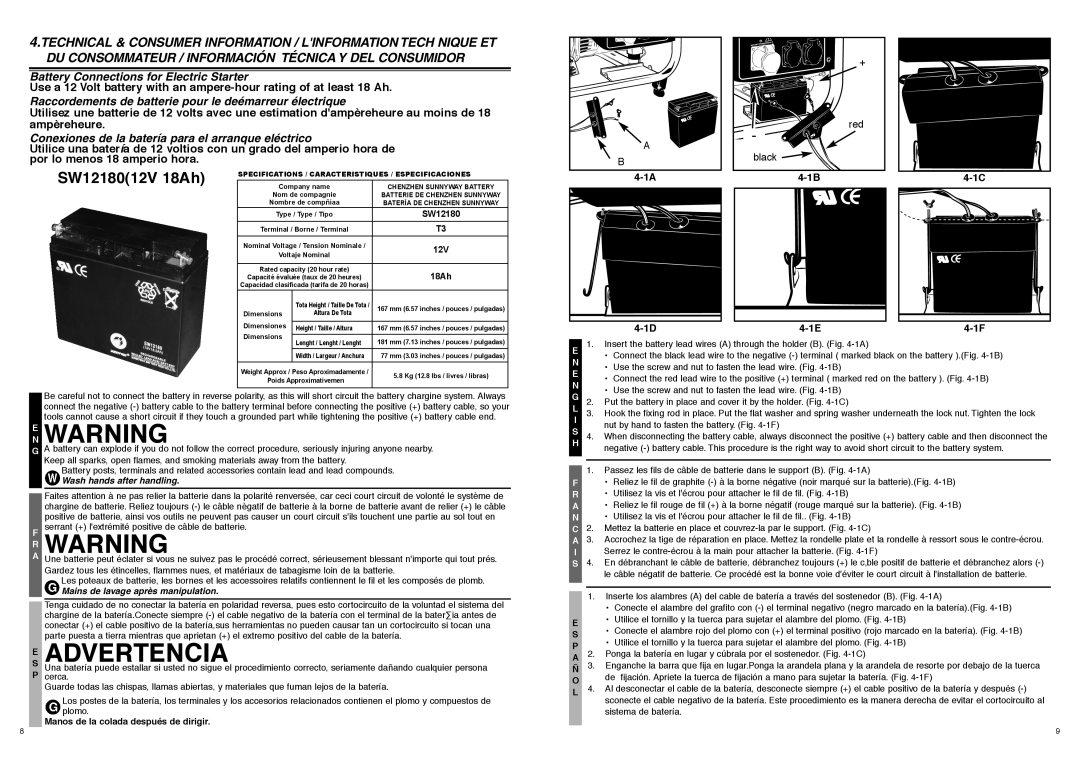
Be careful not to connect the battery in reverse polarity, as this will short circuit the battery chargine system. Always connect the negative (-) battery cable to the battery terminal before connecting the positive (+) battery cable, so your tools cannot cause a short circuit if they touch a grounded part while tightening the positive (+) battery cable end.
N
E WARNING
GA battery can explode if you do not follow the correct procedure, seriously injuring anyone nearby. Keep all sparks, open flames, and smoking materials away from the battery.
Battery posts, terminals and related accessories contain lead and lead compounds.
Wash hands after handling.
Faites attention à ne pas relier la batterie dans la polarité renversée, car ceci court circuit de volonté le système de
chargine de batterie. Reliez toujours (-) le câble nègatif de batterie à la borne de batterie avant de relier (+) le câble positive de batterie, ainsi vos outils ne peuvent pas causer un court circuit s'ils touchent une partie au sol tout en
Fserrant (+) l'extrémité positive de câble de batterie.
RWARNING
A Une batterie peut éclater si vous ne suivez pas le procédé correct, sérieusement blessant n'importe qui tout prés. Gardez tous les étincelles, flammes nues, et matériaux de tabagisme loin de la batterie.
Les poteaux de batterie, les bornes et les accessoires relatifs contiennent le fil et les composés de plomb.
Mains de lavage après manipulation.
Tenga cuidado de no conectar la batería en polaridad reversa, pues esto cortocircuito de la voluntad el sistema del chargine de la batería.Conecte siempre (-) el cable negativo de la batería con el terminal de la bater∑ia antes de conectar (+) el cable positivo de la batería,sus herramientas no pueden causar tan un cortocircuito si tocan una parte puesta a tierra mientras que aprietan (+) el extremo positivo del cable de la batería.
E ADVERTENCIA
S Una batería puede estallar si usted no sigue el procedimiento correcto, seriamente dañando cualquier persona P cerca.
Guarde todas las chispas, llamas abiertas, y materiales que fuman lejos de la batería.
Los postes de la batería, los terminales y los accesorios relacionados contienen el plomo y compuestos de plomo.
Manos de la colada después de dirigir.
E | 1. | Insert the battery lead wires (A) through the holder (B). (Fig. 4-1A) |
N | | • | Connect the black lead wire to the negative (-) terminal ( marked black on the battery ).(Fig. 4-1B) |
| • | Use the screw and nut to fasten the lead wire. (Fig. 4-1B) |
E | |
| • | Connect the red lead wire to the positive (+) terminal ( marked red on the battery ). (Fig. 4-1B) |
N | |
| • Use the screw and nut to fasten the lead wire. (Fig. 4-1B) |
G | |
2. | Put the battery in place and cover it by the holder. (Fig. 4-1C) |
L | 3. | Hook the fixing rod in place. Put the flat washer and spring washer underneath the lock nut. Tighten the lock |
I | | nut by hand to fasten the battery. (Fig. 4-1F) |
S | |
4. | When disconnecting the battery cable, always disconnect the positive (+) battery cable and then disconnect the |
H | | negative (-) battery cable. This procedure is the right way to avoid short circuit to the battery system. |
| |
1.Passez les fils de câble de batterie dans le support (B). (Fig. 4-1A)
F• Reliez le fil de graphite (-) à la borne négative (noir marqué sur la batterie).(Fig. 4-1B)
R • Utilisez la vis et l'écrou pour attacher le fil de fil. (Fig. 4-1B)
A • Reliez le fil rouge de fil (+) à la borne négatif (rouge marqué sur la batterie). (Fig. 4-1B)
N • Utilisez la vis et l'écrou pour attacher le fil de fil.. (Fig. 4-1B)
C2. Mettez la batterie en place et couvrez-la par le support. (Fig. 4-1C)
A3. Accrochez la tige de réparation en place. Mettez la rondelle plate et la rondelle à ressort sous le contre-écrou.
I Serrez le contre-écrou à la main pour attacher la batterie. (Fig. 4-1F)
S4. En débranchant le câble de batterie, débranchez toujours (+) le c‚ble positif de batterie et débranchez alors (-) le câble négatif de batterie. Ce procédé est la bonne voie d'éviter le court circuit à l'installation de batterie.
1.Inserte los alambres (A) del cable de batería a través del sostenedor (B). (Fig. 4-1A)
• Conecte el alambre del grafito con (-) el terminal negativo (negro marcado en la batería).(Fig. 4-1B)
E• Utilice el tornillo y la tuerca para sujetar el alambre del plomo. (Fig. 4-1B)
S• Conecte el alambre rojo del plomo con (+) el terminal positivo (rojo marcado en la batería). (Fig. 4-1B)
P• Utilice el tornillo y la tuerca para sujetar el alambre del plomo. (Fig. 4-1B)
A2. Ponga la batería en lugar y cúbrala por el sostenedor. (Fig. 4-1C)
Ñ3. Enganche la barra que fija en lugar.Ponga la arandela plana y la arandela de resorte por debajo de la tuerca
Ode fijación. Apriete la tuerca de fijación a mano para sujetar la batería. (Fig. 4-1F)
L4. Al desconectar el cable de la batería, desconecte siempre (+) el cable positivo de la batería y después (-) sconecte el cable negativo de la batería. Este procedimiento es la manera derecha de evitar el cortocircuito al sistema de batería.

