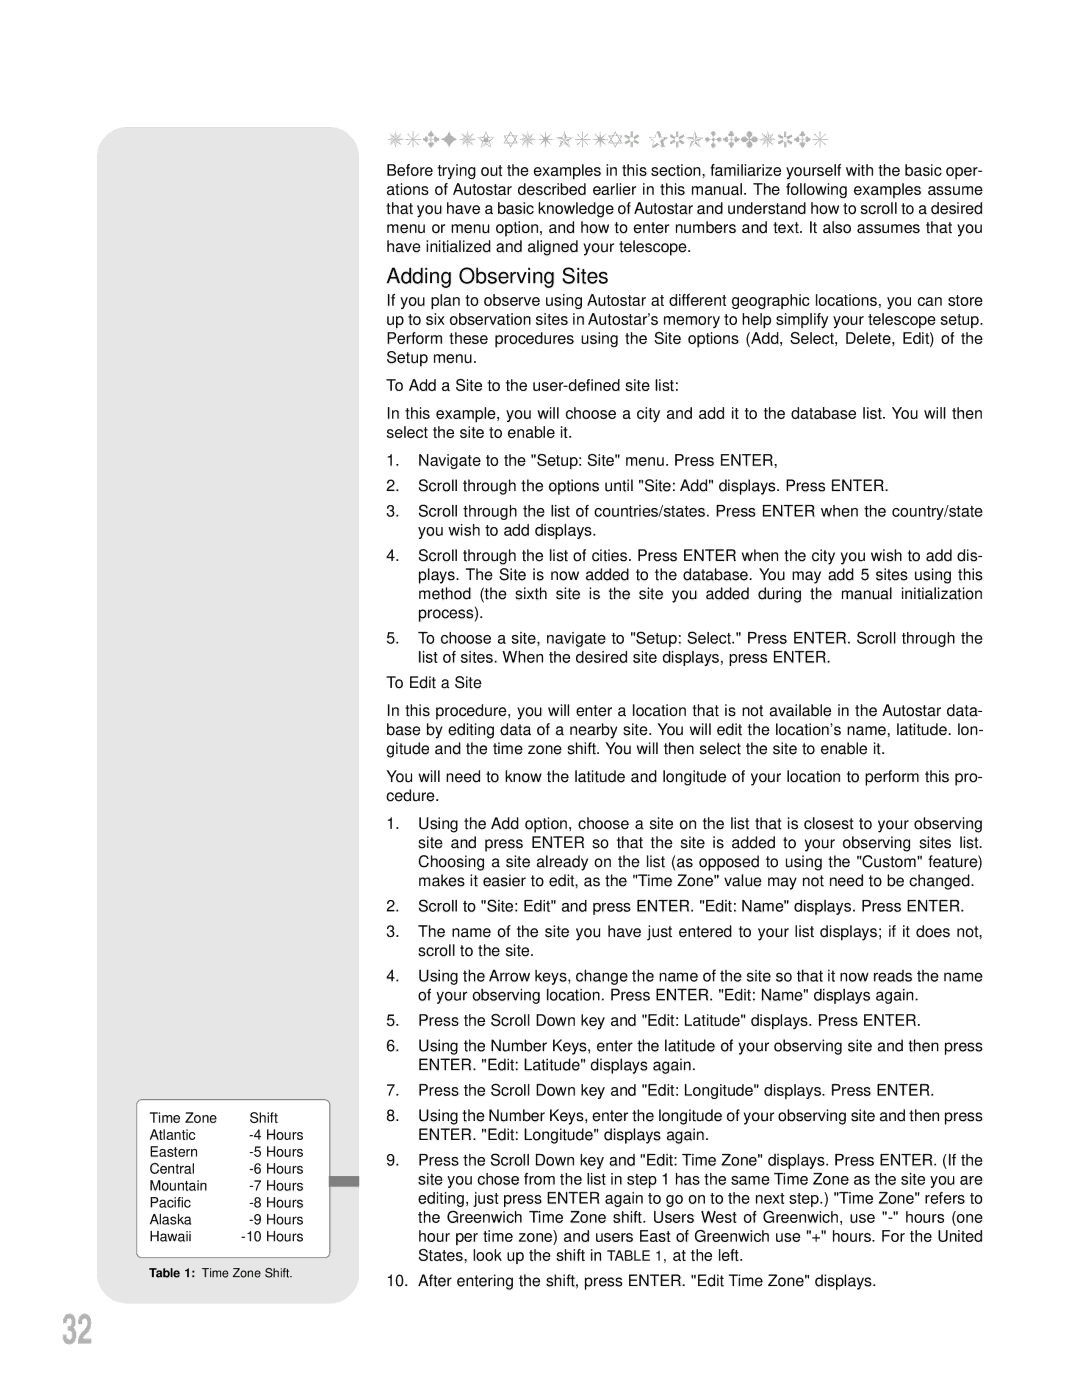
Time Zone | Shift | |
Atlantic | ||
Eastern | ||
Central | ||
Mountain | Hours | |
Pacific | Hours | |
Alaska | Hours | |
Hawaii | Hours | |
Table 1: Time Zone Shift.
USEFUL AUTOSTAR PROCEDURES
Before trying out the examples in this section, familiarize yourself with the basic oper- ations of Autostar described earlier in this manual. The following examples assume that you have a basic knowledge of Autostar and understand how to scroll to a desired menu or menu option, and how to enter numbers and text. It also assumes that you have initialized and aligned your telescope.
Adding Observing Sites
If you plan to observe using Autostar at different geographic locations, you can store up to six observation sites in Autostar's memory to help simplify your telescope setup. Perform these procedures using the Site options (Add, Select, Delete, Edit) of the Setup menu.
To Add a Site to the user-defined site list:
In this example, you will choose a city and add it to the database list. You will then select the site to enable it.
1.Navigate to the "Setup: Site" menu. Press ENTER,
2.Scroll through the options until "Site: Add" displays. Press ENTER.
3.Scroll through the list of countries/states. Press ENTER when the country/state you wish to add displays.
4.Scroll through the list of cities. Press ENTER when the city you wish to add dis- plays. The Site is now added to the database. You may add 5 sites using this method (the sixth site is the site you added during the manual initialization process).
5.To choose a site, navigate to "Setup: Select." Press ENTER. Scroll through the list of sites. When the desired site displays, press ENTER.
To Edit a Site
In this procedure, you will enter a location that is not available in the Autostar data- base by editing data of a nearby site. You will edit the location's name, latitude. lon- gitude and the time zone shift. You will then select the site to enable it.
You will need to know the latitude and longitude of your location to perform this pro- cedure.
1.Using the Add option, choose a site on the list that is closest to your observing site and press ENTER so that the site is added to your observing sites list. Choosing a site already on the list (as opposed to using the "Custom" feature) makes it easier to edit, as the "Time Zone" value may not need to be changed.
2.Scroll to "Site: Edit" and press ENTER. "Edit: Name" displays. Press ENTER.
3.The name of the site you have just entered to your list displays; if it does not, scroll to the site.
4.Using the Arrow keys, change the name of the site so that it now reads the name of your observing location. Press ENTER. "Edit: Name" displays again.
5.Press the Scroll Down key and "Edit: Latitude" displays. Press ENTER.
6.Using the Number Keys, enter the latitude of your observing site and then press ENTER. "Edit: Latitude" displays again.
7.Press the Scroll Down key and "Edit: Longitude" displays. Press ENTER.
8.Using the Number Keys, enter the longitude of your observing site and then press ENTER. "Edit: Longitude" displays again.
9.Press the Scroll Down key and "Edit: Time Zone" displays. Press ENTER. (If the site you chose from the list in step 1 has the same Time Zone as the site you are editing, just press ENTER again to go on to the next step.) "Time Zone" refers to the Greenwich Time Zone shift. Users West of Greenwich, use
10.After entering the shift, press ENTER. "Edit Time Zone" displays.
32
