SECTION 3 - SERVICING COMPONENTS

Appendix - Instructions for Service Kit 47321 - Digital Temperature Controller Kit, 2/02

WARNING

BEFORE PERFORMING ANY SERVICE WORK, THE ELECTRICAL POWER SUPPLY AND THE GAS SUPPLY MUST BE TURNED OFF.

Before you Begin

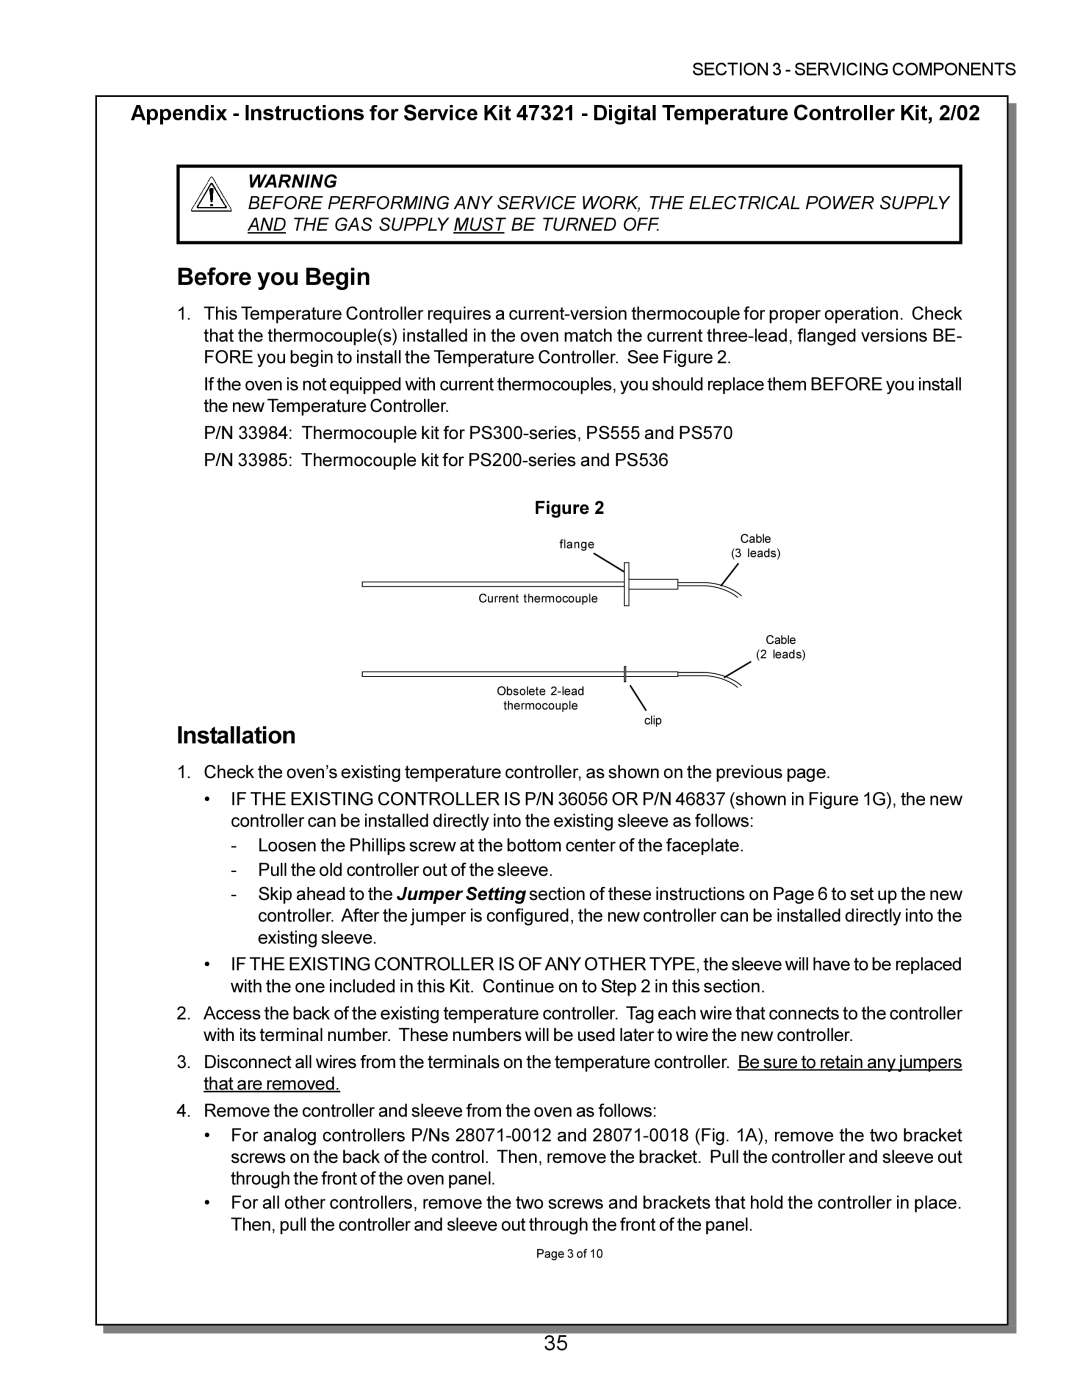
1.This Temperature Controller requires a current-version thermocouple for proper operation. Check that the thermocouple(s) installed in the oven match the current three-lead, flanged versions BE- FORE you begin to install the Temperature Controller. See Figure 2.

If the oven is not equipped with current thermocouples, you should replace them BEFORE you install the new Temperature Controller.

P/N 33984: Thermocouple kit for PS300-series, PS555 and PS570

P/N 33985: Thermocouple kit for PS200-series and PS536

Figure 2

Installation

flange

Cable

(3 leads)


Current thermocouple

Cable

(2 leads)

Obsolete 2-lead

thermocouple

clip

1.Check the oven’s existing temperature controller, as shown on the previous page.

IF THE EXISTING CONTROLLER IS P/N 36056 OR P/N 46837 (shown in Figure 1G), the new controller can be installed directly into the existing sleeve as follows:

-Loosen the Phillips screw at the bottom center of the faceplate.

-Pull the old controller out of the sleeve.

-Skip ahead to the Jumper Setting section of these instructions on Page 6 to set up the new controller. After the jumper is configured, the new controller can be installed directly into the existing sleeve.

IF THE EXISTING CONTROLLER IS OF ANY OTHER TYPE, the sleeve will have to be replaced with the one included in this Kit. Continue on to Step 2 in this section.

2.Access the back of the existing temperature controller. Tag each wire that connects to the controller with its terminal number. These numbers will be used later to wire the new controller.

3.Disconnect all wires from the terminals on the temperature controller. Be sure to retain any jumpers that are removed.

4.Remove the controller and sleeve from the oven as follows:

For analog controllers P/Ns 28071-0012 and 28071-0018 (Fig. 1A), remove the two bracket screws on the back of the control. Then, remove the bracket. Pull the controller and sleeve out through the front of the oven panel.

For all other controllers, remove the two screws and brackets that hold the controller in place. Then, pull the controller and sleeve out through the front of the panel.

Page 3 of 10

35

Page 36
Image 36
Middleby Marshall PS570, PS360, PS200, PS555, PS220, PS224 PS310 manual Before you Begin

PS224 PS310, PS220, PS555, PS200, PS360 specifications

The Middleby Marshall PS555 is a standout commercial pizza oven renowned for its performance, efficiency, and advanced technologies. Designed with the modern pizzeria in mind, the PS555 delivers exceptional cooking results while maximizing energy efficiency and throughput.

One of the key features of the PS555 is its innovative cooking technology, which incorporates both convection and radiant heat. This unique combination ensures that pizzas are cooked evenly and quickly, achieving a perfectly crispy crust and evenly melted cheese every time. The oven’s high-speed air impingement system accelerates cooking times, allowing pizzerias to serve more customers in less time without compromising quality.

The PS555 is designed with a spacious cooking chamber that can accommodate multiple pizzas simultaneously. With its ability to fit pizzas up to 18 inches in diameter, the oven is ideal for establishments with high demand. Additionally, the adjustable conveyor speed allows operators to customize the cooking time based on their specific menu items, enhancing versatility and productivity.

Energy efficiency is a hallmark of the Middleby Marshall PS555. The oven utilizes advanced insulation materials to minimize heat loss, ensuring that it operates at optimal temperatures while consuming less energy. This efficiency not only reduces operating costs but also contributes to a more sustainable kitchen environment.

User-friendly controls make it simple for operators to manage the cooking process. The PS555 features digital controls with programmable settings, enabling quick adjustments to temperature and cooking time. This ensures consistent quality across different shifts and helps maintain product standards while simplifying staff training.

Durability is another defining characteristic of the PS555. Built with high-quality materials, the oven is designed for heavy use in busy commercial kitchens. Its stainless steel construction ensures resistance to wear and tear, making it a worthwhile investment for any pizzeria.

In summary, the Middleby Marshall PS555 pizza oven is a high-performance piece of equipment that combines advanced cooking technologies, efficiency, and durability. Its ability to deliver consistently excellent results while streamlining operations makes it an essential asset for any pizza business aiming to enhance its productivity and customer satisfaction.