Page
Middleby Marshall, Inc
Technical service Manual
Table of Contents
Table of Contents
GAS Oven Sequence of Operation
Section Sequence of Operation
Sequence of Operation
Sequence of Operation
PS200-series PS360-series
Blowers, belts and pulleys
Types of Heat Transfer
II. Blowers and Blower Speed
III. AIR Fingers
Air finger operation
PS300/350 air finger with shutter plate
Current standard air finger all oven models
Performing a Test Bake
Configuration and Alignment
3D air finger label if present
Front-to-back uneven bake
PS300/350 Air Finger Shutter Adjustment
Do not
PS300/350-style air finger with adjustable shutter plate
Time of Delivery TOD
IV. Oven Capacity
Conveyor Speed and Bake Time
Belt Time
Part Number Reference Speed Controllers
Original-style speed controller
Current-style speed controller
Conveyor Speed Controller and Drive Motor
Part Number Reference Pickup Assemblies
Current-style pickup assembly see Figures
Preparing to Service the Speed Controller
Controller/Motor Failure
Current pickup assembly side view
Current pickup assembly End view
Field Tester for Conveyor Drive Motor
If the Gear Motor Runs AT Full Speed
Basic Troubleshooting Flowcharts
If the Gear Motor will not RUN AT ALL
Check the magnetic pickup on the motor
Initial Troubleshooting
Replacing the Magnetic Pickup
Unshielded Pickup Wires on Early PS360-series ovens
Connections for pickup test
Conveyor Control Pickup Test Conveyor Motor Test
Appendices
Servicing Components
Servicing Components
Servicing Components
Servicing Components
Servicing Components
Servicing Components
Compatibility
Subject
General
Application
Conveyor Speed Controller Kit for PS200R68-series ovens
Bulletin No. MM-189
II. Temperature Controller
34983 B
Part Number Reference Temperature Controllers
28071-0012 a
28071-0018 a
COM
Description
Digital Temperature Controller
Controller Types
Before you Begin
Electrical Connections
Variable Pulse Output System
Jumper Setting
Temperature
Diagnostic Error Messages
Digital Temperature Controller Operating Instructions
Middleby Corporation Service Hotline
Servicing Components
Servicing Components
Location
Operation and Troubleshooting
III. High Limit Control Module
Part Number Reference High Limit Control Mod- ules
High Limit Conversion Kit for PS300, 310, 350, & 360 Ovens
Appendix Instructions for Service Kit
Installation
Not to Scale
For Ovens with an Analog Temperature Controller
For Ovens with a Digital Temperature Controller
Testing the Installation
United Electric Model
Ovens with a cooldown feature Replacement
Ovens without a cooldown feature Replacement
Middleby Corporation Service Hotline
Thermocouple Functions
Troubleshooting
IV. Thermocouples
Part Number Reference Thermocouples
Servicing Components
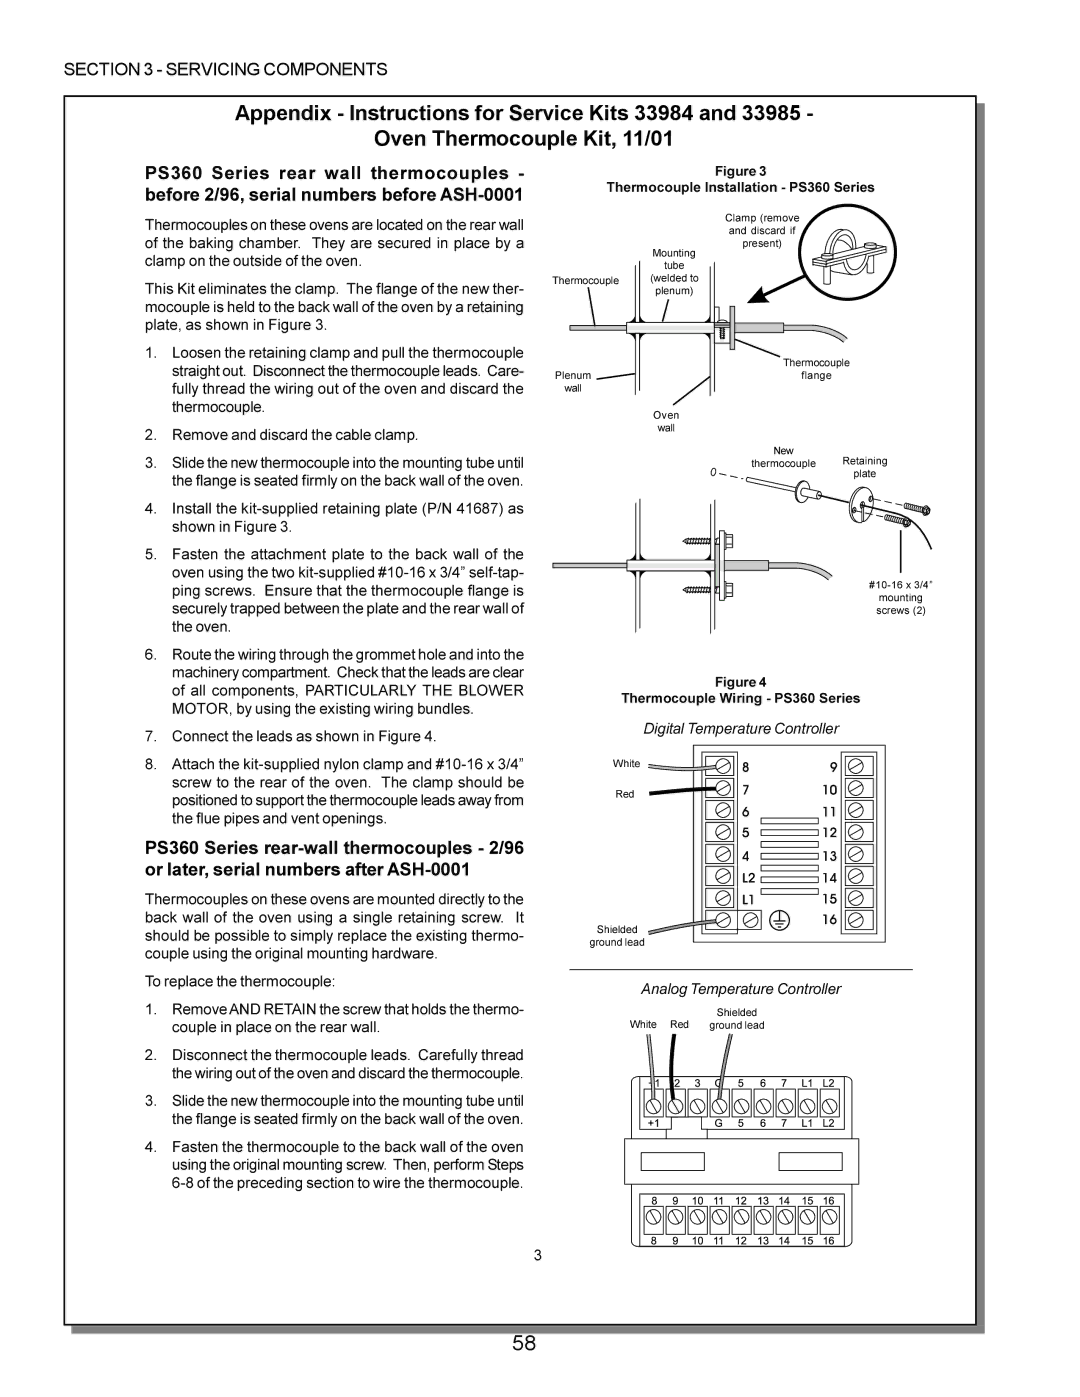
Oven Thermocouple Kit
PS200 Series before 2/96, serial numbers before ASH-0001
Thermocouple Wiring PS360 Series
Analog Temperature Controller Digital
PS536
Thermocouple Wiring PS555
PS555 Electric and PS555E
Servicing Components
High limit thermocouple
High limit thermocouple Position for ovens with
Thermocouple Wiring PS570S Late Left to Right Conveyor
Thermocouple Wiring PS555G and PS570G
Blowers
Early-style PS200 indirect drive assembly
Current PS200 indirect drive assembly
Blower motor fuses
Repositioning the blower motor
Bearing lubrication
Blower belt tension
Fan shaft alignment tool
Qty Part Number Description
Four-point alignment test for correct pulley alignment
Also available
PS360-series ovens
Blower motor fuses single-phase motors
Blower motor fuses three-phase motors
Inlet ring Blower wheel puller tool
Clockwise blower wheel
PS555/570-series ovens
PS570/570S blower configuration
Domino’s Q
Standard
Pizza Hut
Intl. Tricon
PS500-series blower wheel orientation
Blower belt tension Repositioning the blower motor
Bearing replacement and alignment
Part Number Reference Blower Centrifugal Switch
VI. Blower Motor Centrifugal Safety Switch PS360-SERIES
Air pressure safety switch models
PS360WB70/EWB with Wayne burner
PS360WB70/EWB with Midco burner
Servicing Components
Servicing Components
Servicing Components
Servicing Components
Flame Gate Orientation
PS570/570S flame gate adjustment
IX. PS570/570S Flame Gate
Part Number Reference Flame Gate
Part Number Reference
PS200-series gas train
PS310, PS314, PS360 or PS360WB gas train
GAS Train and Burner System
PS360EWB or PS360WB70 gas train with Wayne burner
PS360EWB or PS360WB70 gas train with Midco burner
PS570G or PS555 gas train
PS570S gas train
Part Number Reference Gas Orifices and Gas Conversion Kits
Wayne burner exploded view
Solenoid valve vs. Modulating valve
Component Identification
Burner type
Flame targets
Pilot/Ignitor Assembly
End of burner without flame target Showing pilot shield
Gas Pressure
Flame structure
Flame Rectification
Voltage
Burner Blower Motor
Air shutter adjustment
Temperature
Pilot Application
High Flame Solenoid Valve if so equipped
Low Flame Bypass Orifice
Burner Transformer
Burner Motor Relay
Modulating Gas Valve if so equipped
Pilot pressure
Burrs in pilot adjustment portal
Combination Gas Control Valve
Ignition Module
Gas Conversion Kits
Burner and Gas Train Troubleshooting
100
Combination Gas Valve
Voltage Checks for Ignition Module Combination Gas Valve
101
Check Spark Ignitor
Component Checks Reset System After Lockout
102
Check Spark Ignition Circuit
103
Troubleshooting Flowcharts
104
105
106
107
108
Appendix Instructions for Service Kit 30185 Pilot Tee, 3/94
109
110
111
112
113
114
115
116
Appendix Instructions for Service Kit Ignition Module, 11/90
117
118
Appendix Instructions for All Gas Conversion Kits
119
120
English
121
Preparation and Disassembly
IV. Pilot Orifice Conversion
122
VII. GAS Leak Test VIII. Inlet Pressure Check
123
124
Manifold Pressure Adjustment
For Ovens with Wayne Burner, Propane to Natural Gas, 8/00
125
126
NUTS.3
127
128
129
IX. Pilot Pressure Adjustment
130
Preparation
Pilot Orifice Replacement
131
GAS Leak Test
Main Orifice Replacement
LOW Flame Orifice Replacement PS360WB70 only
132
Inlet Pressure Check
Pilot Pressure Adjustment
Main Manifold Pressure Adjustment
133
36856
134
Conversion Labeling
Propane
135
Propane to Natural Gas Installation Instructions
136
137
14 W.C./34.9mbar
138
Natural
139
Part No. Description
PS200 electric early with mercury Contactors and fuses
140
XI. Electric Oven Heating System
Individual element electrical data
Removing elements
141
PS310/360-series ovens
Electrical leads disconnected
142
143
Element bank removed spacer bracket visible
PS555 ovens
144
145
PS555 electric oven heating element removal
146
Mercury Contactor Replacement
147
148
149
Component Wiring
150
II. PS200-SERIES Ovens
151
152
153
154
155
156
157
158
159
160
III. PS360-SERIES Ovens Electrical Wiring Diagrams
161
162
163
164
165
166
III. PS555/570-SERIES Ovens Electrical Wiring Diagrams
167
168
169
170
171
Check and clean igniter assembly
Check and clean blow out machinery/control compartment
Check and clean blow out main blower motors
Check and clean blow out and brush axial fans
173
Multiply To Obtain
174
175
Pressure conversion chart
176
177
178
179
180