Setting the aspect ratio
You can change the aspect ratio of the input video signal (or the ratio of width to height of the image). Change the setting according to the type of the input video signal.![]()
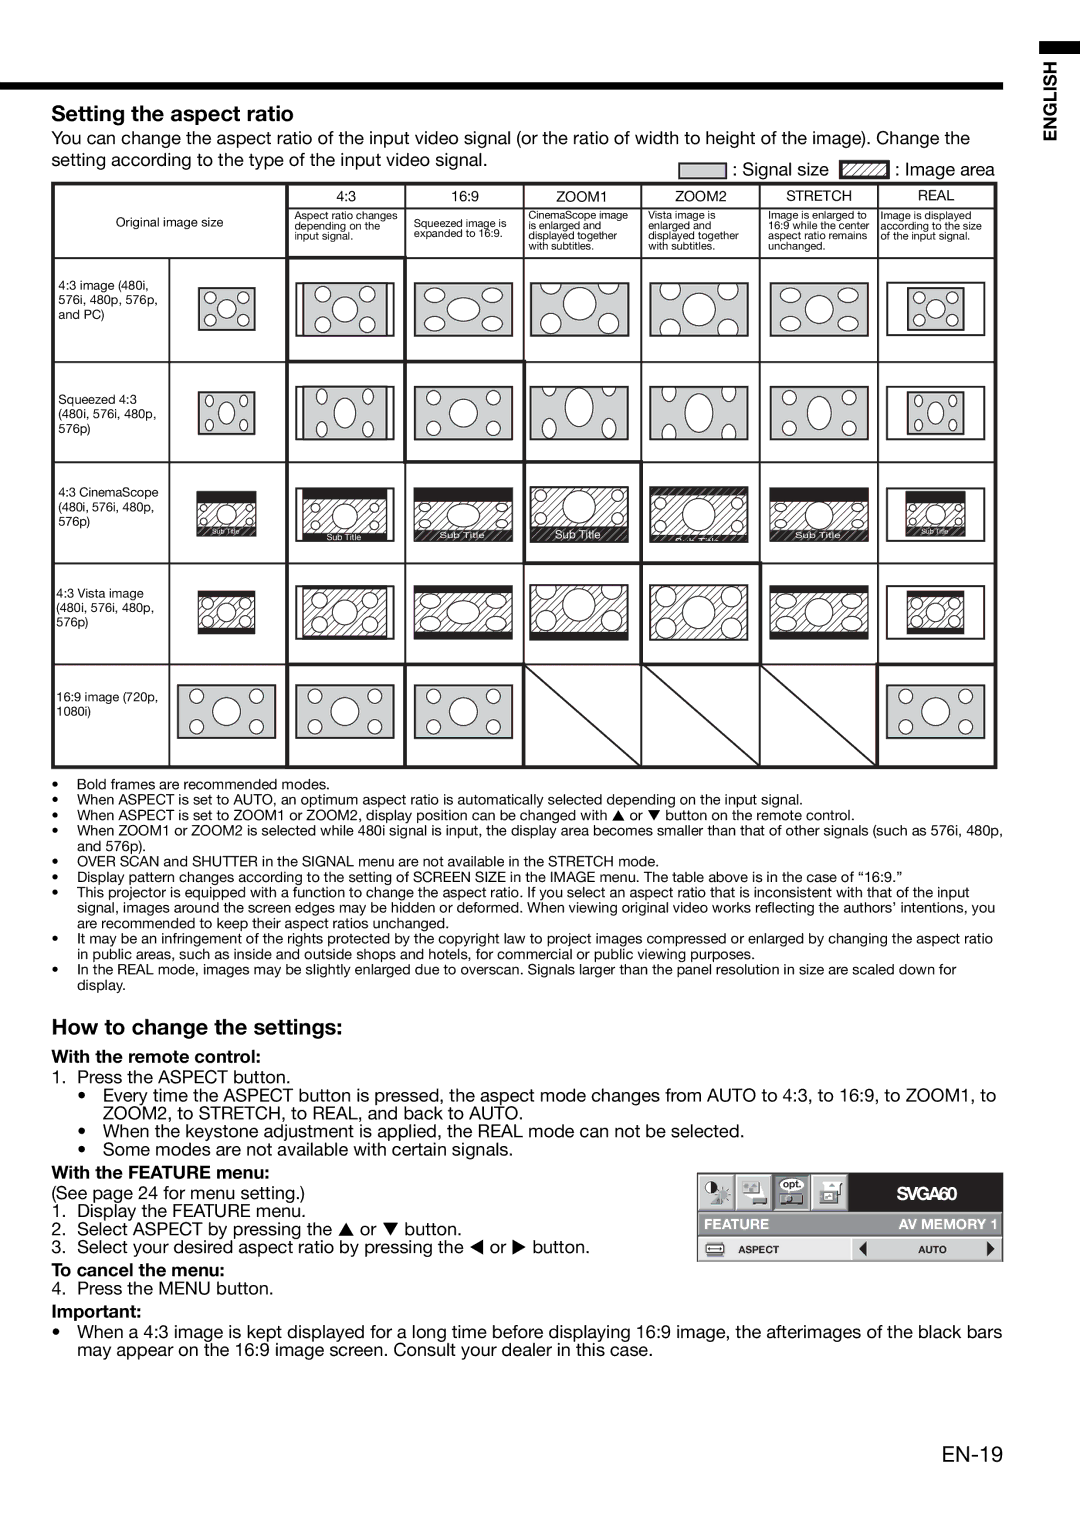
![]()
| 4:3 | 16:9 | ZOOM1 | ZOOM2 | STRETCH | REAL |
Original image size | Aspect ratio changes | Squeezed image is | CinemaScope image | Vista image is | Image is enlarged to | Image is displayed |
depending on the | is enlarged and | enlarged and | 16:9 while the center | according to the size | ||
| input signal. | expanded to 16:9. | displayed together | displayed together | aspect ratio remains | of the input signal. |
|
|
| with subtitles. | with subtitles. | unchanged. |
|
4:3 image (480i, 576i, 480p, 576p, and PC)
Squeezed 4:3 (480i, 576i, 480p, 576p)
4:3 CinemaScope |
|
|
|
|
(480i, 576i, 480p, |
|
|
|
|
576p) |
|
|
|
|
Sub Title | Sub Title | Sub Title | Sub Title | Sub Title |
Sub Title |
| |||
|
|
| Sub Title |
|
4:3 Vista image (480i, 576i, 480p, 576p)
16:9 image (720p, 1080i)
•Bold frames are recommended modes.
•When ASPECT is set to AUTO, an optimum aspect ratio is automatically selected depending on the input signal.
• When ASPECT is set to ZOOM1 or ZOOM2, display position can be changed with or button on the remote control.
•When ZOOM1 or ZOOM2 is selected while 480i signal is input, the display area becomes smaller than that of other signals (such as 576i, 480p, and 576p).
•OVER SCAN and SHUTTER in the SIGNAL menu are not available in the STRETCH mode.
•Display pattern changes according to the setting of SCREEN SIZE in the IMAGE menu. The table above is in the case of “16:9.”
•This projector is equipped with a function to change the aspect ratio. If you select an aspect ratio that is inconsistent with that of the input signal, images around the screen edges may be hidden or deformed. When viewing original video works reflecting the authors’ intentions, you are recommended to keep their aspect ratios unchanged.
•It may be an infringement of the rights protected by the copyright law to project images compressed or enlarged by changing the aspect ratio in public areas, such as inside and outside shops and hotels, for commercial or public viewing purposes.
•In the REAL mode, images may be slightly enlarged due to overscan. Signals larger than the panel resolution in size are scaled down for display.
How to change the settings:
With the remote control:
1.Press the ASPECT button.
•Every time the ASPECT button is pressed, the aspect mode changes from AUTO to 4:3, to 16:9, to ZOOM1, to ZOOM2, to STRETCH, to REAL, and back to AUTO.
•When the keystone adjustment is applied, the REAL mode can not be selected.
•Some modes are not available with certain signals.
With the FEATURE menu: |
|
|
|
|
|
|
|
|
|
|
| |
|
|
|
|
|
| opt. |
|
|
|
| ||
(See page 24 for menu setting.) |
|
|
|
|
|
|
|
|
|
| ||
|
|
|
|
|
|
|
|
|
| SVGA60 | ||
1. | Display the FEATURE menu. |
|
|
|
|
|
|
|
|
|
|
|
FEATURE |
|
|
|
| AV MEMORY 1 | |||||||
2. | Select ASPECT by pressing the or button. |
|
|
|
| |||||||
3. | Select your desired aspect ratio by pressing the or button. |
|
|
| ASPECT |
|
|
|
| AUTO | ||
|
|
|
|
|
|
| ||||||
|
|
|
|
|
|
|
|
|
|
|
|
|
To cancel the menu:
4.Press the MENU button.
Important:
• When a 4:3 image is kept displayed for a long time before displaying 16:9 image, the afterimages of the black bars may appear on the 16:9 image screen. Consult your dealer in this case.
ENGLISH