Manuals
/
Moxa Technologies
/
Computer Equipment
/
Computer Hardware
Moxa Technologies
C168P
user manual
Opt8C/Opt8D, P1P2 P3 P4, P5 P6 P7 P8, Opt8F/Opt8Z
Models:
C168P
1
12
80
80
Download
80 pages
46.89 Kb
9
10
11
12
13
14
15
16
Troubleshooting
Specification
Install
Signal
RS-485 Cable Wiring for Opt8J
Configuring Board and Port
Problem Report Form C168P
Driver Setup
Return Procedure
Default Settings
Page 12
Image 12
Page 11
Page 13
Page 12
Image 12
Page 11
Page 13
Contents
C168P User’s Manual
May 1999 7th Edition
Universal 8 Port Serial Board
support@moxa.com.tw
Copyright Notice
Trademarks
Disclaimer
C168P User’s Manual
MOXA Internet Services
About This Manual
Chapter 2 Hardware Installation
Chapter 3 Software Installation
Chapter 5 Connection Option Opt8x and Cable Wiring
Hardware Installation
Software Installation
Serial Programming Tools
Table of Contents
Connection Option Opt8x and Cable Wiring
Troubleshooting
Technical Reference
The Standard Multiport Async Solutions
Introduction
Overview
Switch
Quick Installation
Hardware Configuration Method
Jumper
Introduction
Operating System Support
MOXA Serial Comm Tools
Wide Applications
Features
Check List
Opt8A/Opt8B/Opt8S
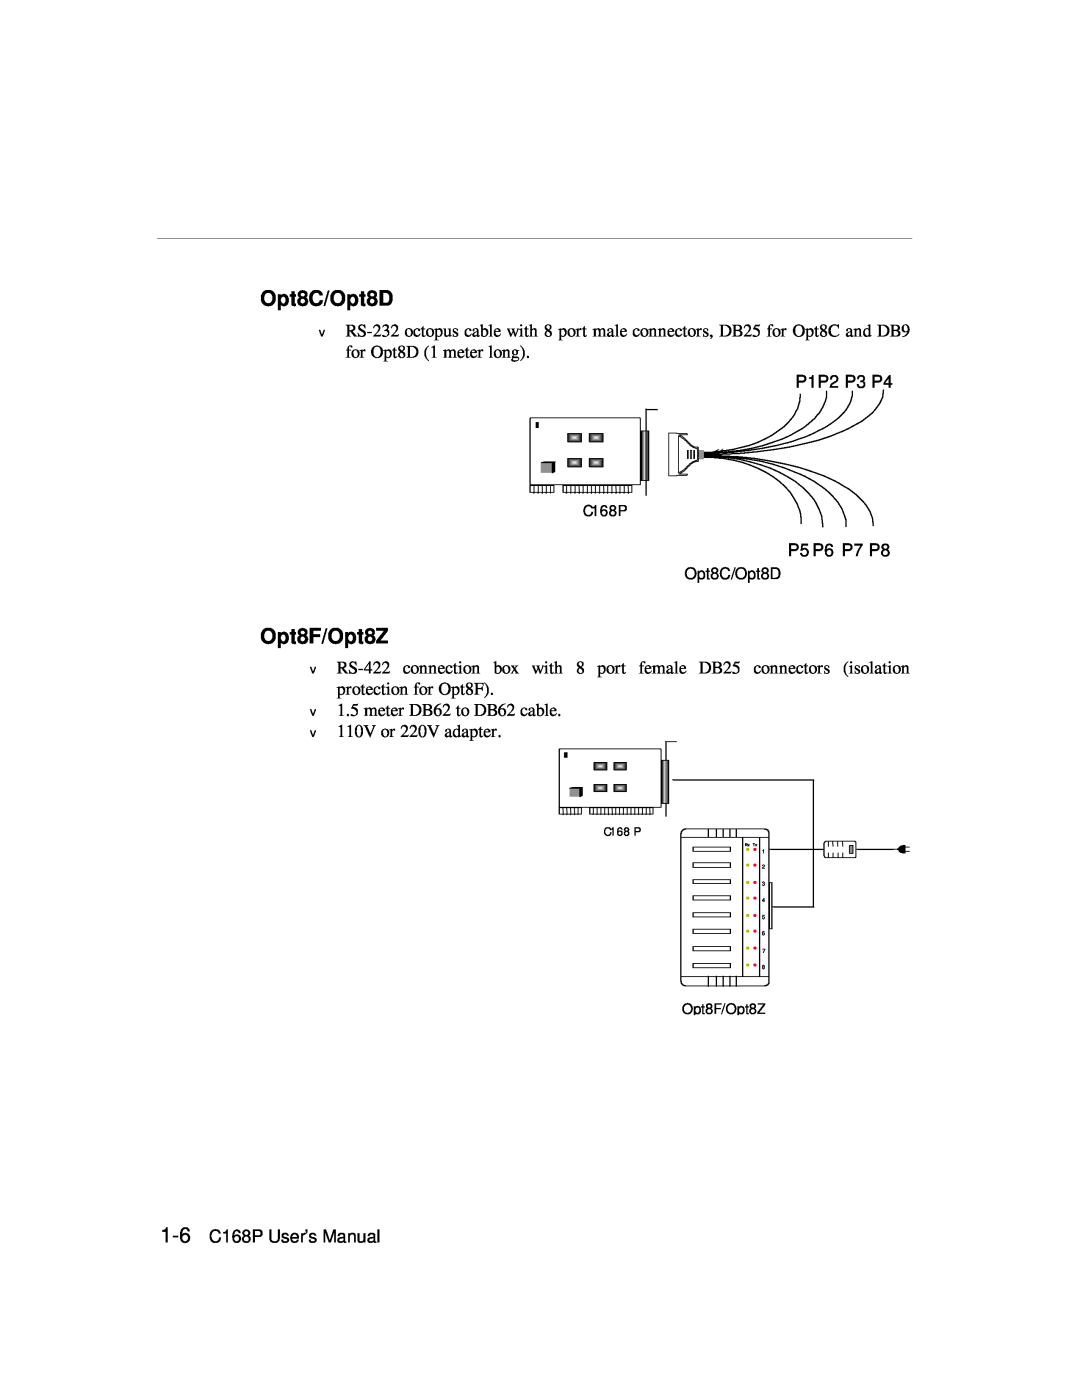
Opt8C/Opt8D
P1P2 P3 P4
P5 P6 P7 P8
Opt8F/Opt8Z
Opt8J
RS-422/485 Port Switch of Opt8J
RS-422 Mode
Opt8J
Installation Guide
RS-485 Mode
Hardware Installation
Default Settings
C168P
Quick Hardware Installation
How to Do Quick Hardware Installation
Hardware Installation with IO-IRQ Utility
IO-IRQ Utility and Hardware Configuration
2-4 C168P User’s Manual
2. Select “Smartio/Industio ISA Family” and press ENTER key
Speed
5. Press F10 to save the configuration and exit the utility
2-8 C168P User’s Manual
Software Installation
Windows NT
Installing Driver
5. Select “MOXA Smartio/Industio Family multiport board” in the “Select OEM Option” dialog box, and then click OK to enter the “Moxa Smartio/Industio Configuration Panel” dialog box to start the installation
3-4 C168P User’s Manual
Port Number
Rx FIFO Trigger
Tx FIFO Size
3-6 C168P User’s Manual
Configuring Board and Port
In this configuration panel, you may
Windows 95/98
Updating Driver
Removing Driver
1. Run Setup95.exe in the driver diskette
Note ! Go directly to the step 7 if you need not change any setting
3-12 C168P User’s Manual
If error message like “Smartio C168 Series CAP=0x0180, port 1=COM3
3-14 C168P User’s Manual
Software Installation
3-16 C168P User’s Manual
Installing Driver
Driver Setup
3-18 C168P User’s Manual
Software Installation
3-20 C168P User’s Manual
You may now enter/modify each port’s configuration. These displayed values are the port initial values as driver is loaded
Loading Driver
Unloading Driver
3-24 C168P User’s Manual
Installation
Serial Programming Tools
Windows NT and Windows 95/98
PComm Programming Library
Utilities
4-2 C168P User’s Manual
Diagnostic for MOXA boards only
Monitor for MOXA boards under Windows NT Only
4-4 C168P User’s Manual
Terminal Emulator
DOS API-232 Library
Data Scope
4-6 C168P User’s Manual
There are three major functions in Data Scope utility
RS-485 Programming for Opt8J
Diagnose
There are 2 solutions to control RS-485 2-wire transmission
Solution
4-10 C168P User’s Manual
RS-232 Cable Wiring for Opt8A/B/C/D/S
Connection Option Opt8x and Cable Wiring
The followings are pin assignments for various connection options
Opt8A/S DCE, DB25 Female
2 RxD 3 TxD 4 CTS 5 RTS 6 DTR 7 GND 8 DCD 20 DSR
Opt8B/C DTE, DB25 Male
Type 1 To connect C168P to a DTE device
Straight-through Cable Opt8A/S
Null Modem Cable Opt8B/C
Type 2 To connect C168P to a DCE device
5-4 C168P User’s Manual
Connection Option Opt8x and Cable Wiring
5-6 C168P User’s Manual
Opt8A/S
DTE Device
RS-422 Cable Wiring for Opt8J/F/Z
RS-422 Pinouts for Opt8J/F/Z
Opt8J/F/Z
2 RxD+B 3 TxD+B 14 RxD-A 16 TxD-A 7 GND 4 CTS+B 5 RTS+B
RTS-A
RS-422 Point-to-point
Opt8J/F/Z
RS-422 Device
RS-422 Device N
RS-485 Cable Wiring for Opt8J
Opt8J
RS-422/485 Impedance Matching
5-12 C168P User’s Manual
Troubleshooting
General Troubleshooting
Hardware causes and solutions
Hardware Causes and Solutions
Software Causes and Solutions
Step Step Step Step Step Step
A Io-irq
Step 8. Power off the PC
3. The COM number of the C168P conflicts with others
4. Windows NT system panic blue screen
6-6 C168P User’s Manual
Specifications
Technical Reference
Appendix
A-2 C168P User’s Manual
PC I/O Port Address Map
IO/ Address
Device
DB62 Connector Pinouts
Signal
A-4 C168P User’s Manual
Pin no
Problem Report Form C168P
3. Moxa hardware settings
Customer name Company Tel Fax EmailDate
1. Moxa Product C168P Serial Number 2. Moxa Driver Version
Return Procedure
Top
Page
Image
Contents