HIGH TEMPERATURE
SEALANT
INNER FLEX
LINER
OUTER FLEX
LINER
Do not clamp the
flexible
aluminium liner.

12

USING FLEXIBLE VENT COMPONENTS

Use only approved aluminum flexible liner kits marked:

“Wolf Steel Approved Venting” as identified by the stamp only on the 7” outer liner.

For safe and proper operation of the fireplace, follow the venting instructions exactly.

All inner exhaust and outer intake vent pipe joists may be sealed using either Red RTV high temp silicone seal- ant or Black high temp Mill Pac with the exception of the fireplace exhaust flue collar which must be sealed using Mill Pac (not supplied).

Spacers are attached to the inner flex liner at predetermined intervals to maintain a 1-1/4” air gap to the outer flex liner. These

spacers must not be removed.

HORIZONTAL AIR TERMINAL INSTALLATION

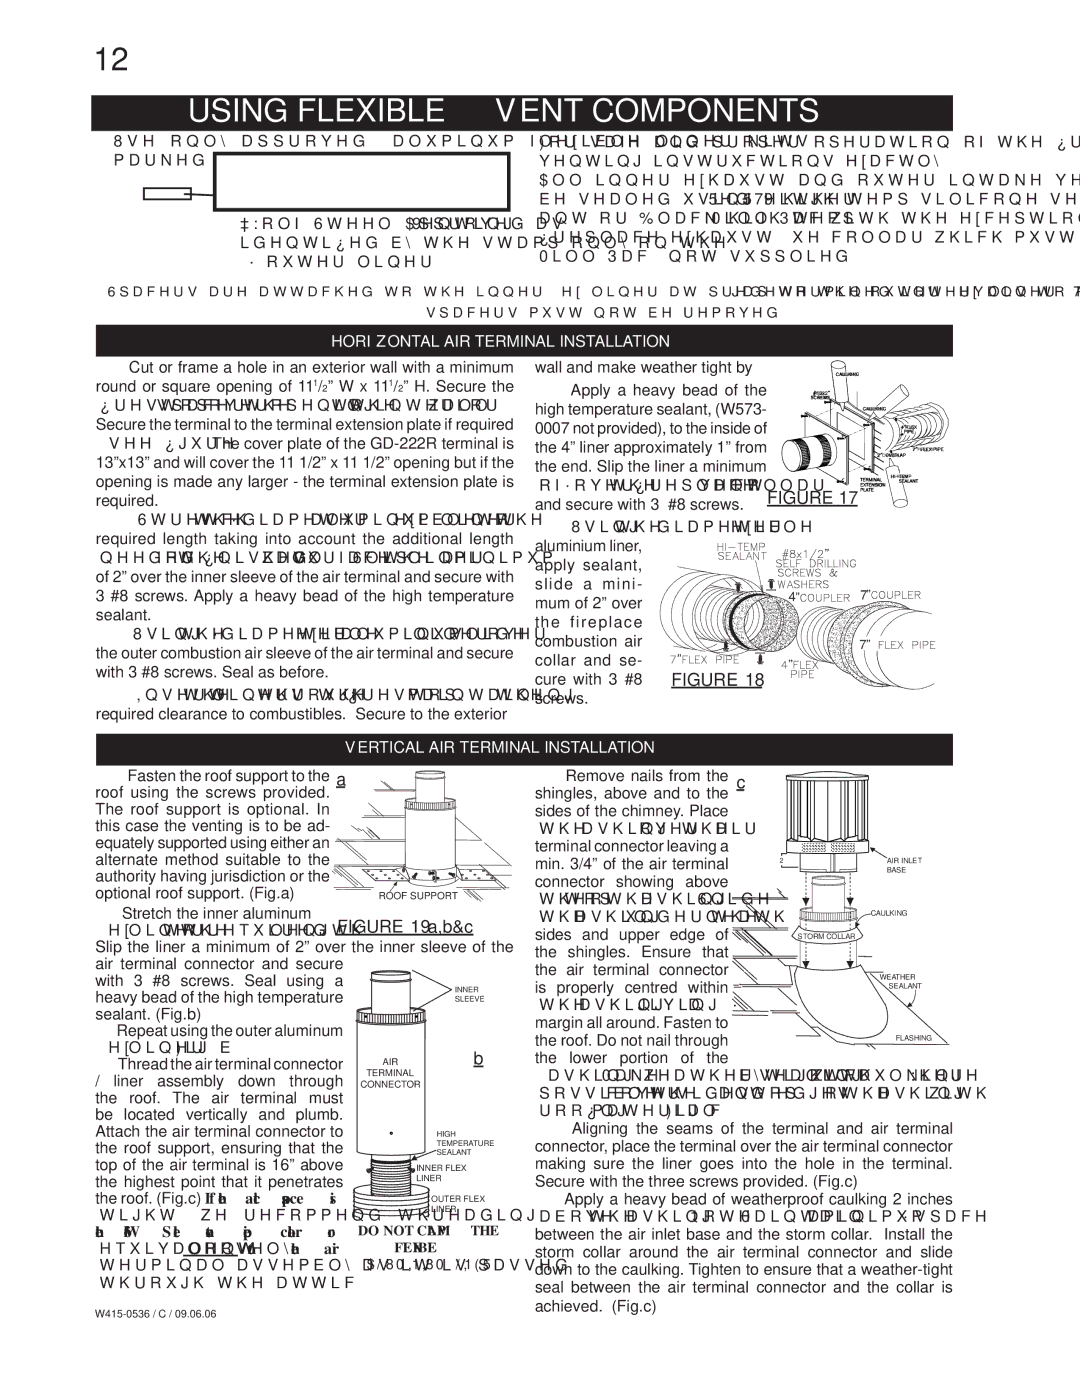
1.Cut or frame a hole in an exterior wall with a minimum round or square opening of 111/2” W x 111/2” H. Secure the firestop spacer over the opening to the interior wall.

Secure the terminal to the terminal extension plate if required (see figure 18). The cover plate of the GD-222R terminal is 13”x13” and will cover the 11 1/2” x 11 1/2” opening but if the opening is made any larger - the terminal extension plate is required.

2.Stretch the 4” diameter aluminum flexible liner to the required length taking into account the additional length needed for the finished wall surface. Slip the liner a minimum of 2” over the inner sleeve of the air terminal and secure with 3 #8 screws. Apply a heavy bead of the high temperature sealant.

3.Using the 7” diameter flexible aluminum liner, slide over the outer combustion air sleeve of the air terminal and secure with 3 #8 screws. Seal as before.

4.Insert the liners through the firestop maintaining the required clearance to combustibles. Secure to the exterior

wall and make weather tight by

CAULKING


5. Apply a heavy bead of the

SCREWS


high temperature sealant, (W573-

#10x2"


CAULKING

0007 not provided), to the inside of


PIPE


4"FLEX

the 4” liner approximately 1” from

2"

OVERLAP


7" FLEX PIPE

the end. Slip the liner a minimum


HI-TEMP

of 2” over the fireplace vent collarfigure 17 PLATE


TERMINAL

SEALANT


EXTENSION


and secure with 3 #8 screws.


6.Using the 7” diameter flexible

aluminium liner,

apply sealant,


slide a mini-

4

7

mum of 2” over

the fireplace


combustion air


7

collar and se-

FIGURE 18


cure with 3 #8


screws.


VERTICAL AIR TERMINAL INSTALLATION

1. Fasten the roof support to the

a

roof using the screws provided.


The roof support is optional. In


this case the venting is to be ad-


equately supported using either an


alternate method suitable to the


authority having jurisdiction or the


optional roof support. (Fig.a)

ROOF SUPPORT

2. Stretch the inner aluminum

FIGURE 19a,b&c

flex liner to the required length.

Slip the liner a minimum of 2” over the inner sleeve of the

air terminal connector and secure


with 3 #8 screws. Seal using a

INNER

heavy bead of the high temperature

SLEEVE

sealant. (Fig.b)


3.Repeat using the outer aluminum

flex liner. (Fig.b)


b

4. Thread the air terminal connector

AIR

5. Remove nails from the

c

shingles, above and to the


sides of the chimney. Place


the flashing over the air


terminal connector leaving a


min. 3/4” of the air terminal

2”


connector showing above


the top of the flashing. Slide


the flashing underneath the


sides and upper edge of

STORM COLLAR

the shingles. Ensure that

the air terminal connector is properly centred within

the flashing, giving a 3/4”

margin all around. Fasten to

the roof. Do not nail through the lower portion of the

AIR INLET

BASE

CAULKING

WEATHER

SEALANT

FLASHING

/ liner assembly down

through

TERMINAL

CONNECTOR

the

roof. The air terminal must


be

located vertically and

plumb.


Attach the air terminal connector to the roof support, ensuring that the top of the air terminal is 16” above the highest point that it penetrates the roof. (Fig.c) If the attic space is tight, we recommend threading the Wolf Steel vent pipe collar or equivalent loosely onto the air terminal assembly as it is passed

through the attic.

W415-0536 / C / 09.06.06

flashing. Make weather-tight by sealing with caulking. Where possible, cover the sides and top edges of the flashing with roofing material. (Fig.c)

6.Aligning the seams of the terminal and air terminal connector, place the terminal over the air terminal connector making sure the liner goes into the hole in the terminal. Secure with the three screws provided. (Fig.c)

7.Apply a heavy bead of weatherproof caulking 2 inches above the flashing. Note: Maintain a minimum 2” space between the air inlet base and the storm collar. Install the storm collar around the air terminal connector and slide down to the caulking. Tighten to ensure that a weather-tight seal between the air terminal connector and the collar is achieved. (Fig.c)

Page 12
Image 12
Napoleon Fireplaces GD82PT, GD82NT Using Flexible Vent Components, Horizontal AIR Terminal Installation, Through the attic

GD82PT, GD82NT specifications

Napoleon Fireplaces has long been recognized for its exceptional quality and innovative designs in the world of home heating. Among its impressive lineup are the GD82PT and GD82NT gas fireplaces, two models that stand out for their remarkable features and technologies. These fireplaces provide an ideal combination of aesthetic appeal and functional performance, making them a popular choice for modern homes.

Both the GD82PT and GD82NT are direct vent gas fireplaces, meaning they efficiently draw air from the outside for combustion and exhaust the leftover gases outside, ensuring optimal indoor air quality. This system allows them to be installed in a variety of locations without the need for a traditional chimney, providing flexibility in design and placement.

One of the key features of these models is their large viewing area, which is enhanced by a minimalist design that eliminates bulky frames. This offers an unobstructed view of the mesmerizing flames, turning the fireplace into a stunning focal point in any room. Additionally, both models boast an impressive heating capacity, ensuring that they efficiently warm up spaces even in the coldest climates.

The GD82PT model comes with a traditional logset and ember bed, creating a classic look that many homeowners desire. It is designed to accommodate a 35,000 BTU input, providing substantial heat while still being energy efficient. The GD82NT, on the other hand, features a contemporary linear design, which appeals to those looking for a modern aesthetic in their living spaces. This model also includes a unique glass media option that allows for a sleek and stylish appearance.

Both fireplaces feature Napoleon's advanced electronic ignition system, which ensures a reliable startup every time. Furthermore, the built-in remote control allows users to adjust heat output and flame height with ease. These models are also equipped with a variable speed blower, enhancing heat circulation throughout the room, making them not only visually appealing but highly functional as well.

Safety is another priority for Napoleon. Both models come with a safety screen barrier, preventing accidental contact with the hot glass surface. The intelligent gas control system also includes an oxygen depletion sensor, automatically shutting off the gas supply if oxygen levels drop to unsafe levels.

In summary, the Napoleon GD82PT and GD82NT gas fireplaces exemplify cutting-edge technology and elegant design, providing warmth and ambience to any space. With their innovative features, customizable options, and a strong commitment to safety, these models represent the pinnacle of modern fireplace design.