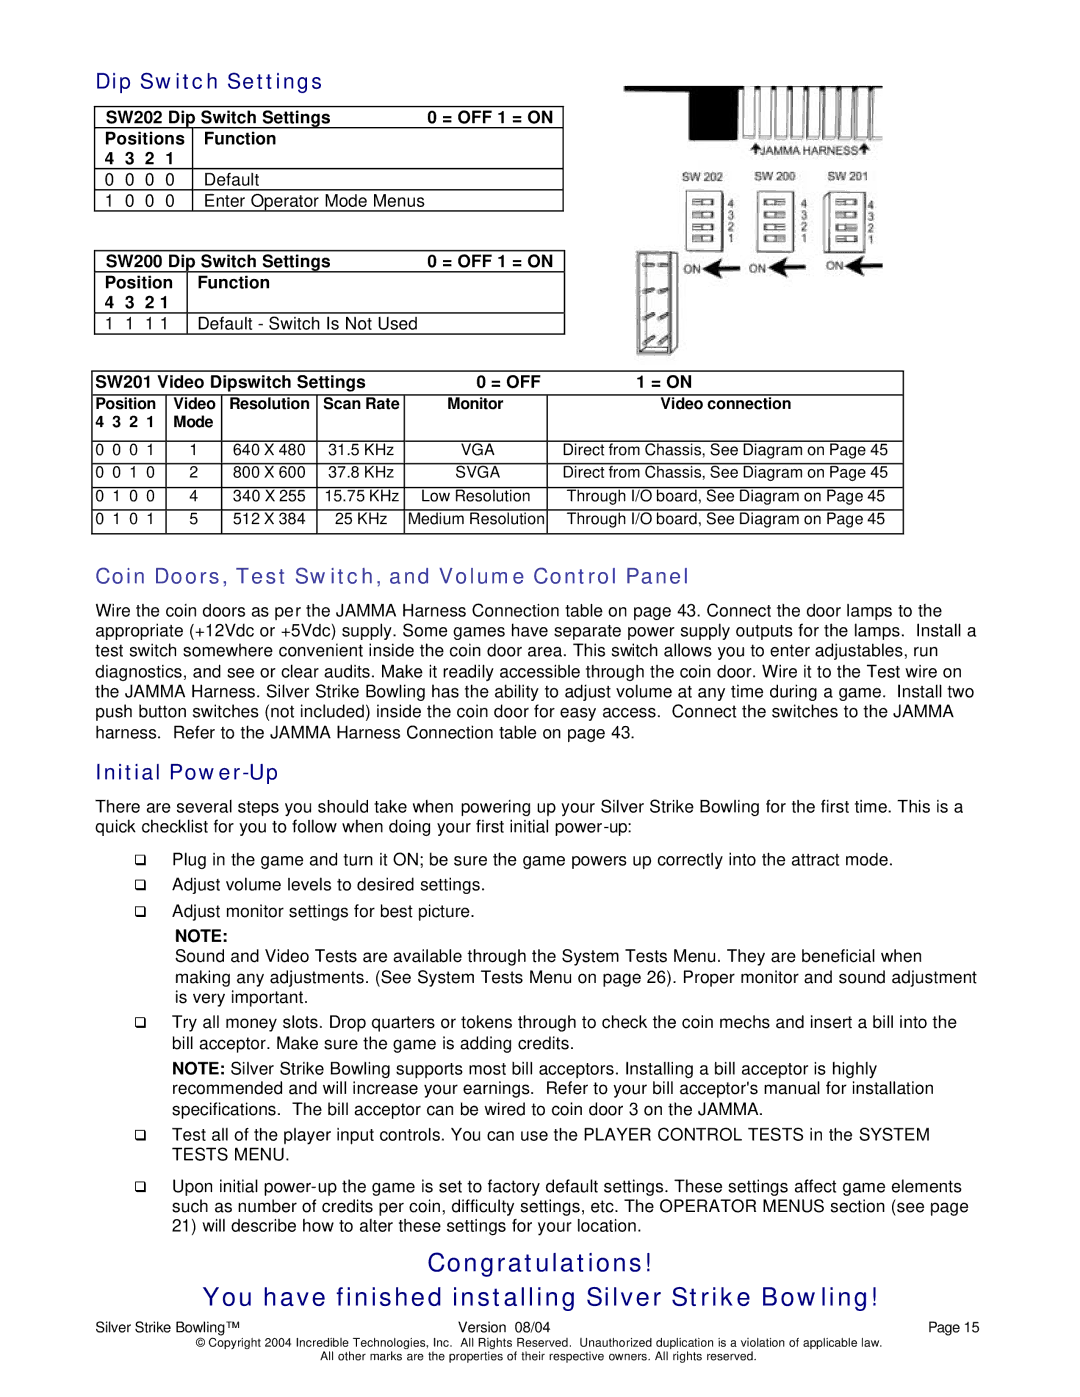
Dip Switch Settings
|
| SW202 Dip Switch Settings | 0 = OFF 1 = ON |
| ||||||||||
|
| Positions |
| Function |
|
|
|
| ||||||
|
| 4 | 3 | 2 | 1 |
|
|
|
|
|
|
|
| |
|
| 0 | 0 | 0 | 0 |
|
| Default |
|
|
|
| ||
|
| 1 | 0 | 0 | 0 |
| Enter Operator Mode Menus |
| ||||||
|
|
|
|
|
|
|
|
|
| |||||
|
| SW200 Dip Switch Settings | 0 = OFF 1 = ON |
| ||||||||||
|
| Position | Function |
|
|
|
| |||||||
|
| 4 | 3 | 2 1 |
|
|
|
|
|
|
|
| ||
|
| 1 | 1 | 1 1 | Default - Switch Is Not Used |
| ||||||||
|
|
|
|
|
|
|
| |||||||
| SW201 Video Dipswitch Settings | 0 = OFF | 1 = ON | |||||||||||
| Position |
| Video | Resolution | Scan Rate | Monitor |
| Video connection | ||||||
| 4 | 3 | 2 | 1 |
| Mode |
|
|
|
|
| |||
|
|
|
|
|
|
|
|
|
|
|
|
| ||
| 0 | 0 | 0 | 1 |
| 1 |
| 640 X 480 | 31.5 KHz | VGA |
| Direct from Chassis, See Diagram on Page 45 | ||
| 0 | 0 | 1 | 0 |
| 2 |
| 800 X 600 | 37.8 KHz | SVGA |
| Direct from Chassis, See Diagram on Page 45 | ||
|
|
|
|
|
|
|
|
|
|
|
|
| ||
| 0 | 1 | 0 | 0 |
| 4 |
| 340 X 255 | 15.75 KHz | Low Resolution |
| Through I/O board, See Diagram on Page 45 | ||
| 0 | 1 | 0 | 1 |
| 5 |
| 512 X 384 | 25 KHz | Medium Resolution |
| Through I/O board, See Diagram on Page 45 | ||
|
|
|
|
|
|
|
|
|
|
|
|
|
|
|
Coin Doors, Test Switch, and Volume Control Panel
Wire the coin doors as per the JAMMA Harness Connection table on page 43. Connect the door lamps to the appropriate (+12Vdc or +5Vdc) supply. Some games have separate power supply outputs for the lamps. Install a test switch somewhere convenient inside the coin door area. This switch allows you to enter adjustables, run diagnostics, and see or clear audits. Make it readily accessible through the coin door. Wire it to the Test wire on the JAMMA Harness. Silver Strike Bowling has the ability to adjust volume at any time during a game. Install two push button switches (not included) inside the coin door for easy access. Connect the switches to the JAMMA harness. Refer to the JAMMA Harness Connection table on page 43.
Initial Power-Up
There are several steps you should take when powering up your Silver Strike Bowling for the first time. This is a quick checklist for you to follow when doing your first initial
qPlug in the game and turn it ON; be sure the game powers up correctly into the attract mode.
qAdjust volume levels to desired settings.
qAdjust monitor settings for best picture.
NOTE:
Sound and Video Tests are available through the System Tests Menu. They are beneficial when making any adjustments. (See System Tests Menu on page 26). Proper monitor and sound adjustment is very important.
qTry all money slots. Drop quarters or tokens through to check the coin mechs and insert a bill into the bill acceptor. Make sure the game is adding credits.
NOTE: Silver Strike Bowling supports most bill acceptors. Installing a bill acceptor is highly recommended and will increase your earnings. Refer to your bill acceptor's manual for installation specifications. The bill acceptor can be wired to coin door 3 on the JAMMA.
qTest all of the player input controls. You can use the PLAYER CONTROL TESTS in the SYSTEM TESTS MENU.
qUpon initial
21)will describe how to alter these settings for your location.
Congratulations!
You have finished installing Silver Strike Bowling!
Silver Strike Bowling™ | Version 08/04 | Page 15 |
© Copyright 2004 Incredible Technologies, Inc. All Rights Reserved. Unauthorized duplication is a violation of applicable law.
All other marks are the properties of their respective owners. All rights reserved.