Reference Manual
Table of Contents
Where to Find It
Troubleshooting
Symbols and Conventions
Package Contents
Viewing Photographs
Taking Photographs
Maintenance and Optional Accessories
Menus and Settings
Retouching Photographs
Connections
Table of Contents
A, and M Modes
More on Photography All Modes
Recording and Viewing Movies 101
Live View
Special Effects 111
Playback and Deletion 118
Connections 132
Camera Menus 148
Vii
Viii
167
178
Technical Notes 199
AKeep the sun out of the frame
For Your Safety
AKeep out of reach of children
ADo not disassemble
AObserve proper precautions when handling batteries
AObserve caution when using the flash
AObserve proper precautions when handling the charger
AAvoid contact with liquid crystal
Xii
Battery Charger
Xiii
D5200
Xiv
Items prohibited by law from being copied or reproduced
Comply with copyright notices
Servicing the Camera and Accessories
Use Only Nikon Brand Accessories
Before Taking Important Pictures
Life-Long Learning
Camera Body
Getting to Know the Camera
Microphone and Speaker
Power Switch
Camera offers a choice of the following shooting modes
Mode Dial
Viewfinder
Viewfinder
Monitor can be angled and rotated as shown below
Monitor
Pbutton
Information Display
Hiding Shooting Information
Choose a scene h mode 0
Command Dial
Choose a special effect q mode 0
Choose a combination of aperture and shutter speed mode P 0
Choose an Aperture Mode M
Choose an aperture mode a 0
Set exposure Compensation Mode P, S, A, or
Choose a flash mode 0
Page
Setup 0 Retouch 0
Custom Settings 0
Recent settings or My Menu defaults to Recent settings 0
Camera Menus An Overview
Display the menus
Using Camera Menus
Highlight the icon for the current menu
Select a menu
Highlight a menu item
Position the cursor in the selected menu
Display options
Highlight an option
Insert the battery
Charge the battery
First Steps
Attach the strap
Autofocus is available with AF-S lenses. When using
Insert a memory card available separately
Attach a lens
Turn the camera on
Open the monitor
Choose a language and set the camera clock
Open the monitor as shown. Do not use force
Charging the Battery
Adjusting Viewfinder Focus
Focus the viewfinder
During Charging
Write Protect Switch
Removing the Battery
Formatting Memory Cards
Memory Cards
CPU Lenses with Aperture Rings
Clock Battery
Detaching the Lens
Camera Clock
Turn the camera on Check the battery level
Battery Level and Card Capacity
Check the number of exposures remaining
Description
When framing photographs
Select i or j mode
Point-and-Shoot Photography i and j Modes
Ready the camera
In-focus indicator Description
Check the indicators in the viewfinder
Image Sensor Cleaning
Press the shutter-release button halfway
Standby Timer
Shutter-Release Button
Built-in Flash
KPortrait
Creative Photography Scene Modes
PChild
ONight Portrait
Other Scenes
WPet Portrait
XCandlelight
List of release mode options will be displayed
Choose a release mode
Press IE/#
Choose from the following release modes
Continuous Release Modes
Memory Buffer
Buffer Size
Shooting Menu
Select a release mode
Self-Timer and Remote Control Modes
Mount the camera on a tripod
Take the photograph
WR-R10/WR-T10
Information, see the manual provided with
Display focus mode options
Focus Mode
Choose a focus mode
Focus
Predictive Focus Tracking
Continuous-servo Autofocus
Getting Good Results with Autofocus
AF-Assist Illuminator
Display AF-area mode options
AF-Area Mode
AF-Area Mode
Choose an AF-area mode
Focus Point Selection
Focus Lock
Focus
Lock focus
Recompose the photograph and shoot
A L Button
If the lens is equipped with an A-M or M/A-M mode
Set the lens focus-mode switch
Switch, slide the switch to M
Manual Focus
Exposure Indicator as Rangefinder
Selecting Manual Focus with the Camera
Focal Plane Position
Image Quality
Image Quality and Size
Display image quality options
Choose a file type
Fn Button
NEF RAW Images
Display image size options
Image Size
Choose an image size
Choose a size for Jpeg images
Using the Built-in Flash i, k, p, n, o, s, w, and gModes
Using the Built-in Flash
Using the Built-in Flash P, S, A, M, and 0Modes
Choose a flash mode 0 Take pictures
Display flash mode options
Flash Mode
Choose a flash mode
Flash modes available vary with shooting mode
Flash Modes
Choosing a Flash Mode
Shutter Speeds Available with the Built-in Flash
Mode Shutter speed
Aperture, Sensitivity, and Flash Range
Approximate range
ISO Sensitivity
Mode ISO sensitivity
Display ISO sensitivity options
Choose an ISO sensitivity
Auto
Select Interval timer shooting
Interval Timer Photography
Choose a starting time
Choose the interval
Interrupting Interval Timer Photography
Other Settings
Choose the number of intervals
Start shooting
Option Default
Settings Accessible from the Information Display
A, M
Exposure compensation S, A, M
Other Settings
Shutter Speed and Aperture
Mode Description
Lens Aperture Rings
Shutter Speed and Aperture
Mode P Programmed Auto
Frame a photograph, focus, and shoot
Flexible Program
Mode S Shutter-Priority Auto
Choose a shutter speed
To take photographs in shutter-priority auto
Mode a Aperture-Priority Auto
Choose an aperture
To take photographs in aperture-priority auto
Mode M Manual
Exposure Indicator
Choose aperture and shutter speed
Long Time-Exposures M Mode Only
Close the shutter
Open the shutter
Metering
Exposure
Display metering options
Choose a metering method
Meter exposure
Autoexposure Lock
Lock exposure
Recompose the photograph
Mode Setting
Adjusting Shutter Speed and Aperture
Exposure Compensation
Display exposure compensation options
Choose a value
Mode M
Using a Flash
E N Button
Display flash compensation options
Flash Compensation
M Y and E N Buttons
Button
Optional Flash Units
Active D-Lighting
Preserving Detail in Highlights and Shadows
Display Active D-Lighting options
Choose an option
Active D-Lighting Versus D-Lighting
Active D-Lighting
Display HDR High Dynamic Range Options
High Dynamic Range HDR
Framing HDR Photographs
Multiple Exposure
Enable multiple exposure mode
Creating a Multiple Exposure
Select Multiple exposure
Choose the amount of gain
Choose the number of shots
Highlight Number of shots and press
Continuous high-speed and continuous
Interrupting Multiple Exposures
Multiple Exposure Indicator
$flashes Shooting in progress
Multiple Exposures
Display white balance options
White Balance
Choose a white balance option
Option Description Auto
Iday white fluorescent 5000 K Mshade 8000 K Fn Button
Color Temperature
Select a white balance option
Fine-Tuning White Balance
Fine-tune white balance
Save changes and exit
Measuring a Value for Preset White Balance
Preset Manual
Light a reference object
Select Measure
Check the results
Measure white balance
Preset White Balance
Measuring Preset White Balance
Other Methods for Measuring Preset White Balance
Studio Settings
Copying White Balance from a Photograph
Lighting setting
Bracketing
Choose a bracketing option
Highlight the current bracketing setting and press J
Display bracketing options
Select a bracketing increment
Bracketing Progress Indicator
Disabling Bracketing
Exposure Bracketing
Selecting a Picture Control
Picture Controls
Display Picture Control options
Select a Picture Control
Modifying Picture Controls
Adjust settings
Display the Picture Control menu
Highlight the desired Picture Control and press
Picture Control Settings
Picture Control Grid
Previous Settings
Custom Picture Controls
Filter Effects Monochrome Only
Select Manage Picture Control
Creating Custom Picture Controls
Select Save/edit
Edit the selected Picture Control
Name the Picture Control
Existing Picture Control to use the default
Manage Picture Control Rename
Manage Picture Control Delete
Saving Custom Picture Controls
Sharing Custom Picture Controls
Framing Photographs in the Monitor
Rotate the live view switch
Position the focus point
Take the picture
Choosing a Focus Mode
Focusing in Live View
Display focus options
Choose a focus option
Display AF-area modes
Choosing an AF-Area Mode
Subjects. Use the multi selector to select the focus point
Normal-area AF
Subject Tracking
Choosing the Focus Point
Live View Display
Live View/Movie Recording Display Options
Automatic Scene Selection Scene Auto Selector
Close up
Count Down Display
Shooting in Live View Mode
100
Using Autofocus in Live View
Recording Movies
Movies can be recorded in live view mode
Start recording
101
102
End recording
Taking Photographs During Movie Recording
Maximum Length
103
Movie Settings
Using an External Microphone
Select Movie settings
Choose movie options
104
Hdmi and Other Video Devices
105
106
Viewing Movies
Following operations can be performed
2 Icon
Trimming Movies
Editing Movies
Display a movie full frame
Choose a starting or end point
Delete frames
Select Choose start/end point
Save the copy
108
109
Trimming Movies
Retouch Menu
View the movie and choose a frame
Saving Selected Frames
Choose Save selected frame
Create a still copy
Shooting with Special Effects
Special effects can be used when recording images
111
1Icon
Night Vision
112
3Selective Color
113
Options Available in Live View
Adjust options
GColor Sketch
Select live view
Return to the live view display
Miniature Effect
115
Press J to display miniature effect options
Select a color
3Selective Color
Choose the color range
116
117
118
Full-Frame Playback
File Information
Photo Information
Highlights
119
120
RGB Histogram
Playback Zoom
Histograms
121
Shooting Data
GPS Data
Overview Data
122
Data for movies are for start of recording
123
Thumbnail Playback
Calendar Playback
124
Use Description
125
Taking a Closer Look Playback Zoom
Select an image
Protecting Photographs from Deletion
Press the a L button
126
Full-Frame, Thumbnail, and Calendar Playback
Deleting Photographs
Press the O button
Press the O button again
Selected Deleting Selected Photographs
Playback Menu
Choose Select Date
Select Date Deleting Photographs Taken on a Selected Date
Highlight a date
Select the highlighted date
Slide Shows
Adjust slide show settings
Select Slide show
130
131
Start the slide show
Start the computer and insert the installer CD
Installing ViewNX
Start the installer
Select a language
Remove the installer CD from the CD-ROM drive
Exit the installer
133
System Requirements
Copy Pictures to the Computer
Using ViewNX
Choose how pictures will be copied to the computer
Start Nikon Transfer 2 component of ViewNX
Editing Movies
View Pictures
Printing Pictures
Click Start Transfer
136
Connecting Cables
For More Information
During Transfer
Connect the camera using the supplied UC-E17 USB cable
Connecting the Printer
Printing Photographs
Turn the camera off Connect the USB cable
Printing Pictures One at a Time
Adjust printing options
Select a picture
Display printing options
Start printing
139
Date Imprint
Printing Multiple Pictures
Display the PictBridge menu
140
Select pictures or choose a date
141
Press W Q again to return to the date selection dialog
142
Order item in the playback menu
Creating a Dpof Print Order Print Set
Select pictures
Display imprint options
Complete the print order
Select imprint options
144
Press J to complete the print order
Standard Definition Devices
Viewing Photographs on TV
Turn the camera off
Connect the A/V cable as shown
Playback Volume
Close the Connector Cover
High-Definition Devices
Connect the Hdmi cable as shown
Hdmi Options
Output Resolution
Device Control
147
148
Playback Folder
Playback menu contains the following options
Choose a folder for playback
Image Review
Playback Display Options
Rotate Tall
149
Select Yes to reset shooting menu settings
Reset Shooting Menu
150
Shooting menu contains the following options
Auto Distortion Control
Storage Folder
151
Folder Names
Color Space
152
Nikon Software
Adjust ISO sensitivity 0
ISO Sensitivity Settings
Long Exposure NR
High ISO NR
154
Auto ISO Sensitivity control
Maximum Sensitivity/Minimum Shutter Speed
Maximum sensitivity and minimum shutter speed
Custom Settings are used to customize camera settings
ACustom Settings
155
To suit individual preferences
Reset Custom Settings
Following Custom Settings are available
156
A2 Number of Focus Points
A1 AF-C Priority Selection
157
Option Description Release
When the viewfinder is used in AF-Amode
Available when both of the following conditions are met
158
Eis chosen and the center focus point is selected
B1 EV Steps for Exposure Cntrl
A4 Rangefinder
C1 Shutter-Release Button AE-L
159
C2 Auto off Timers
C3 Self-Timer
160
D1 Beep
C4 Remote on Duration ML-L3
D2 Viewfinder Grid Display
D3 ISO Display
D4 File Number Sequence
D5 Exposure Delay Mode
162
File Number Sequence
D6 Print Date
Date Counter
163
E1 Flash Cntrl for Built-in Flash
E2 Auto Bracketing Set
164
F1 Assign Fn Button
165
Choose the role played by the Fn button
F2 Assign AE-L/AF-L Button
F5 Reverse Indicators
F3 Reverse Dial Rotation
F4 Slot Empty Release Lock
BThe Setup Menu Camera Setup
Setup menu contains the following options
167
Monitor Brightness
Format Memory Card
Highlight Yes
Press J
Info Display Format
Select a shooting mode option
Select a format and background color
169
Classic display is shown below
170
Auto Info Display
Frame a featureless white object in the viewfinder
Image Dust Off Ref Photo
Choose a start option
Flicker Reduction
Video Mode
Acquire Image Dust Off reference data
172
Language
Time Zone and Date
173
Choose a language for camera menus and messages
Image Comment
Auto Image Rotation
174
Remote Shutter Release
Accessory Terminal
GPS
175
176
Eye-Fi Upload
Option also reduces the drain on the camera battery
Wireless Mobile Adapter
Firmware Version
177
178
NThe Retouch Menu
Display retouch options
Creating Retouched Copies
Select retouch options
Create a retouched copy
Lighting
By yellow border. Press J to cancel zoom
Red-Eye Correction
180
Monochrome
Trim
181
Selected image press 1 to increase color
Filter Effects
182
Intensifier, or blues Blue intensifier. Press 1 to
Color Balance
183
Zoom
Select Image overlay
Image Overlay
Select the first image
184
Select the second image
Adjust gain
Preview the overlay
Save the overlay
NEF RAW Processing
Adjust NEF RAW processing settings
Select NEF RAW processing
Select a photograph
Select Resize
Resize
Choose a size
Choose pictures
Straighten
Quick Retouch
Distortion Control
188
Color Outline
Fisheye
Color Sketch
189
190
Perspective Control
191
Miniature Effect
Select Selective color
Selective Color
192
Create a copy in which only selected hues appear in color
Save the edited copy
193
Press J to copy the photograph
Select Side-by-side comparison
Side-by-side Comparison
Compare the copy with the original
194
My Menu
MRecent Settings/OMy Menu
Select Choose tab
Select OMy Menu
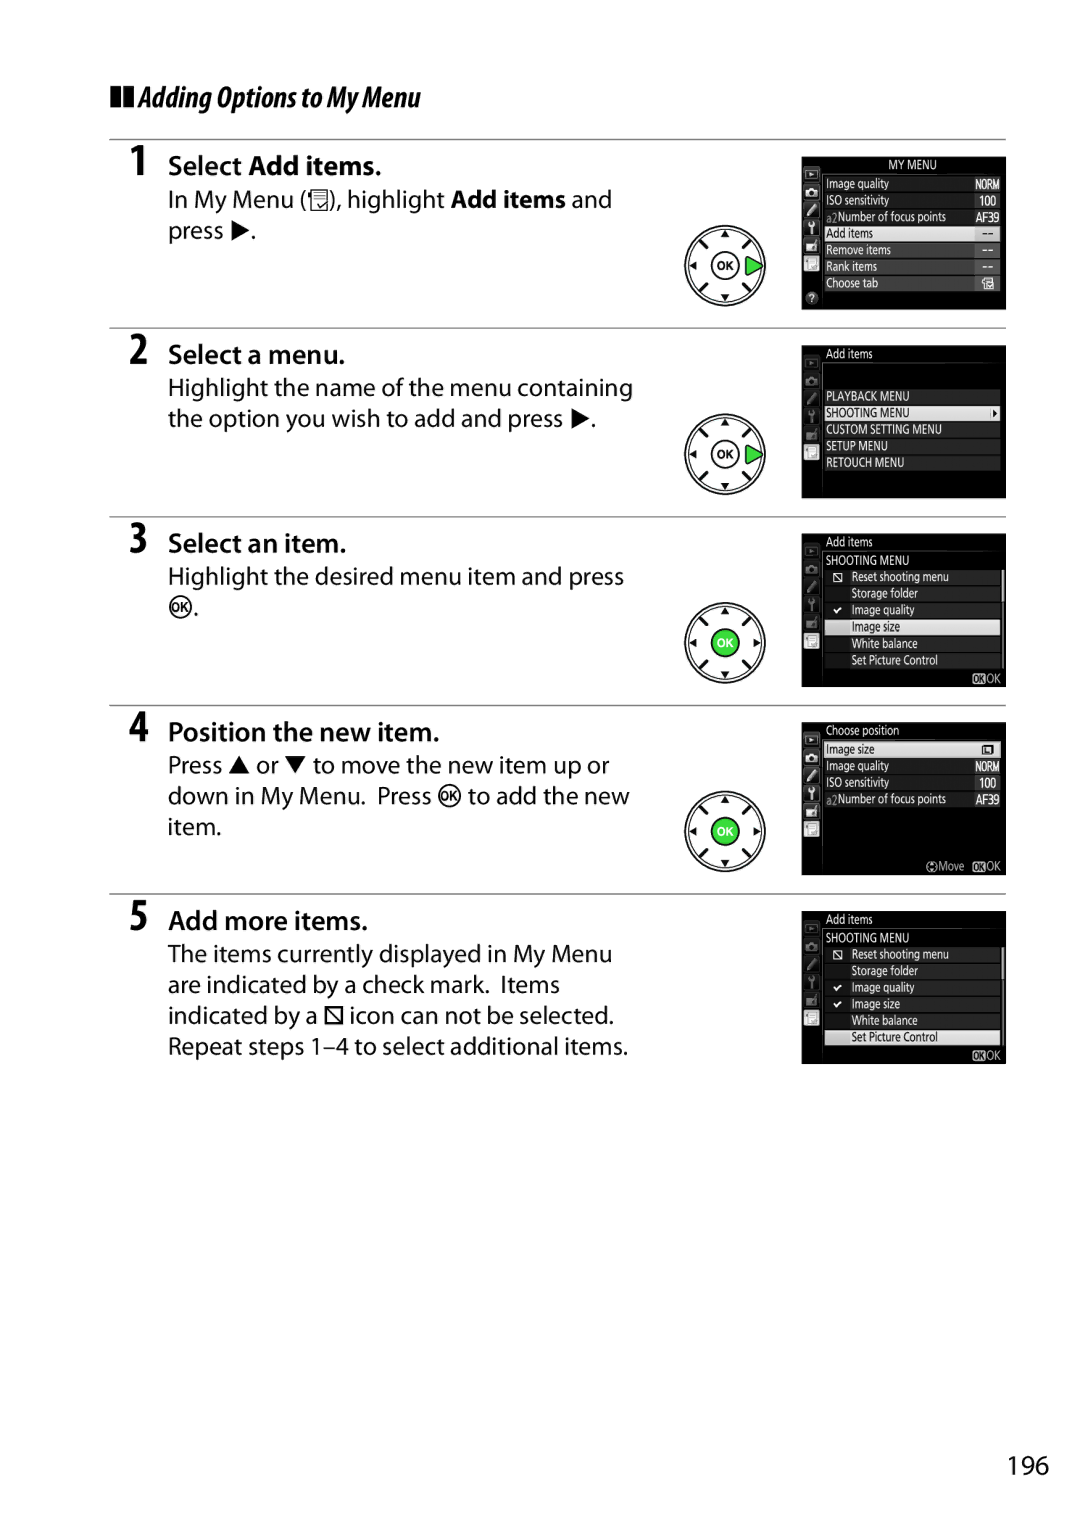
Select Add items
Adding Options to My Menu
Select an item
Position the new item
Select Remove items
Deleting Options from My Menu
Select items
Delete the selected items
Select Rank items
Reordering Options in My Menu
Position the item
Exit to My Menu
Compatible CPU Lenses
Compatible Lenses
199
IX Nikkor Lenses
Identifying CPU and Type G and D Lenses
200
Incompatible Accessories and Non-CPU Lenses
Compatible Non-CPU Lenses
201
Lens
202
203
AF-Assist Illumination
Calculating Angle of View
Optional Flash Units Speedlights
Use Only Nikon Flash Accessories
204
AS-15 Sync Terminal Adapter
CLS-Compatible Flash Units
Nikon Creative Lighting System CLS
205
Guide Number
SU-800
206
207
Other Flash Units
208
Focus points shown at right
Shown at right
Power
Other Accessories
209
Filters
210
211
Approved Memory Cards
Sdhc memory cards
Platinum
Insert the EP-5A power connector
Attaching a Power Connector and AC Adapter
Close the battery-chamber cover
Connect the AC adapter
Caring for the Camera
Cleaning
Storage
213
Select Clean image sensor in the setup Menu
Clean Now
Select Clean now
Low-Pass Filter
Select Clean at startup/shutdown
Clean at Startup/Shutdown
Select an option
215
Manual Cleaning
217
Clean the filter
Under no circumstances should you touch or wipe the filter
Foreign Matter on the Low-Pass Filter
Caring for the Camera and Battery Cautions
Caring for the Camera
218
219
Caring for the Battery
220
AF-area mode live view/movie AE-L/AF-L button hold
Available Settings
221
Color space Active D-Lighting HDR high dynamic range
Reset with Reset shooting menu 0
Reset with Reset custom settings 0
222
Exposure program for mode P is shown in the following graph
Exposure Program Mode P
223
Shutter speed seconds
Battery/Display
Troubleshooting
Shooting All Modes
224
Beep does not sound
225
Playback
Shooting P, S, A, M
226
Full range of shutter speeds not available
227
Miscellaneous
Can not change print order
Picture is not displayed on TV
228
Error Messages
229
230
Specifications
Nikon D5200 Digital Camera
231
232
233
234
235
EN-EL14 rechargeable Li-ion battery
MH-24 battery charger
AF-S DX Nikkor 18-55mm f/3.5-5.6G VR lens
236
AF-S DX Nikkor 18-55mm f/3.5-5.6G VR
Keep the CPU contacts clean
237
Lens Care
238
Vibration Reduction VR
Vibration Reduction
Camera
Optional Accessories
Supplied Accessories
239
Subject does not fill the focus point
240
Supported Standards
Trademark Information
FreeType License FreeType2 MIT License HarfBuzz
Memory Card Capacity
241
File Names
Battery Life
242
Every other shot. Live view not used
243
Index
181
244
Quick-response remote ML-L329
245
Page
SB2J0111