Digital Camera
Shoot, View, and Enjoy
Product Documentation
Quick-Start Guide
For Your Safety
Do not look at the sun through the viewfinder
Iii
Use appropriate cables
Page
Trademark Information
Table of Contents
Vii
Measuring Light Metering
Viii
Monitor Options
Getting Started
Overview
Getting to Know the COOLPIX4500
First Steps
Use Only Nikon Brand Electronic Accessories
Overview
About This Manual
Life-Long Learning
Where to Find It-Parts of the COOLPIX4500
Getting to Know the COOLPIX4500
Parts of the Camera and Their Functions
Menu button Focus mode button
How to Use It-Camera Controls and Displays
Monitor
Viewfinder
Diopter Adjustment Dial
Func Button
Multi Selector
First Steps
Attach the Camera Strap
Getting Ready to Use Your Camera
Insert the Battery
Read Battery Warnings
Alternative Power Sources
Clock Battery
Close the battery-chamber cover
Insert the Memory Card
Closing the Card-Slot Cover
Formatting Memory Cards
Removing Memory Cards
Close the card slot cover
Choose a Language
Set the Time and Date
Menu. To exit menus, press Menu button
Taking Pictures
18-26
Basic Playback
27-30
Auto Power Off
Taking Pictures
Ready the Camera
Basics
Choose Auto Mode
Display
Meaning
Camera status
Adjust Camera Settings Optional
Setting
Default
Frame the Picture
Built-in Speedlight
Swivel Limit
Monitor or Viewfinder?
Don’t Block the Shot
Controlling the Monitor
Focus and Shoot
During Recording
Take the picture
Put the Camera Away
Lower the built-in Speedlight
Return the lens section to the storage position
Rotate the lens section to the position shown
Basic Playback
During Playback
Quick Review and Playback
To view pictures, press Button
When the Memory Card Contains No Pictures
Quick Review
View other Pictures View current Picture full screen
Press Description
Full-Screen Playback
Press
Delete highlighted Picture Return to Shooting mode
Thumbnail Playback
Highlight pictures Through Images
Connecting to a Computer
Connecting to a Television or VCR
32-39
Connecting to a Computer
Before You Begin Installing Nikon View
Nikon View
XP Professional, Windows 2000 Professional, Windows
Install Adobe Acrobat Reader
Read installation instructions for Nikon View
Already Have Nikon View?
Making the Connection Connecting to Your Computer
Direct Connection Connecting Your Camera by Cable
Before Connecting the Camera
Use a Reliable Power Source
Panorama Assist/Ultra HS
Selecting Pictures for Transfer
Windows 2000 Professional
Windows Millennium Edition Me
Windows 98 Second Edition SE
Mac OS
Reading Pictures from Memory Cards
CompactFlash Card Readers
PC Card Adapter
Removing the Memory Card
Windows XP Home Edition/Windows XP Professional
Connecting to a Television or VCR
Choosing a Video Mode
Use an AC Adapter
Television Playback
Beyond Point- and-Shoot
Camera Controls
Shooting-Mode Selection
Shooting and Exposure Modes
Mode
Description Menu
Scene Mode
Scene Mode
Image Quality and Size
Flash mode Icon
Focus mode
Icon
Scene Description
Scene Description Blur
Effects of candlelight and other indoor background lighting
Preserves the deep hues seen in sunsets and sun- rises
Any Any Auto
Scene
Background artistically blurred
Tips on Creating a Multiple Exposure
Any† Auto
Multiple Exposure and Panorama Assist
Noise Reduction
Taking Pictures for a Panorama
Use a Tripod
Viewing Photographs Taken in Panorama Mode
Panorama Assist
Programmed Auto
Flexible Program
Shutter-Priority Auto
Shutter-Speed Limitations
Exposure Warning
Noise
Aperture-Priority Auto
Faster Shutter Speeds
Aperture and Zoom
Manual
Shutter-Speed Display
When manual exposure mode is selected
Long Time-Exposures Bulb
Focus Mode
Focusing Near and Far
Macro Close-Up
Option Description
Delaying Shutter Release Self-Timer Mode
Autofocus
Getting Good Results with Autofocus
Choose the Center Focus Area
Focus and Exposure Lock
Autoexposure Lock
Shoot- Focus Mode
Manual Focus
Optical and Digital Zoom
Optical Zoom
Optical vs. Digital Zoom
Framing Pictures
Digital Zoom
Restrictions on Digital Zoom
Flash Mode
Auto Flash Off
Flash-Ready Lamp
Flash Photography
Using the Built-in Speedlight
Flash mode is controlled with the button
Anytime Anytime flash +
Using an Optional Speedlight
Sync Terminal
Use Only Nikon Flash Accessories
When Lighting Is Poor
Close-Ups
Movie Mode
Making Movies P, S, A, and M
Cancelling Exposure Compensation
Exposure Compensation
Func Button
Choosing an Exposure Compensation Value
Sensitivity P, S, A, and M
ISO 200 and Above
Reacting Faster to Light
200 400 800
Disable Delete
Keep or Delete
To delete the picture, press Button
Confirmation dialog will be displayed. Press
Page
More About Playback
Playback Options
Zoom photo View other Areas of image Cancel zoom
Taking a Closer Look Playback Zoom
Creating a Small Copy of a Picture Small Picture
Restrictions on Small Picture
Viewing Small Picture Files on Other Cameras
Movie Playback
Inverted Playback
Adding Audio Commentary Voice Memo
Play Memo
Description If voice memo can be recorded
Deleting voice memo Select Yes to delete voice memo
Photo Information
Image File and Folder Names
File Information
Shooting Information,
Exposure Information
Focus Confirmation
Using Camera Menus
Index to Menu Options
Shooting Menu
Set-up Menu
Index to Menu Options
Image Size & Quality and Scene Modes
Shooting Menu P, S, A, and M Modes
Saturation Control
SET-UP Menu P, S, A, and M Modes
Index to Menu Options
Ntsc
Playback Menu
SET-UP Menu Playback Mode
Using Camera Menus
Main Menu
Basic Menu Operations
Display menu
Activate the selected menu
Making Selections with the Command Dial
Make a selection A.2
A.4
Exit the menus
Shooting Menu
Shooting Options
Option
What Is White Balance?
Choosing a White Balance Setting
Keeping Colors True White Balance
Fine-Tuning White Balance
Confirming White Balance
Bulb Type
White W
Preset White Balance
Zoom in and the menu at right will appear in the monitor
Memory and sets white balance to this value
Recorded
Measuring Light Metering
Confirming the Metering Method
Image. Best choice in most circumstances
Off-center subjects
Taking a Sequence of Shots Continuous
Focus, Exposure, and White Balance
Using a Flash
Confirming the Continuous Setting
Ultra HS/Movie
Getting Sharper Pictures BSS Best Shot Selector
Restrictions on BSS
Confirming BSS
Adjusting Contrast and Brightness Image Adjustment
Viewing the Current Image Adjustment Setting
Ing to shooting conditions
Later be retouched on a computer
Controlling Color Saturation Control
Black-and-White/Sepia
100
Making Effective Use of Memory Image Quality and Size
101
Confirming Image Quality and Size Settings
Image Quality
102
Compression Ratio approx
Image Size
Print Size
103
Storing Menu Settings User Setting
Confirming User Setting
104
Making Edges More Distinct Image Sharpening
Confirming Image Sharpening
105
Settings for Optional Converter Lenses Lens
106
Use with
Confirming the Lens Setting
Slide Copy Adapter
Slide Copy Adapter Inverse Color
107
Confirming AE-Lock Settings
Restores normal exposure and white balance
Controlling Exposure Exposure Options
108
Confirming Exposure Compensation
109
Focus-Area Selection AF Area Mode
Controlling Focus Focus Options
Spot AF Area Metering
110
Auto-Focus Mode
111
Controlling Zoom Zoom Options
112
113
Aperture changes as you zoom in or out
Prevent this, choose an f/-number from about f/5 to
Around f/7
Popup Settings for the Built-in Speedlight Pop-Up
Controlling Flash Output Variable Power
Built-in Speedlight pops up automatically when required
Controlling the Flash Speedlight Options
Flash-Mode Indicators for Optional Speedlights
Flash Mode
Options for Optional Speedlights Speedlight Cntrl
115
Varying Settings Automatically Auto Bracketing
Select Off to restore normal exposure and white balance
116
Option No. of shots
Recording Time
Restrictions on Bracketing
Confirming Autoexposure Bracketing
Confirming White Balance Bracketing
Avoiding Grainy Photographs Noise Reduction
Restrictions on Noise Reduction
Confirming Noise Reduction
118
Restoring Default Settings Reset All
Default Setting
119
Setting Default
Monitor Options Display Mode Brightness
120
Off Auto Single Wide Int&Ext Active
Camera Setup
Set-up Menu
SET-UP Menu P, S, A, M
SET-UP Menu Playback
Adjusting Monitor Settings Monitor Options
Controlling the Monitor Display Mode P, S, A, M Only
Adjusting Monitor Brightness Brightness
122
Customizing Camera Controls Controls
123
124
Posure
Conserving Battery Power Auto Off
125
File Numbering
126
Resetting File Numbering to
Audio Confirmation Shutter Sound
127
Option Description Off
Formatting Memory Cards CF Card Format
During Formatting
Before Formatting
128
Setting the Time and Date Date
Confirming Shutter Release Shot Confirmation
Storing Photo Info in a Separate File info.txt
129
Choosing a Video Standard Video Mode
Choosing a Language Language
130
Protecting Images from Deletion Disable Delete
Choosing a USB Option USB
131
Protocol
132
Windows 2000 Professional
Playback Menu
Deleting Pictures Delete
133
Managing Pictures
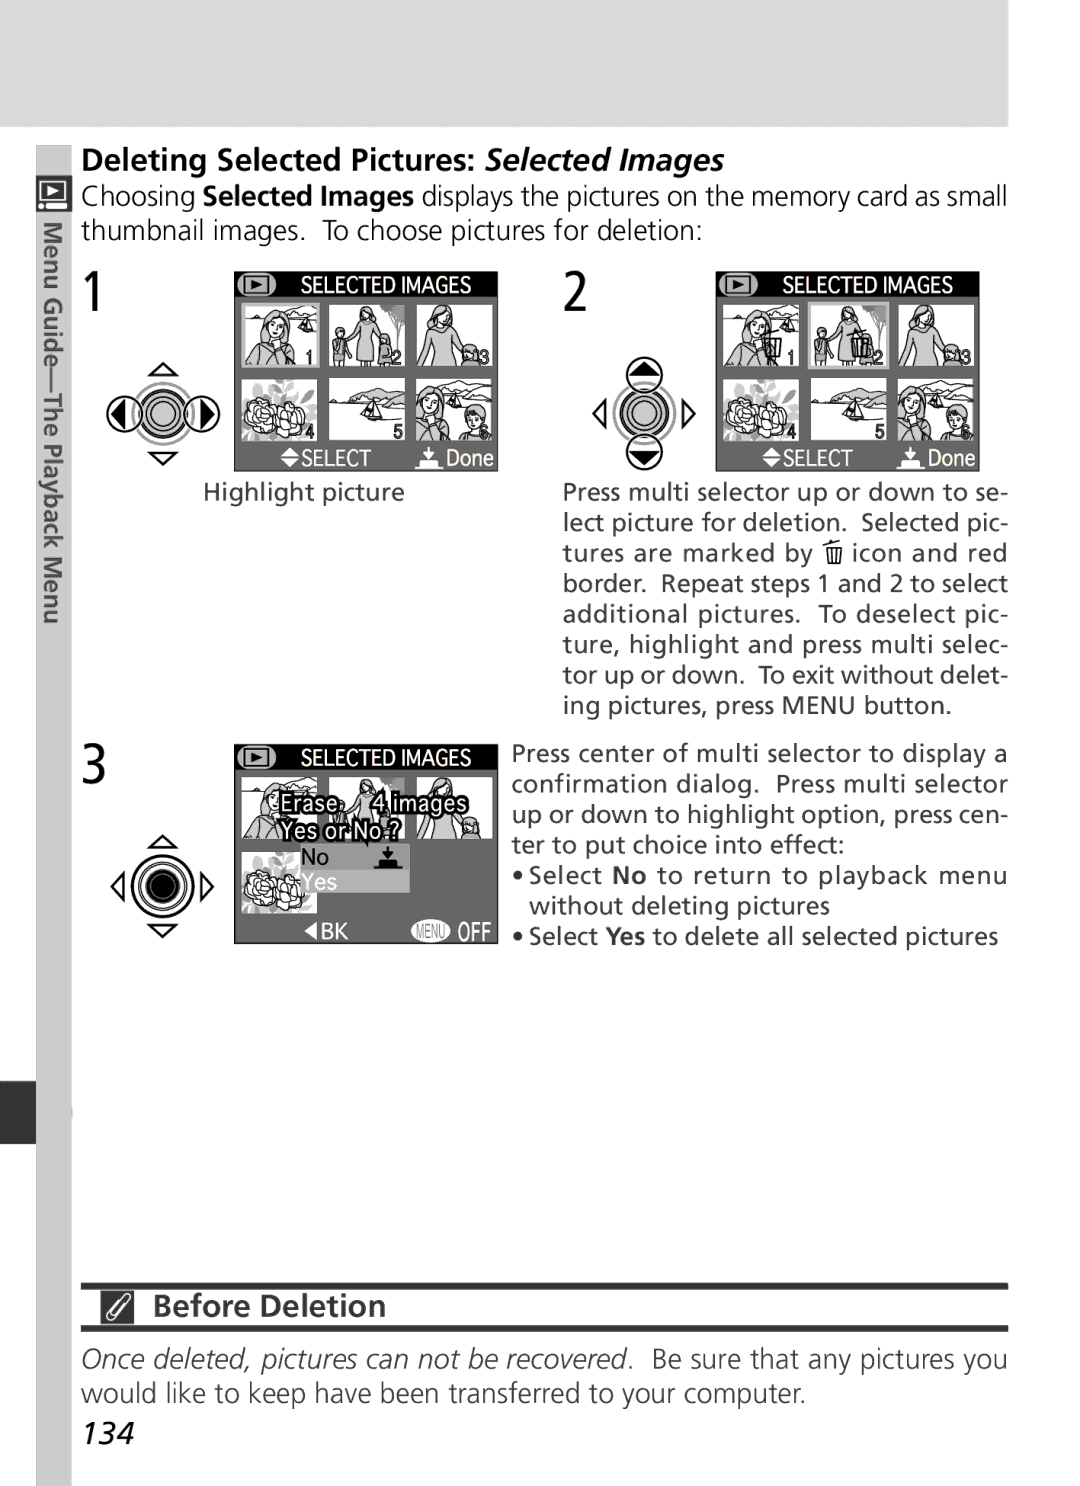
Deleting Selected Pictures Selected Images
Before Deletion
134
Cancelling the Current Print Order Print Set
Deleting All Pictures Erase All Images
Removing Transfer Marking from All Images Transfer
Hidden and Protected Pictures
Selecting a Folder for Playback Folders
136
Deleting Folders Delete
Hidden and Protected Images
137
Have not been hidden using Hide Image will be
Automated Playback Slide Show
Small Picture
138
Changing the Display Interval
Frame Interval
Auto Off
139
Changing Vertical Perspective Perspective Control
Restrictions on Perspective Control
140
141
Stretch top Image Bottom
Choosing a Size for Small Pictures Small Pic
Perspective Control
142
Safeguarding Valuable Pictures Protect
143
Deleted using the button or the options in the Delete menu
Hiding Pictures During Playback Hide Image
All images are hidden
144
Cancelling the Print Order
Ordering Prints Print Set
145
Prints, and the information to be included on each
146
Selecting Images for Transfer Auto Transfer
Selecting Pictures for Transfer Selected Photos
147
List of thumbnails
Selecting All Pictures for Transfer All Photos
Marking All Images for Transfer
Marking Pictures for Transfer with Other Cameras
Removing Transfer Marking from All Images
149
Camera Care, Options, and Resources
Optional Accessories
Rechargeable battery EN-EL1 Li-ion batteries
150
Carrying case
Approved Memory Cards
151
Caring for the Camera and Battery
152
Storage
Tips and Tricks for Handling Batteries
153
Cleaning
Avoid Contact with Liquid Crystal
154
Troubleshooting
Web Resources
For Product Information and Tips For Contact Information
155
156
Possible cause
Problem Possible cause
157
Error Messages
158
159
160
Specifications
161
162
File system
Weight Operating Environment Temperature Humidity
163
164
System requirements Nikon View 5 Windows
Index
165
166
Index
167
Party/Indoor Perspective Control, 140-142 Photocell
6MAA2311-05