IX. Setting the Zone Address DIP
Switches (Fig. 8)
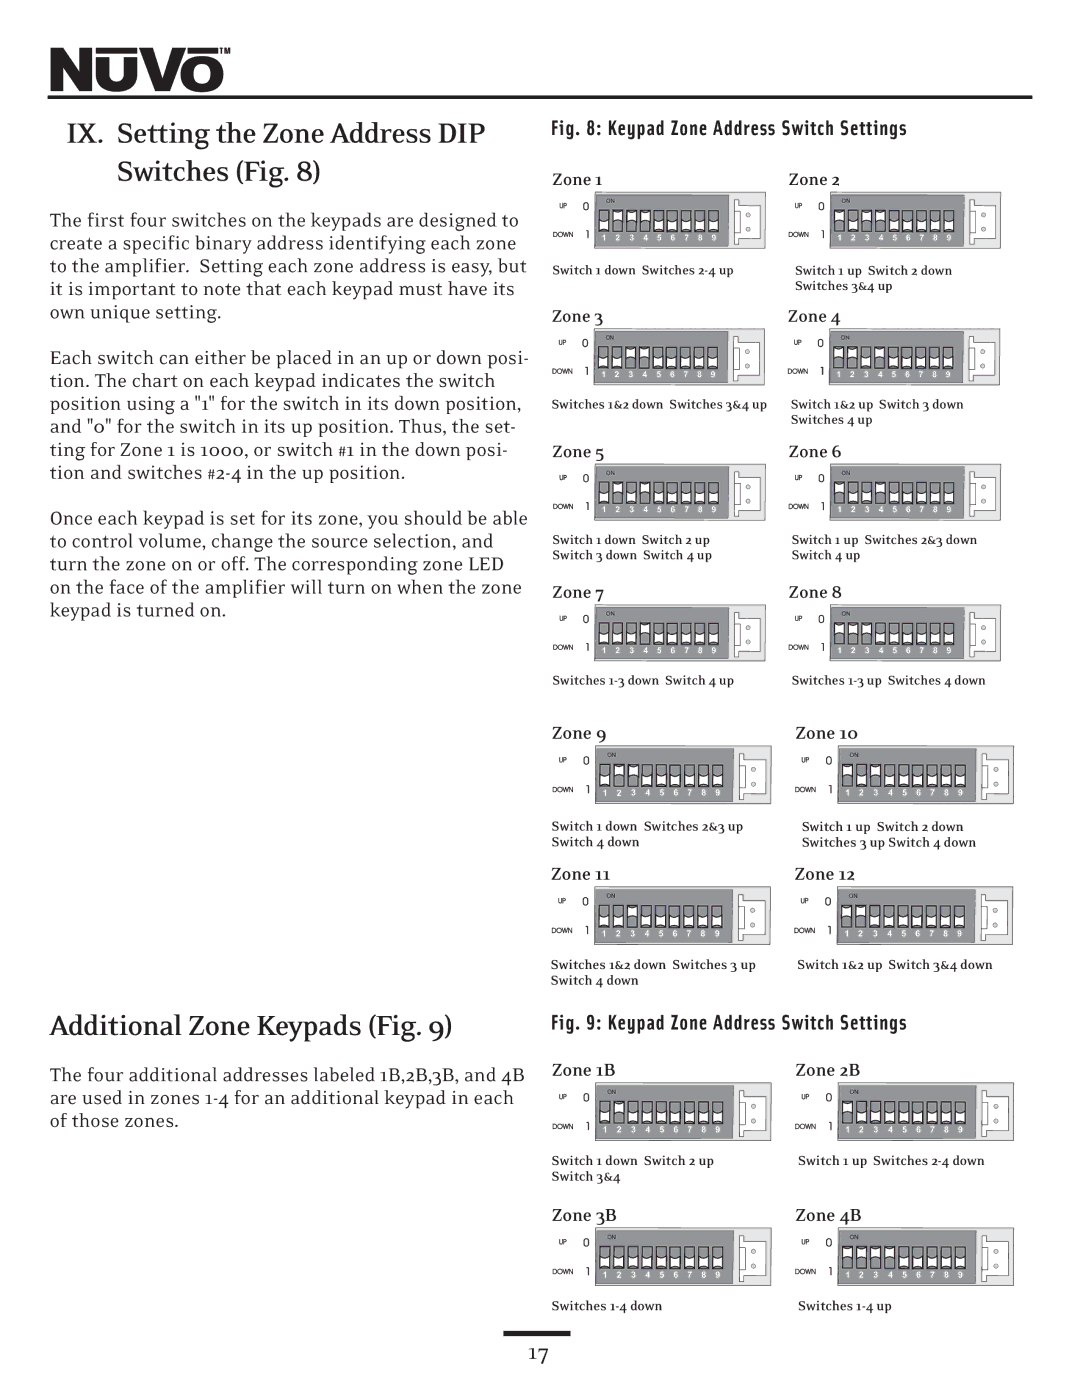
The first four switches on the keypads are designed to create a specific binary address identifying each zone to the amplifier. Setting each zone address is easy, but it is important to note that each keypad must have its own unique setting.
Each switch can either be placed in an up or down posi- tion. The chart on each keypad indicates the switch position using a "1" for the switch in its down position, and "0" for the switch in its up position. Thus, the set- ting for Zone 1 is 1000, or switch #1 in the down posi- tion and switches
Once each keypad is set for its zone, you should be able to control volume, change the source selection, and turn the zone on or off. The corresponding zone LED
Fig. 8: Keypad Zone Address Switch Settings
Zone 1 |
|
|
|
| Zone 2 |
|
|
|
|
|
|
| ||||
UP | 0 | ON |
|
|
| UP | 0 | ON |
|
|
|
|
|
|
| |
|
|
|
|
|
|
|
|
|
|
|
|
| ||||
DOWN | 1 | 1 | 2 | 3 | 4 5 6 7 8 | 9 | DOWN | 1 | 1 2 | 3 | 4 | 5 | 6 | 7 | 8 | 9 |
Switch 1 down Switches | Switch 1 up Switch 2 down | |||||||||||||||
|
|
|
|
|
|
| Switches 3&4 up |
|
|
|
| |||||
Zone 3 |
|
|
|
| Zone 4 |
|
|
|
|
|
|
| ||||
UP | 0 | ON |
|
|
|
| UP | 0 | ON |
|
|
|
|
|
|
|
|
|
|
|
|
|
|
|
|
|
|
|
| ||||
DOWN | 1 | 1 | 2 | 3 | 4 5 6 7 8 | 9 | DOWN | 1 | 1 2 | 3 | 4 | 5 | 6 | 7 | 8 | 9 |
Switches 1&2 down Switches 3&4 up | Switch 1&2 up Switch 3 down | |||||||||||||||
|
|
|
|
|
|
| Switches 4 up |
|
|
|
|
|
| |||
Zone 5 |
|
|
|
| Zone 6 |
|
|
|
|
|
|
| ||||
UP | 0 | ON |
|
|
| UP | 0 | ON |
|
|
|
|
|
|
| |
|
|
|
|
|
|
|
|
|
|
|
|
| ||||
DOWN | 1 | 1 | 2 | 3 | 4 5 6 7 8 | 9 | DOWN | 1 | 1 2 | 3 | 4 | 5 | 6 | 7 | 8 | 9 |
Switch 1 down Switch 2 up |
| Switch 1 up Switches 2&3 down | ||||||||||||||
Switch 3 down Switch 4 up | Switch 4 up |
|
|
|
|
|
|
| ||||||||
on the face of the amplifier will turn on when the zone keypad is turned on.
Zone 7
Zone 8
UP 0
ON
UP 0
ON
DOWN | 1 | 1 | 2 | 3 | 4 | 5 | 6 | 7 | 8 | 9 |
Switches
Zone 9
DOWN | 1 | 1 | 2 | 3 | 4 | 5 | 6 | 7 | 8 | 9 |
Switches
Zone 10
UP 0
ON
UP 0
ON
DOWN | 1 | 1 | 2 | 3 | 4 | 5 | 6 | 7 | 8 | 9 |
Switch 1 down Switches 2&3 up Switch 4 down
Zone 11
DOWN | 1 | 1 | 2 | 3 | 4 | 5 | 6 | 7 | 8 | 9 |
Switch 1 up Switch 2 down Switches 3 up Switch 4 down
Zone 12
UP 0
ON
UP 0
ON
DOWN | 1 | 1 | 2 | 3 | 4 | 5 | 6 | 7 | 8 | 9 |
Switches 1&2 down Switches 3 up Switch 4 down
DOWN 1 | 1 | 2 | 3 | 4 | 5 | 6 | 7 | 8 | 9 |
Switch 1&2 up Switch 3&4 down
Additional Zone Keypads (Fig. 9)
The four additional addresses labeled 1B,2B,3B, and 4B are used in zones
Fig. 9: Keypad Zone Address Switch Settings
Zone 1B |
|
|
|
| Zone 2B |
|
| ||||
UP | 0 | ON |
|
|
|
| UP | 0 | ON |
|
|
|
|
|
|
|
|
|
| ||||
DOWN | 1 | 1 | 2 | 3 | 4 5 6 7 8 | 9 | DOWN | 1 | 1 2 | 3 | 4 5 6 7 8 9 |
Switch 1 down Switch 2 up |
| Switch 1 up Switches | |||||||||
Switch 3&4 |
|
|
|
|
|
|
|
| |||
Zone 3B |
|
|
|
|
|
| Zone 4B |
|
|
|
|
|
|
| ||||
UP | 0 | ON |
|
|
|
|
|
| UP | 0 | ON |
|
|
|
|
|
|
|
|
|
|
|
|
|
|
|
|
|
|
|
|
|
| ||||
DOWN | 1 | 1 2 | 3 | 4 5 | 6 | 7 | 8 | 9 | DOWN | 1 | 1 2 | 3 | 4 | 5 | 6 | 7 | 8 | 9 |
Switches |
|
|
|
| Switches |
|
|
|
|
| ||||||||
17