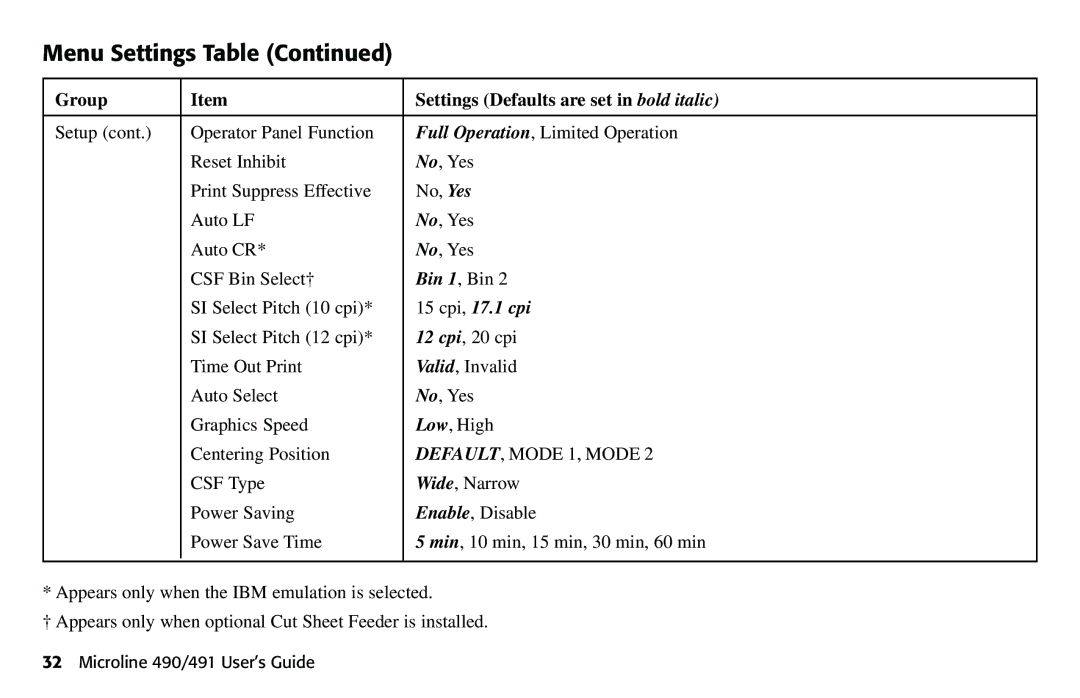
User’s Guide
59348401
Mailing Address
e-Mail Address pubs@okidata.com
Safety
These are some of the things to look for
Contents
Chapter 3 Using Your Printer
Chapter 1 Introduction
Chapter 2 Helpful Hints
Chapter 5 Maintenance
Chapter 6 Troubleshooting
Appendix A Parts & Accessories
Appendix C Specifications
Printer Features
Chapter 1 Introduction
Oki Data on the Internet
High Speed Draft Mode 420 cps 10 cpi Utility Mode 269 to 472 cps
Note This feature is normally turned off
Chapter 2 Helpful Hints
Saving Money Forms Tear-Off
Saving Time
Controlling Access to the Printer
Operation Tips
Top of Form TOF
Turning the Platen Knob
Note For rear feed, the paper lever must be forward
Chapter 3 Using Your Printer
Parts Identification Rear Feed Continuous Forms
Parts Identification Top Feed Single Sheets
Paper Guides Sheet Guide Paper Lever On-Off Switch Platen Knob
Using Your Printer
Control Panel Acoustic Cover open
Top of Form TOF
Top of Form TOF and Forms Tear-Off
Determining if Forms Tear-Off is Off or On
The printhead moves back to the left margin
Setting Top of Form TOF
Forms Tear-Off OFF Default Setting
The SEL light goes off and the red alarm light comes on
Forms Tear-Off Set to ON
The paper moves to the current TOF
Setting Top of Form TOF
Resetting Top of Form to the Factory Default
Temporarily Changing the Top of Form Position
Do not use Forms Tear-Off with labels or multipart forms
Forms Tear-Off Feature
Potential Problems with Software Packages
Changing the Forms Tear-Off Setting
Note The default setting for Forms Tear-Off is OFF
Paper Park
Manual Forms Tear Off
Using Your Printer
Changing Paper Paths
Continuous Forms toSingle Sheets
Single Sheets toContinuous Forms
3 Swing the wire feed guide over onto the pull-up roller
1 Press FF/LOAD to remove the single-sheet paper
2 Lower the sheet guide into the continuous-forms position
Make sure the printer is turned off before you open the access cover
Printhead Gap
Print Quality
LQ Letter Quality LQ light on
Utility UTILITY light on
HSD High Speed Draft LQ and UTILITY lights both on
Typefaces LQ Mode
Courier
Gothic
Orator
Character Pitch
Printer Reset
Epson LQ - factory setting
Emulations
Changing Emulations
Chapter 4 Menu Mode
Menu Mode Keys
Resetting the Menu to the Factory Defaults
Printing the Menu Settings
Entering and Exiting Menu Mode
Printing the Current Menu Settings
Changing the Menu Settings
Group
Menu Settings Table
Settings Defaults are set in bold italic
Menu Settings Table Continued
13.6
Settings Defaults are set in bold italic
Group
500 ms, 1 sec, 2 sec
Menu Settings Table Continued
Settings Defaults are set in bold italic
Group
Menu Settings Table Continued
Settings Defaults are set in bold italic
Group
32 Microline 490/491 User’s Guide
Ready on Power Up, Ready on Select
Invalid, Valid
Menu Settings Table Continued
Settings Defaults are set in bold italic
Menu Settings Table Continued
Settings Defaults are set in bold italic
Group
34 Microline 490/491 User’s Guide
Explanations of Menu Items
Auto CR, Default =No
Auto LF, Default = No
Auto Feed XT, Default = Invalid
SSD -9V, select SSD SSD +9V, select SSD+ DTR -9V, select DTR
Selects the printer command set emulation you want to engage
Wide carriage model only. Change to 13.6 to print on wide paper
Choose the quality and typeface of printing
Change to Double for double width and height printing
1 Make sure the printer is turned OFF
Chapter 5 Maintenance
Replacing the Ribbon Cartridge
The printhead may be HOT
Do not remove the ribbon shield 1 from the ribbon
Loading Paper
Rear Feed
Maintenance
Loading Rear Feed Paper from the Back of the Printer
44 Microline 490/491 User’s Guide
Careful
3 Grasp the sheet guide. Lift it slightly, then slide it back
5 From the back of the printer, locate the tractors
Note If the paper is too loose or too tight it can cause jams
8 Place continuous forms paper on the first two pins of either tractor
13 Press FF/LOAD
Loading Rear Feed Paper from the Front of the Printer
48 Microline 490/491 User’s Guide
ML490ML491
50 Microline 490/491 User’s Guide
9 Reinstall the sheet guide
Note If the paper is too loose or too tight it can cause jams
Maintenance
11 Press FF/LOAD
Top Feed Single Sheets
If the paper does not feed in, remove it. Check the paper lever position. Make sure the ALARM light is on if it is flashing, hold the SHIFT key and press the CHARACTER PITCH/RESET key. Reload the sheet of paper
Make sure the printer is turned off before you open the access cover
Clearing Paper Jams
Rear-Feed Paper Jams
Rear-Feed, Repeating Paper Jams
Make sure the printer is turned off before you open the access cover
4 Remove any torn pieces of paper
Single-Sheet Paper Jams
3 Open the access cover 1 and remove the pull-up roller assembly
5 Reinstall the pull-up roller assembly and close the access cover
Maintenance
58 Microline 490/491 User’s Guide
Cleaning the Housing
Make sure the printer is turned off before you open the access cover
Chapter 6 Troubleshooting
Note Settings in your software application will normally
override any settings in your printer driver
General Information
Problems / Solutions
Problem
Solution
Nothing happens when I turn on the printer
The printer does not print when the computer sends data
Solutions
Problem
Problem
Ink smears on the paper when I print narrow columns
Ive installed a new ribbon and the printing is smeared and streaked
Problem
Solution
The ALARM light is flashing
The ALARM light is on and the Character Pitch 10 light is flashing
The ALARM light is on and the Character Pitch 15 light is flashing
There are dots missing in my printouts
The printer needs paper. The ALARM is not on. I can’t load paper
Continuous-form paper sticks to the sheet guide
Problem
Solution
Appendix A Parts & Accessories
Purchasing Parts & Accessories
Replacement Parts
Power Cord
Access Cover
Pull-Up Roller Assembly
Accessories
Option
Pull Tractor, Top-Mount
70030501
Epson LQ Commands
Appendix B Printer Control Codes
Epson LQ Commands Continued
IBM Proprinter X24e / XL24e and IBM X24e AGM / XL24e AGM Commands
IBM Commands continued
IBM Commands Continued
Appendix C Specifications
Note Specifications are subject to change without notice
Print Method
Printhead
Graphics Resolution
Emulations co-resident
Print Speed
Characters per Line cpl
Resident Fonts
Bar Codes
Resident Typefaces
Specifications
Paper Specifications ML490
Single Cut Sheets
Single-part, continuous forms
Carbonless continuous forms orig. + 4 copies
Paper Specifications ML491
Physical Specifications
Note Height dimensions do not include the acoustic cover
Environmental Requirements
Electrical Requirements
Unpack
Appendix D Installation
Location
82 Microline 490/491 User’s Guide
3 Remove the shipping restraint from the pull-up roller assembly
2 Remove the printhead shipping restraint
Installation
Install the Ribbon Cartridge
1 Make sure the printer is turned OFF
The printhead may be HOT
Do not remove the ribbon shield 1 from the ribbon
Power Connection
Computer Connections
Parallel LPT IEEE
1 Make sure both the printer and the computer are OFF
86 Microline 490/491 User’s Guide
USB Specification 1.1 Compliant
Loading Paper
Testing the Printer
Font Sample Test
Rolling ASCII Test
The printer prints the rolling ASCII text page after page
Emulations
Printer Drivers
Hexadecimal Dump Mode
The Windows Add New Hardware Wizard window displays
Using a Compatible Driver
Loading the OKI Driver
Index
92 Microline 490/491 User’s Guide
Index
94 Microline 490/491 User’s Guide