Please read these instructions for information about using
DS-3000
DIGITAL VOICE RECORDER
ONLINE INSTRUCTIONS
General Precautions
For Safe And Correct Usage
Never use any battery with a torn or cracked outer cover
Batteries
AC Adapter
In case
Main Features
Table of Contents
Getting Started
Preparing For Recording
Basic operations
What is SmartMedia?
SP Mode
LP Mode
SmartMedia
Write-protect SmartMedia
$VOLUME control
SmartMedia ejection switch
POWER/LOCK switch
switch
1 Folder 2 Battery indicator 3 Recording date/time mark
4Remaining memory mark 5Total file time mark 6Record mode 7Alarm mark
Display LCD Panel
8Erase lock mark 9Current file
1 Slide open the battery cover
3 Close the battery cover completely
Inserting Batteries
2 Insert two AAA alkaline batteries, observing the correct polarity
Using the AC Adapter
Stop the recorder before disconnecting the AC adapter
Use only the correct power supply voltage as indicated on the adapter
Replacing Batteries
Setting Time/Date
Time/Date Setup Screen
1 Repeat steps 1 and 2 to set the time and date
2 Press the STOP button to end
2 choose the time/date setup screen
3 date setup process
Change Time/Date
Press the FOLDER/MENU button
Inserting SmartMedia cards
2 Set the POWER/LOCK switch to ON
Inserting and Ejecting SmartMedia cards
Set the POWER/LOCK switch to OFF
Raise the SmartMedia ejection switch
if the POWER/LOCK switch is set to ON
Corrupted, lost, or erased data cannot be 15 restored
Recording
New Recording
1 Press the FOLDER/MENU button to choose a folder
2 Press the NEW button to create a new file
Pause Recording
To instantly review a recording Quick review
Listening While Audio Is Recorded Recording Monitor
Append recording
4 Press the STOP button where you want to start overwriting
Overwrite Recording
Recording
1 to choose a folder
Append recording does not erase the next previously recorded file
Inserting Recording into Previous Files
Recording
5 2 Press the FF/+ or REW/- button
5 Press the REC/SET button to start inserting additional recording
Using the MICSENS switch, choose between the CONF and DICT positions
Microphone Sensitivity
Pause Insert Recording
Resume Insert Recording
Recording Modes
1 Press the FOLDER/MENU button for 1 second or longer
3 Press the REC/SET button
4 Press the FF/+ or REW/- button to choose between SP and LP
Adjust the VOLUME control to your
Playing
Press the FOLDER/MENU button to
1 choose a folder
Canceling Playback
Playback Functions
Playing
Stop
Canceling Fast Playback
Canceling a Cue
Canceling the Review
To skip backward
Erasing
Erasing One File at a Time
2 several times to choose the file
you want to erase
Erase All Files from a Folder
Press the ERASE button for 3 seconds or longer
To Partially Erase a File
5,6,7
Erasing
several times to choose the file into
Press the ERASE button once again where you want to stop erasing
Press the ERASE button once again
Using the Variable Control Voice Actuator VCVA
2 Using the VOLUME control, adjust the start/stop actuation level
High
2,4,6
Locking Files
5,7 3 Press the FOLDER/MENU button for 1 second or longer
5 Press the REC/SET button. bFile to be locked
Setting an Index Mark
Index Marks
Clearing an Index Mark
1 Play the file with the index mark you want to clear → P.23
open the system sound setup
System Sounds
Press the FOLDER/MENU button for 1 second or
1 longer
Alarm Playback Function
2,4,6
1 Press the FOLDER/MENU button to choose a folder
5,7 3 Press the FOLDER/MENU button for 1 second or longer
The minute indicator flashes
while the alarm sounds to play the file you associated with the
alarm
9,11
1,4,5
Moving Files Across Folders
Press the FOLDER/MENU button to choose a
1 folder
Press the FF/+ or REW/- button to choose a destination folder
Press the REC/SET button to accept the chosen destination folder
2 open the folder name setup screen
Assigning Folder Names
3,5,7
2,4,6 4 choose the folder you want to
Available characters are 0 to 9, A to Z, and space
6 Press the FF/+ or REW/- button to choose characters
8 Press the STOP button to close the menu
Setting Priority Levels
To Set a Priority Level for an Existing File
Press the FOLDER/MENU button to choose a folder
Press the INDEX button for longer than 1 second
To Set a Priority for a New File
Press the NEW button
Press the INDEX button for longer
3 than 1 second
Setting Job Data
Setting an Author ID
2,4,6
Press and hold the FOLDER/MENU
4 Press the REC/SET button
5 Press the FF/+ or REW/- button to choose characters
7 Press the STOP button to close the menu
To delete the flashing character
Setting a Work Type
Setting Job Data
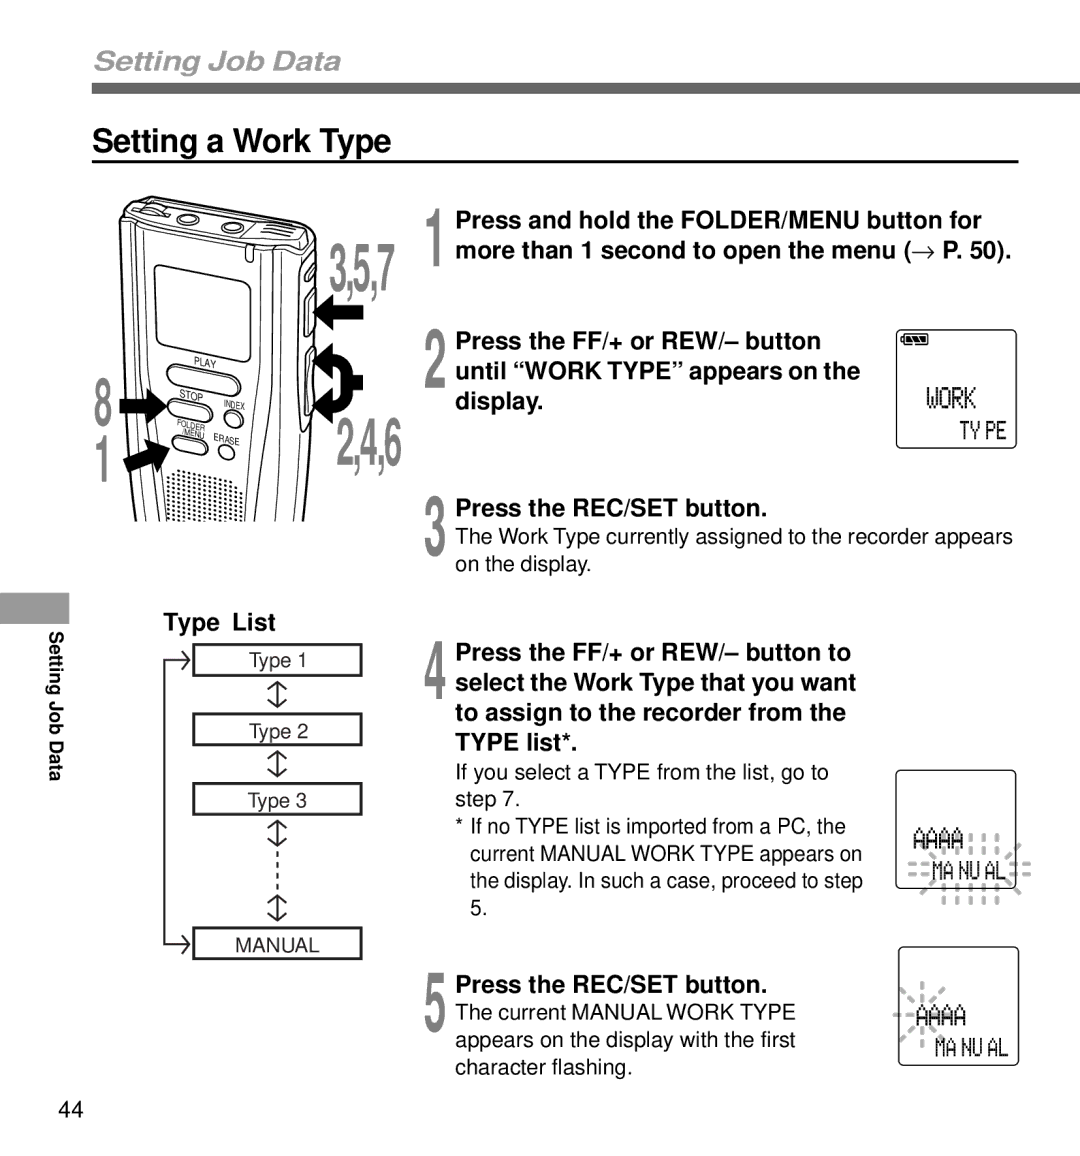
Press and hold the FOLDER/MENU button for
2 until “WORK TYPE” appears on the
6 Press the FF/+ or REW/- button to choose characters
8 Press the STOP button to close the menu
3,5 2,4
Formatting SmartMedia
4 Press the FF/+ or REW/- button to choose “YES?”
Transferring Data to a PC
PC platform
Hold
Reset
Dealer Option Items
4 Speak into the recorder’s microphone
3 Press and hold the NEW button to get into PC train mode
Training your PC for Voice Recognition
Menu List
Press the FOLDER/MENU button during playing
Alarm Message List
Message
Meaning
Explanation
Troubleshooting
Symptom
Probable cause
Action
Specifications
Specifications and design are subject to change without notice
Accessories optional
Noise-Cancellation microphoneME12
Connecting cordKA232
SmartMedia cards of 4, 8, 16, 32, and 64MBM-4/8/16/32/64
Technical Assistance And Support
Tested To Comply With FCC Standards FOR HOME OR OFFICE USE
Canadian RFI
Trade Name DIGITAL VOICE RECORDER Model Number DS-3000
E2-0470-01