SPECIAL SETTINGS
Setting the BD Audio Mode
BD-V
There are 2 ways to set “BD Audio Mode” setting; whether to output the secondary and interactive audio accompanied by the primary audio or only the primary audio. Depending on the setting of the mode, Dolby Digital, Dolby Digital Plus, Dolby TrueHD, DTS, or
1In stop mode with BD inserted, press [MODE].
2Use [K / L] to select your desired setting.
BD Audio Mode | Mix Audio Output |
|
|
“Mix Audio Output”:
If it is available,
•The secondary audio is the audio for the secondary video (Director’s comment etc.) and the interactive audio is the audio for the interactive application (Button click sounds etc.).
“HD Audio Output”:
Only the primary audio will be output. Set this mode in order to output Dolby Digital, Dolby Digital Plus, Dolby TrueHD, DTS or
3Press [RETURN] to exit.
•You can also set “BD Audio Mode” from the setup menu. Refer to page 38.
Note
•In “Mix Audio Output” mode, if there is no secondary and interactive audio, the audio will be output as “HD Audio Output” mode.
•In “Mix Audio Output” mode, even if you set “HDMI Multi(Normal)” in “HDMI Audio Out” setting, multi LPCM will be output from HDMI OUT jack for BD audio. Refer to page 14.
•In “Mix Audio Output” mode with HDMI audio being output,
•In “Mix Audio Output” mode with “HDMI Audio Out” setting set to “Audio Mute” and “Digital Out”setting set to “Bitstream”, DTS,
•You can also set “ BD Audio Mode” setting from the setup menu. Refer to page 38.
Adjusting the Picture
You can adjust the picture quality and store the setting you have adjusted on memory
1During playback, press [MODE] repeatedly until the picture adjustment menu appears.
Memory1
32
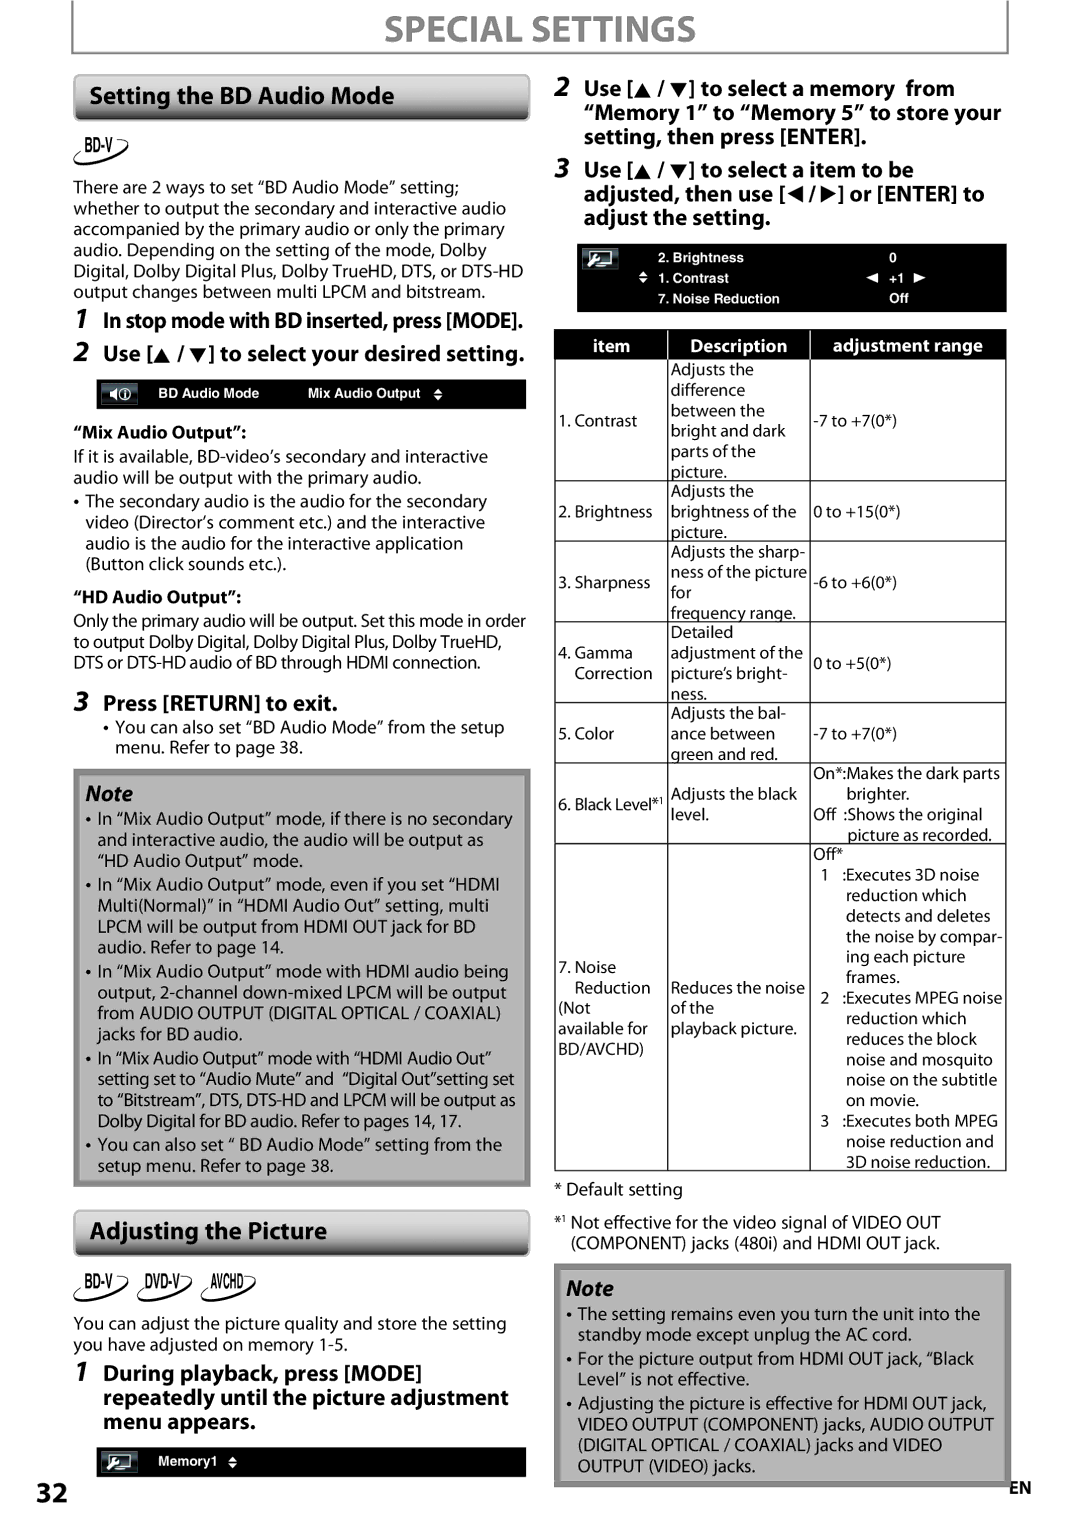
2Use [K / L] to select a memory from “Memory 1” to “Memory 5” to store your setting, then press [ENTER].
3Use [K / L] to select a item to be adjusted, then use [{ / B] or [ENTER] to adjust the setting.
| 2. Brightness |
| 0 | ||
| 1. Contrast |
| s +1 B | ||
| 7. Noise Reduction |
| Off | ||
|
|
|
|
| |
| item | Description |
| adjustment range | |
|
| Adjusts the |
|
| |
|
|
|
| ||
|
| difference |
|
| |
1. Contrast | between the | ||||
bright and dark | |||||
|
|
|
| ||
|
| parts of the |
|
| |
|
| picture. |
|
| |
|
| Adjusts the |
|
| |
2. Brightness | brightness of the | 0 to +15(0*) | |||
|
| picture. |
|
| |
|
| Adjusts the sharp- |
|
| |
3. Sharpness | ness of the picture | ||||
|
| for |
|
| |
|
| frequency range. |
|
| |
|
| Detailed |
|
| |
4. Gamma | adjustment of the | 0 to +5(0*) | |||
Correction | picture’s bright- |
|
| ||
|
| ness. |
|
| |
|
| Adjusts the bal- |
|
| |
5. Color | ance between | ||||
|
| green and red. |
|
| |
|
|
| On*:Makes the dark parts | ||
6. Black Level*1 | Adjusts the black |
| brighter. | ||
level. | Off :Shows the original | ||||
|
|
|
| picture as recorded. | |
|
|
| Off* | ||
|
|
| 1 | :Executes 3D noise | |
|
|
|
| reduction which | |
|
|
|
| detects and deletes | |
|
|
|
| the noise by compar- | |
7. Noise |
|
| ing each picture | ||
Reduces the noise |
| frames. | |||
Reduction |
| ||||
2 | :Executes MPEG noise | ||||
(Not | of the |
| reduction which | ||
available for | playback picture. |
| |||
| reduces the block | ||||
BD/AVCHD) |
|
| |||
|
| noise and mosquito | |||
|
|
|
| ||
|
|
|
| noise on the subtitle | |
|
|
|
| on movie. | |
|
|
| 3 | :Executes both MPEG | |
|
|
|
| noise reduction and | |
|
|
|
| 3D noise reduction. | |
* Default setting
*1 Not effective for the video signal of VIDEO OUT (COMPONENT) jacks (480i) and HDMI OUT jack.
Note
•The setting remains even you turn the unit into the standby mode except unplug the AC cord.
•For the picture output from HDMI OUT jack, “Black Level” is not effective.
•Adjusting the picture is effective for HDMI OUT jack, VIDEO OUTPUT (COMPONENT) jacks, AUDIO OUTPUT (DIGITAL OPTICAL / COAXIAL) jacks and VIDEO OUTPUT (VIDEO) jacks.
EN