CR-525 CR-325
Avis
Important Safety Instructions
Installing this Unit
Precautions
Power
Brown Live
Precautions
CD Player
Features
Supplied Accessories
Amplifier
Using the Remote Controller
Before Using the CD receiver
Installing the Batteries
Contents
CR-525 CR-325
Getting to Know the CD receiver
Front Panel
Getting to Know the CD receiver
Display
Rear Panel
RC-721S CR-525 RC-660S CR-325
Remote Controller
STANDBY/ON button 25, 50
Timer button 24, 49, 50, 52
Previous/Next 7/6 PRESET/PRESET r buttons 29
Volume q/w buttons 25
Example Shows the case of h YES/MODE/SHUFFLE button
Controlling an Onkyo MD recorder, cassette deck, or RI Dock
Discs Made on Personal Computers
Disc Notes
Supported Discs
CD-R/RW Compatibility
Handling Discs
Disc Content Organization
Cleaning Discs
Disc Notes
Attach the FM antenna, as shown North American Model
Connecting Antennas
Connecting the Indoor FM Antenna
Connecting the AM Loop Antenna
Using a TV/FM Antenna Splitter
Connecting Antennas
Connecting an Outdoor FM Antenna
Connecting an Outdoor AM Antenna
Terminal posts
Connecting Speakers
Connecting Your Speakers
Connection Color Coding
Connecting Other Components
Connecting a Subwoofer
About Connections
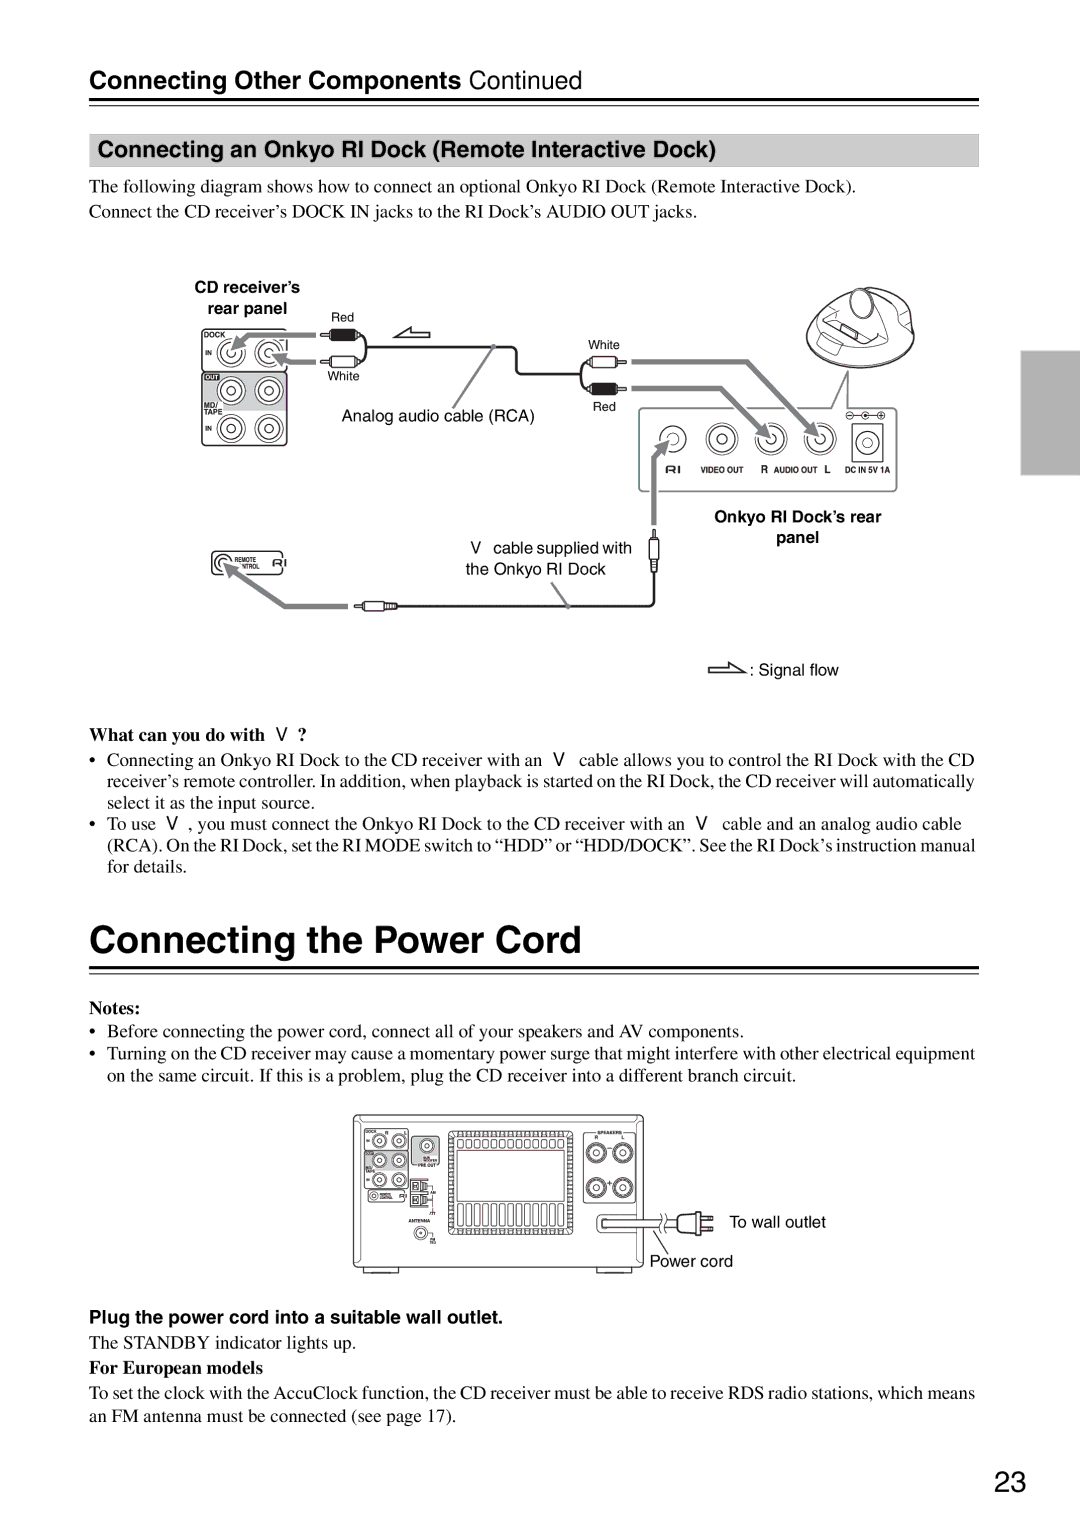
What can you do with u?
Connecting Other Components
Connecting an Onkyo Cassette Deck
Connecting an Onkyo MD recorder
For European models
Connecting the Power Cord
Connecting an Onkyo RI Dock Remote Interactive Dock
Plug the power cord into a suitable wall outlet
Turning Off the AccuClock Function
First Time Setup European models only
Setting the Clock with the AccuClock Function
Turning On the CD receiver
Adjusting the Volume
Using Headphones
Basic Operations
Basic Operations
Adjusting the Bass and Treble
Using the Super Bass Function
Using the Direct Function
Input Source Name Abbreviations
Changing the Input Display
Selecting Tracks
Playing CDs
Total Remain
Playing CDs
Displaying CD Information
Remain
To start playback, press the Enter or Play 1 button
Selecting MP3 Files in Navigation Mode
Selecting/Playing MP3 Files
While playback is stopped, press the Folder button
Selecting MP3 Files in All Folder Mode
Playing the MP3 Files in Only One Folder
Displaying MP3 Information
Memory Playback
Repeat Playback
Random Playback
Preferences
Setting MP3 Preferences
Folder Key?
USB Mass Storage Device Folders and Files
Using USB interface CR-525 only
Supported Audio File Formats
USB Mass Storage Device Requirements
Selecting Music files in other folders
Using USB interface CR-525only
Playing Music Files on a USB Mass Storage Device
Selecting Music files
Select the type of Repeat Playback
Cancelling Resume Playback
Resume Playback
Random Playback
Displaying Music File Information
Listening to the Radio
Tuning into Radio Stations
Adjusting the Antennas
Listening to the Radio
Presetting FM Stations Automatically Auto Preset
After Storing Presets You Can
About Presets
Presetting AM/FM Stations Manually
Selecting Preset Stations
Receiving RDS European models only
What is RDS?
Displaying Radio Information
Available Characters
Naming Presets
Copying Presets
To erase the preset, press Enter
Erasing a Preset’s Name Erasing Presets
Buttons to tune into
Setting the Clock
Press the Timer button When you’ve selected the station
Use the Rewind and Fast Forward
Displaying the Time in Standby Mode
Setting the Clock
Setting the Clock Manually
Using the 12- or 24-hour Format
About the Timers
Using the Timers
You must set the clock before you can program
Using the Timers
Programming the Timers
Edly to select timer 1, 2, 3, or 4, and then press Enter
Buttons to specify the On
Timer indicator 1, 2, 3, or 4 will
If you selected Once, use
If you selected Every, use
Then press Enter
Turning Timers On and Off
Checking Timer Settings
All of the timer’s settings
Checking the Remaining Sleep Time
Using the Sleep Timer
Canceling the Sleep Timer
Troubleshooting
Troubleshooting
Can’t play WMA files
Timers Timer playback or recording doesn’t work
Clock Time is not displayed in Standby mode
Can’t play MP3 files
Tuner Section
Specifications
General
Amplifier Section
3 4 4 7 0