Selecting a sound source
1
SENDING/
LEARNED
POWER | SLEEP | DIMMER | TEST | SUR |
| |
TONE | MODE |
| ||||
DVD |
| SELECTOR |
|
| ||
| ||||||
|
|
|
| INPUT |
|
|
TAPE | TUNER | PHONO | C D | LEARN |
| |
POWERPROGRAMMABLEC H | AREA | TV/VIDEO |
| |||
VOLUME |
| |||||
POWER |
|
|
|
| TV/VCR | |
|
|
|
| TUNER |
| |
|
| GROUP | PRESET | INPUT | ||
DISC | CD |
|
| TAPE |
| |
| DVD |
|
|
|
|
|
|
|
|
| CH SEL |
|
|
| KARAOKE |
|
|
|
|
|
KEY CONTROL |
| LEVEL | VOLUME |
| ||
| VOCAL |
|
| MUTING |
|
|
| CANCEL |
|
|
|
| |
REMOTE CONTROLLER |
|
|
| |||
2
LEFT |
|
| CENTER | RIGHT | |
SUBWOOFER |
|
| |||
SENDING/ |
|
|
|
|
|
LEARNED |
|
|
|
| CH SEL |
POWER | SLEEP | DIMMER | TEST | SUR | |
TONE | MODE | ||||
DVD |
| SELECTOR |
|
| |
| |||||
|
|
| INPUT |
|
|
TAPE | TUNER | PHONO | C D | LEARN |
|
|
|
| TV/VIDEO |
| |
POWERPROGRAMMABLEC H AREA VOLUME |
| ||||
POWER |
|
|
| TV/VCR |
|
|
| GROUP | TUNER |
|
|
|
| PRESET |
| ||
DISC | CD |
| TAPE |
| |
| DVD |
|
|
| LEVEL |
|
|
| CH SEL |
|
|
| KARAOKE |
|
|
|
|
KEY CONTROL | LEVEL | VOLUME |
| ||
| VOCAL |
| MUTING |
|
|
| CANCEL |
|
|
| |
REMOTE CONTROLLER |
|
| |||
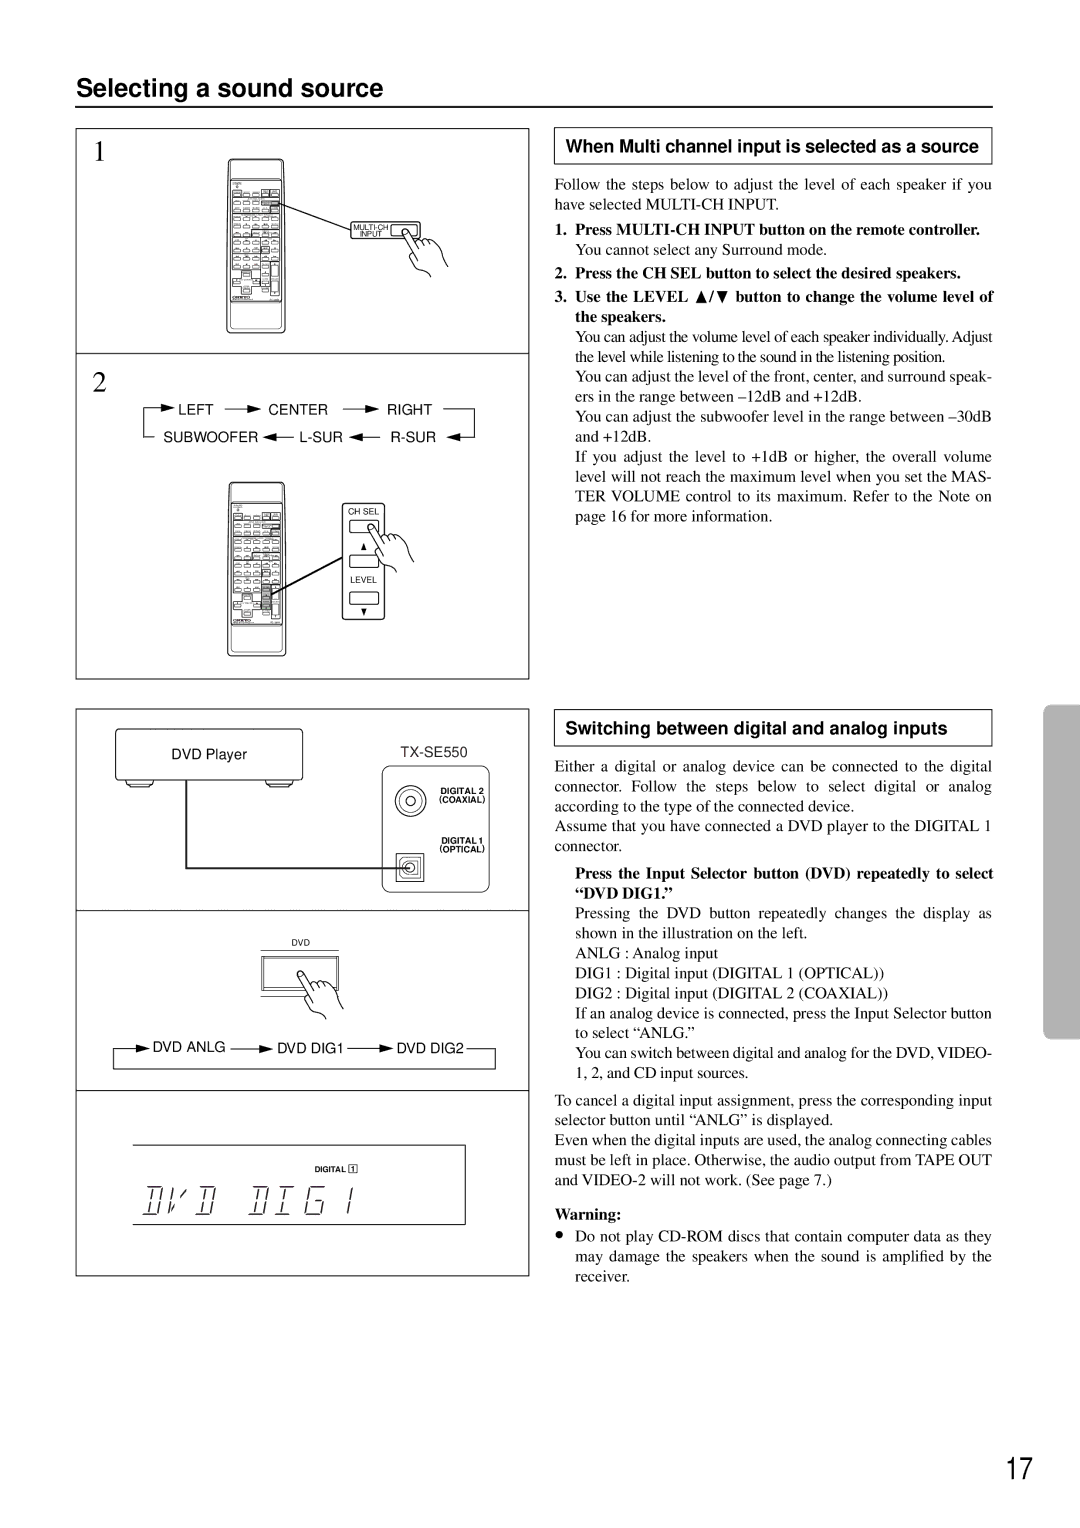
When Multi channel input is selected as a source
Follow the steps below to adjust the level of each speaker if you have selected
1.Press
2.Press the CH SEL button to select the desired speakers.
3.Use the LEVEL π/† button to change the volume level of the speakers.
You can adjust the volume level of each speaker individually. Adjust the level while listening to the sound in the listening position.
You can adjust the level of the front, center, and surround speak- ers in the range between
You can adjust the subwoofer level in the range between
If you adjust the level to +1dB or higher, the overall volume level will not reach the maximum level when you set the MAS- TER VOLUME control to its maximum. Refer to the Note on page 16 for more information.
DVD Player |
| |
|
| DIGITAL 2 |
|
| (COAXIAL) |
|
| DIGITAL 1 |
|
| (OPTICAL) |
| DVD |
|
DVD ANLG | DVD DIG1 | DVD DIG2 |
| DIGITAL 1 |
|
Switching between digital and analog inputs
Either a digital or analog device can be connected to the digital connector. Follow the steps below to select digital or analog according to the type of the connected device.
Assume that you have connected a DVD player to the DIGITAL 1 connector.
Press the Input Selector button (DVD) repeatedly to select “DVD DIG1.”
Pressing the DVD button repeatedly changes the display as shown in the illustration on the left.
ANLG : Analog input
DIG1 : Digital input (DIGITAL 1 (OPTICAL))
DIG2 : Digital input (DIGITAL 2 (COAXIAL))
If an analog device is connected, press the Input Selector button to select “ANLG.”
You can switch between digital and analog for the DVD, VIDEO- 1, 2, and CD input sources.
To cancel a digital input assignment, press the corresponding input selector button until “ANLG” is displayed.
Even when the digital inputs are used, the analog connecting cables must be left in place. Otherwise, the audio output from TAPE OUT and
Warning:
•Do not play
17
