Selecting a sound source
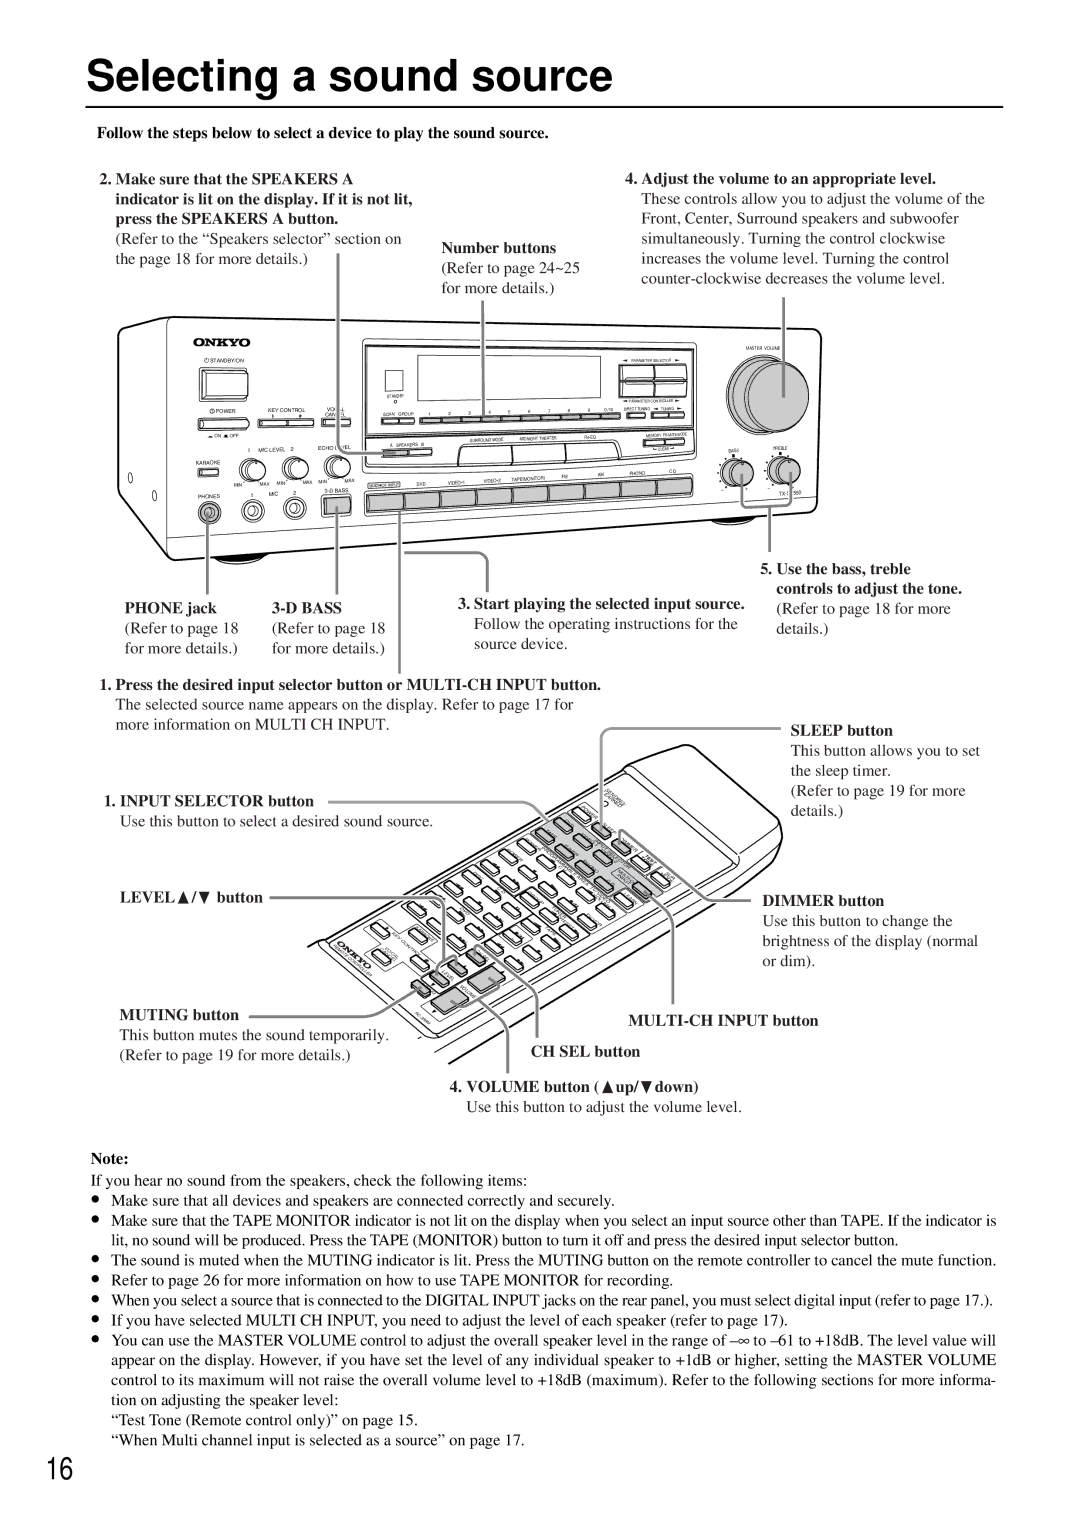
Follow the steps below to select a device to play the sound source.
2. Make sure that the SPEAKERS A indicator is lit on the display. If it is not lit, press the SPEAKERS A button.
(Refer to the “Speakers selector” section on
4. Adjust the volume to an appropriate level. |
These controls allow you to adjust the volume of the |
Front, Center, Surround speakers and subwoofer |
simultaneously. Turning the control clockwise |
the page 18 for more details.)
Number buttons
(Refer to page 24~25 for more details.)
increases the volume level. Turning the control |
STANDBY/ON |
|
|
|
|
|
|
|
|
|
| |
|
|
|
|
|
|
|
| STANDBY |
|
| |
POWER |
| KEY CONTROL | VOCAL |
| SCAN | GROUP |
| 1 | |||
|
|
|
|
|
| CANCEL |
| ||||
ON | OFF |
|
|
|
|
|
|
|
|
|
|
|
|
| MIC LEVEL | 2 | ECHO LEVEL | A | SPEAKERS | B | |||
| 1 |
|
|
|
|
| |||||
|
|
|
|
|
|
|
| ||||
KARAOKE |
|
|
|
|
|
|
|
|
|
|
|
| MIN |
| MAX | MIN | MAX | MIN | MAX | MULTI CH INPUT | DVD | ||
|
|
|
| ||||||||
PHONES |
| 1 | MIC | 2 |
|
|
|
| |||
|
|
|
|
|
|
| |||||
|
|
|
|
|
|
|
|
|
| ||
|
|
|
|
|
|
|
|
| PARAMETER SELECTOR | ||
|
|
|
|
|
|
|
|
| PARAMETER CONTROLLER | ||
2 | 3 | 4 | 5 | 6 | 7 | 8 | 9 | 0 /10 | DIRECT TUNING | TUNING | |
|
|
|
| ||||||||
|
|
|
|
| THEATER |
|
| MEMORY | FM MUTE/MODE | ||
| SURROUND MODE |
| MIDNIGHT |
|
|
| |||||
|
|
|
|
|
|
|
|
|
| CLEAR | |
|
|
|
|
|
| FM |
| AM | PHONO |
| C D |
|
|
|
| (MONITOR) |
|
|
| ||||
|
| VIDEO 2 |
|
|
|
|
|
| |||
VIDEO 1 |
|
| TAPE |
|
|
|
|
|
|
| |
MASTER VOLUME
BASS | TREBLE |
PHONE jack |
|
(Refer to page 18 | (Refer to page 18 |
for more details.) | for more details.) |
3.Start playing the selected input source. Follow the operating instructions for the source device.
5.Use the bass, treble controls to adjust the tone. (Refer to page 18 for more details.)
1.Press the desired input selector button or
SLEEP button
This button allows you to set the sleep timer.
1.INPUT SELECTOR button
Use this button to select a desired sound source.
LEVELπ/† button
|
| K | KAR |
|
|
| A |
| |
|
| E | O |
|
|
| C | KE |
|
|
| Y |
|
|
REMOTE |
| O |
| |
| C A | L |
| |
|
| C V | N |
|
|
| T |
| |
|
| A O | R |
|
|
| N C | O |
|
| CONTROLLER | E L |
|
|
|
| L |
|
|
|
|
| M | LEVEL |
|
|
|
| |
|
|
| U |
|
|
|
| T |
|
|
|
| IN |
|
|
|
| G |
|
|
|
|
|
|
| L | S |
|
|
|
|
|
|
|
|
|
|
|
|
|
| E |
|
|
|
|
|
|
| ||
|
|
|
|
|
|
| EAN |
|
|
|
|
|
|
| |
|
|
|
|
|
|
| R D |
|
|
|
|
|
|
| |
|
|
|
|
|
|
|
| N IN |
|
|
|
|
|
|
|
|
|
|
|
| P |
|
| E G/ |
|
|
|
|
|
| |
|
|
|
|
|
|
| D |
|
|
|
|
|
|
| |
|
|
|
|
| O |
|
|
|
|
|
|
|
|
|
|
|
|
|
|
| W |
|
|
|
|
|
|
|
|
|
|
|
|
|
|
| E |
|
|
|
|
|
|
|
|
|
|
|
|
|
| D | R |
|
|
|
|
|
|
|
|
|
|
|
|
|
|
| S |
|
|
|
|
|
|
|
|
| |
|
|
|
| V |
|
|
|
|
|
|
|
|
|
| |
|
|
|
| D |
|
| L |
|
|
|
|
|
|
|
|
|
|
| T |
|
|
| E |
|
|
|
|
|
|
|
|
|
|
|
|
|
| E |
|
|
|
|
|
|
| ||
|
|
| A |
| V |
|
| P |
|
|
|
|
|
|
|
|
|
| P |
|
|
|
|
|
|
|
|
|
|
| |
|
| P | E |
| ID |
|
| D |
|
|
|
|
|
| |
|
|
|
| E |
|
|
|
|
|
|
|
| |||
|
| O |
|
| O IN |
|
| IM |
|
|
|
|
|
| |
|
| W |
| T | - | P |
|
|
|
|
|
|
|
| |
|
| P | 1 | U |
|
| M |
|
|
|
|
| |||
| P | E | U |
| V | T |
|
| E |
|
|
|
| ||
| R | R | N |
| S |
|
| R |
|
|
|
| |||
| O | W | O | E |
| ID | E |
|
|
| T |
|
| ||
|
| G | R |
| E | L |
|
| T |
|
| ||||
|
| E | R |
| P |
| O E |
|
|
| E |
| |||
|
| R | A |
|
|
|
|
| O |
| S | ||||
|
|
| M | M | H |
|
| T |
|
| N |
| T | ||
|
|
| C | O |
|
|
| O |
|
|
| E |
| ||
|
|
| A | N |
|
| M | R |
|
|
|
|
|
| |
D |
|
|
| H BL | O |
|
|
|
|
|
|
|
| M S | |
|
|
| E | A |
|
| U |
|
|
|
|
| |||
IS |
|
|
|
|
|
| IN | L |
|
|
|
|
| O U | |
C |
|
|
| R |
| C |
| P TI- |
|
|
|
| D R | ||
|
|
|
|
| E |
| D | U | C |
|
|
|
| E | |
|
|
|
|
| A |
|
| T | H |
|
|
|
| ||
| C |
|
|
| T |
|
|
|
|
|
|
|
|
|
|
|
|
|
| V |
|
|
|
|
|
|
|
|
|
| |
| D | G |
|
| / |
|
|
| L |
|
|
|
|
|
|
|
|
|
| V | V |
|
|
|
|
|
|
|
| ||
|
| R |
|
| ID |
|
| E |
|
|
|
|
|
| |
|
| O |
|
| OL E |
| A |
|
|
|
|
| |||
|
| U |
|
|
| U | O |
|
| R |
|
|
|
| |
|
| P |
|
|
| M |
|
|
| N |
|
|
|
| |
D |
|
| T |
|
|
| E |
|
|
|
|
|
|
|
|
|
| U |
|
|
|
|
|
|
|
|
|
|
|
| |
V |
|
| N |
| T |
|
|
|
|
|
|
|
|
|
|
D |
|
| E |
|
|
|
|
|
|
|
|
|
| ||
|
|
| P | R | V |
|
|
|
|
|
|
|
|
|
|
|
|
| R | / |
|
|
|
|
|
|
|
|
|
| |
|
|
|
| E | V |
|
|
|
|
|
|
|
|
|
|
|
|
|
| S | C |
|
|
|
|
|
|
|
|
| |
|
|
| T | E |
| R |
|
|
|
|
|
|
|
|
|
|
|
| T |
|
|
|
|
|
|
|
|
|
|
| |
|
|
| A |
|
|
|
|
|
|
|
|
|
|
|
|
|
|
| P |
|
|
|
|
|
|
|
|
|
|
|
|
|
|
| E |
|
|
|
|
|
|
|
|
|
|
|
|
CH | SEL |
|
|
|
|
|
|
|
|
|
|
|
|
|
|
|
|
|
|
|
|
|
|
|
|
|
|
|
|
| |
VOLUME |
|
|
|
|
|
|
|
|
|
|
|
|
|
|
|
(Refer to page 19 for more details.)
DIMMER button
Use this button to change the brightness of the display (normal or dim).
MUTING button
This button mutes the sound temporarily. (Refer to page 19 for more details.)
RC- 386M
CH SEL button
4.VOLUME button (πup/†down)
Use this button to adjust the volume level.
Note:
If you hear no sound from the speakers, check the following items:
•Make sure that all devices and speakers are connected correctly and securely.
•Make sure that the TAPE MONITOR indicator is not lit on the display when you select an input source other than TAPE. If the indicator is lit, no sound will be produced. Press the TAPE (MONITOR) button to turn it off and press the desired input selector button.
•The sound is muted when the MUTING indicator is lit. Press the MUTING button on the remote controller to cancel the mute function.
•Refer to page 26 for more information on how to use TAPE MONITOR for recording.
•When you select a source that is connected to the DIGITAL INPUT jacks on the rear panel, you must select digital input (refer to page 17.).
•If you have selected MULTI CH INPUT, you need to adjust the level of each speaker (refer to page 17).
•You can use the MASTER VOLUME control to adjust the overall speaker level in the range of
“Test Tone (Remote control only)” on page 15.
“When Multi channel input is selected as a source” on page 17.
16