TX-SR604/604E TX-SR8460 TX-SR674/674E TX-SR8467
Avis
Important Safety Instructions
FCC Information for User
Precautions
Power
For models having a power cord with a polarized plug
Speaker cable labels Power-plug adapter
Supplied Accessories
Precautions
Make sure you have the following accessories
Features
TX-SR674/674E and TX-SR8467 Only
TX-SR604/604E and TX-SR8460 Only
Table of Contents
Front Panel
Front & Rear Panels
Front & Rear Panels
Display
Hdmi in 1, 2, and OUT
Rear Panel
Digital Optical in 1, 2, 3 and OUT
XM antenna on North American models
Zone 2 Line OUT
Remote Controller
Installing the Batteries
Aiming the Remote Controller
Remote Controller
Using the Remote Controller
RECEIVER/TAPE Mode
Zone 2 button
Remote Mode buttons
Buttons used when the Tuner input is selected
Buttons used when the Tape input is selected
DVD Mode
Arrow / and Enter buttons
CD/MD/CDR/HDD Mode
To select the input source, press
DISC/ALBUM +/- button
Enjoying Home Theater
About Home Theater
AV Connection Color Coding
Connecting the AV Receiver
About AV Connections
Optical Digital Jacks
Connecting Your Speakers
Connecting the AV Receiver
Strip about 5/8 15 mm
Speaker Connection Precautions
Connecting the Speaker Cables
Read the following before connecting your speakers
Attach the FM antenna, as shown North American models
Connecting Antenna
Connecting the Indoor FM Antenna
Connecting the AM Loop Antenna
Connecting an Outdoor FM Antenna
Connecting an Outdoor AM Antenna
Using a TV/FM Antenna Splitter
Audio Connection Formats
Connecting Both Audio & Video
Which Connections Should I Use?
Video Connection Formats
Hint
Connecting Your TV or Projector
Video Connection
Audio Connection
Connecting a DVD Player
DVD player
Hooking Up the Multichannel DVD Input
DVD recorder
Connecting a VCR or DVD Recorder for Playback
Connecting a VCR or DVD Recorder for Recording
Satellite, cable, set-top box, etc
Connecting a Camcorder, Games Console, or Other Device
About Copyright Protection
Connecting Components with Hdmi
About Hdmi
Supported Audio Formats
TX-SR604/604E, TX-SR8460
Video Signal Flow Chart
Audio Signal Flow Chart
Making Hdmi Connections
CD Player or Turntable MM with Built-in Phono Preamp Step
Connecting a CD Player or Turntable
Receiver’s Video 3 in L/R jacks and Video 3 Jacks
Connecting a HDD-compatible Component
Connect your HDD-compatible component’s analog
Audio output jacks and video output jack to the AV
Connecting a Cassette, CDR, MiniDisc, or DAT Recorder
Remote Control
Connecting Onkyo Components
Connecting the Power Cord of Another Component
Auto Power On/Standby
Turning On and Standby
Connecting the Power Cord
Do the automatic speaker setup-this is essential
Turning On the AV Receiver
First Time Setup
Automatic Speaker Setup Audyssey2EQ
Measurement Points
First Time Setup
Connect the setup microphone to the Setup MIC jack
Press Enter
Plete, the following screen
When the calculations are com
Disconnect the speaker setup
Following screen appears
Ambient noise is too high
Error Messages
Speaker Detect Errors
Reviewing the Results
Changing the Speaker Settings Manually
Using a Powered Subwoofer
Press the Return button to return to the previous menu
About the Onscreen Setup Menus
Submenus
Main menu
Digital Input
Video Input
Hdmi Video Setup
Component Video Setup
Setup menu closes
Main menu appears onscreen
Minimum Speaker Impedance not North American models
Changing the Input Display
You must specify the TV system used in your area
TV Format Setup Not North American models
AM Frequency Step Setup on some models
Hardware Setup menu appears
Video OUT, Hdmi OUT or Monitor OUT
Basic Operations
Selecting the Input Source
Start playback on the source component
Displaying Source Information
Using the Multichannel DVD Input
Adjusting the Bass & Treble
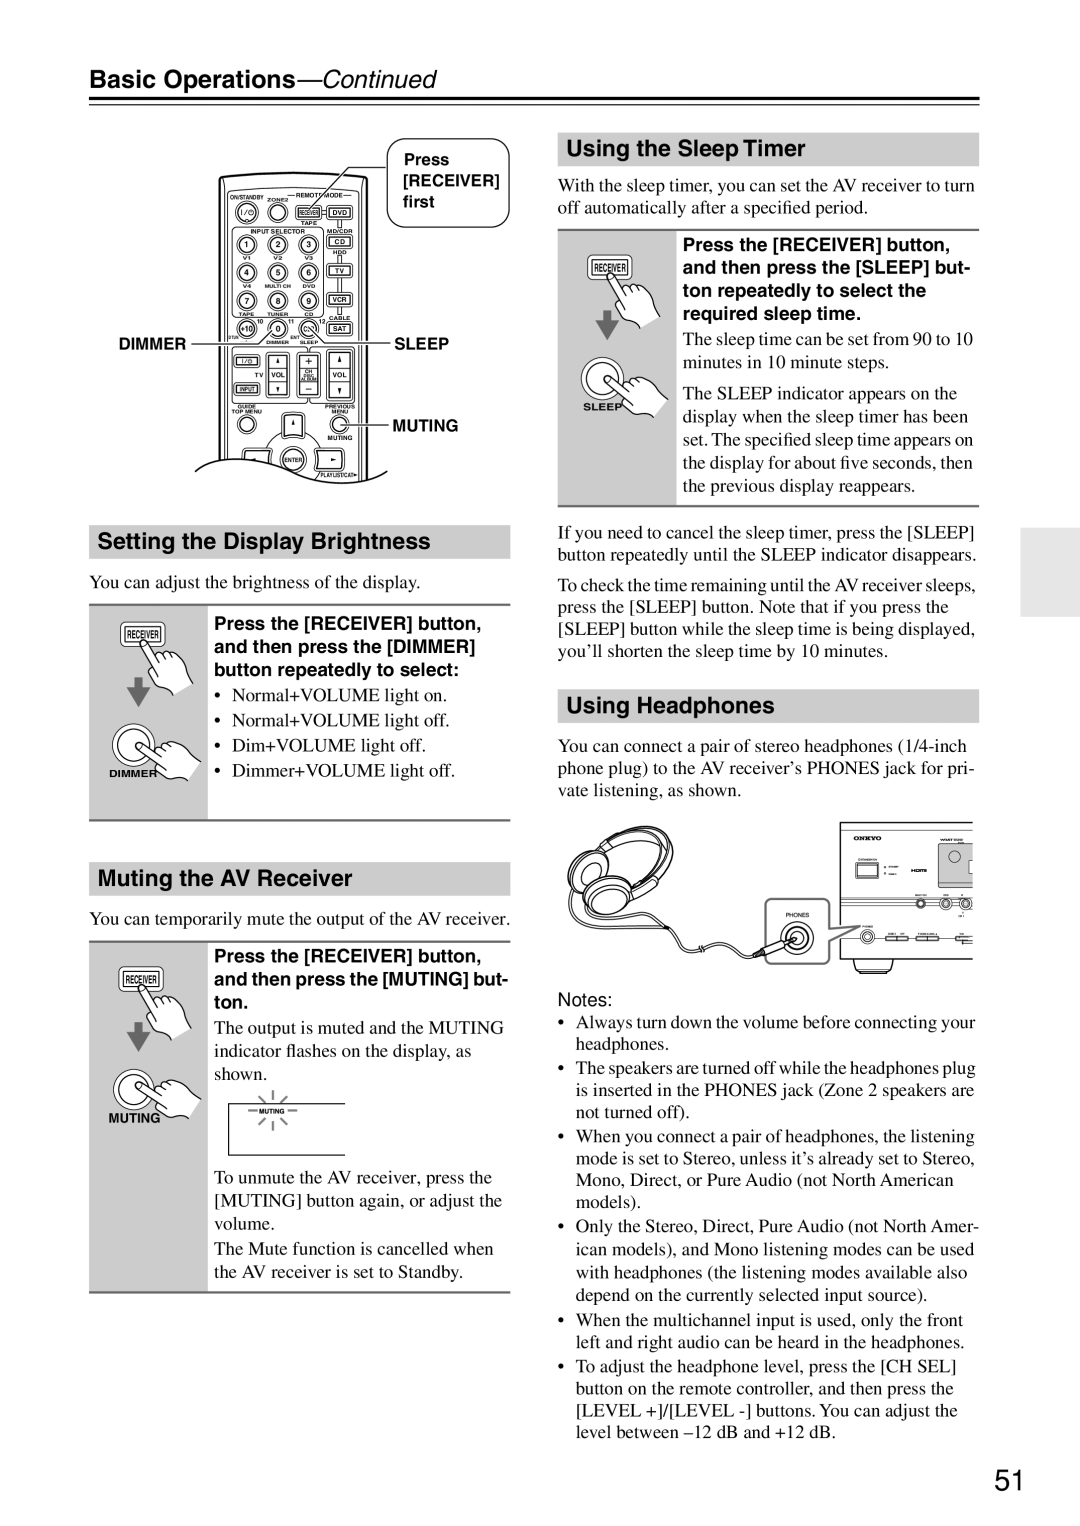
Basic Operations
Muting the AV Receiver
Using the Sleep Timer
Setting the Display Brightness
Using Headphones
Listening to the Radio
Using the Tuner
Tuning into Radio Stations
Listening to the Radio
Listening to the Radio
Presetting AM/FM Stations XM Channels
Selecting Presets
Deleting Presets
Using RDS European models only
What is RDS?
RDS Program Types PTY
Displaying Radio Text RT
Listening to Traffic News TP
Finding Stations by Type PTY
About XM Radio
Connecting the XM Passport System
Listening to XM Satellite Radio North American models only
Important XM Radio Information
Setting the Satellite Radio Mode
Signing Up for XM Satellite Radio
Selecting XM Satellite Radio
Receiver button flashes
Channel Search mode select any channel
Selecting XM Radio Channels
There are three ways to select XM radio channels
Displaying XM Radio Information
Long as possible
TER signal strength bar is as
XM Radio Messages
Positioning the XM Passport System
Selecting on the AV Receiver
Using the Listening Modes
Selecting with the Remote Controller
Selecting Listening Modes
DVD
Using the Listening Modes
About the Listening Modes
Onkyo Original DSP Modes
Use this mode with any stereo movie e.g., TV, DVD, VHS
Recording
AV Recording
Recording Separate AV Sources
Advanced Operations
Using the CinemaFILTER
Using the Late Night Function Dolby Digital only
Adjusting Individual Speaker Levels
Advanced Setup
Speaker Setup
Speaker Config menu appears
Advanced Setup
Low-Pass Filter for the LFE Channel
Double Bass
Buttons to select 2. Speaker Dis
Speaker Distance
Tance, and then press Enter
Speaker Distance menu appears
Is the same
Repeat until the volume
Speaker Level Calibration
Test tone from each speaker
Buttons to select 4. Equalizer
Equalizer Setting
Settings, and then press
Equalizer Settings menu appears
SW Input Sensitivity
Multichannel DVD Input Settings
Audio Adjust Functions
When you’ve finished, press
Dolby Digital EX Input Signal Setting
Input Channel Settings
PL IIx Music Mode Settings
Neo6 Music Mode Setting
Select the input source that you
Tons on the remote controller to
Assigning Listening Modes to Input Sources
Use the Input Selector but
Lowed by the Setup button. The main menu appears onscreen
IntelliVolume
Volume Setup/OSD Setup
Use the Up and Down Buttons to select a. IntelliVolume
Hdmi Audio Out
Changing the AV Receiver’s ID
TAL Input button for about 3 seconds
Lock Setup
Digital Input Signal Formats
Press and hold the AV receiver’s Digi
Fltr at the same time
Changing the Remote Controller’s ID
Correcting Sound and Picture Sync
Press the Receiver and the Cine
Zone
Connecting Zone
Using a Receiver/Integrated Amp in Zone
Using Only Speakers in Zone
Buttons to select Powered Zone
Setting the Powered Zone
Using Zone
Controlling Zone 2 with the Remote Controller
Controlling Zone 2 from the AV receiver
Using a Multiroom Kit with a Cabinet
Using the Remote Control in Zone
Adjusting the Volume for Zone
Using a Multiroom Kit with Zone
Controlling Other Components
Entering Remote Control Codes
Controlling Other Components
Remote Control Codes for Onkyo Components Connected via
Resetting Remote Mode Buttons
Resetting the Remote Controller
CH +
TV VOL
Tuner Section
Specifications
Amplifier Section
Video Section
Troubleshooting
Troubleshooting
Immediate display does not appear
Remote controller doesn’t work
There’s no picture from a source connected to an Hdmi
Onscreen menus don’t appear
Speaker distance cannot be set as required
Sound changes when I connect my head- phones
Speaker volume cannot be set as required
There’s no sound
Memo
Onkyo Europe UK Office
Onkyo Europe Electronics GmbH