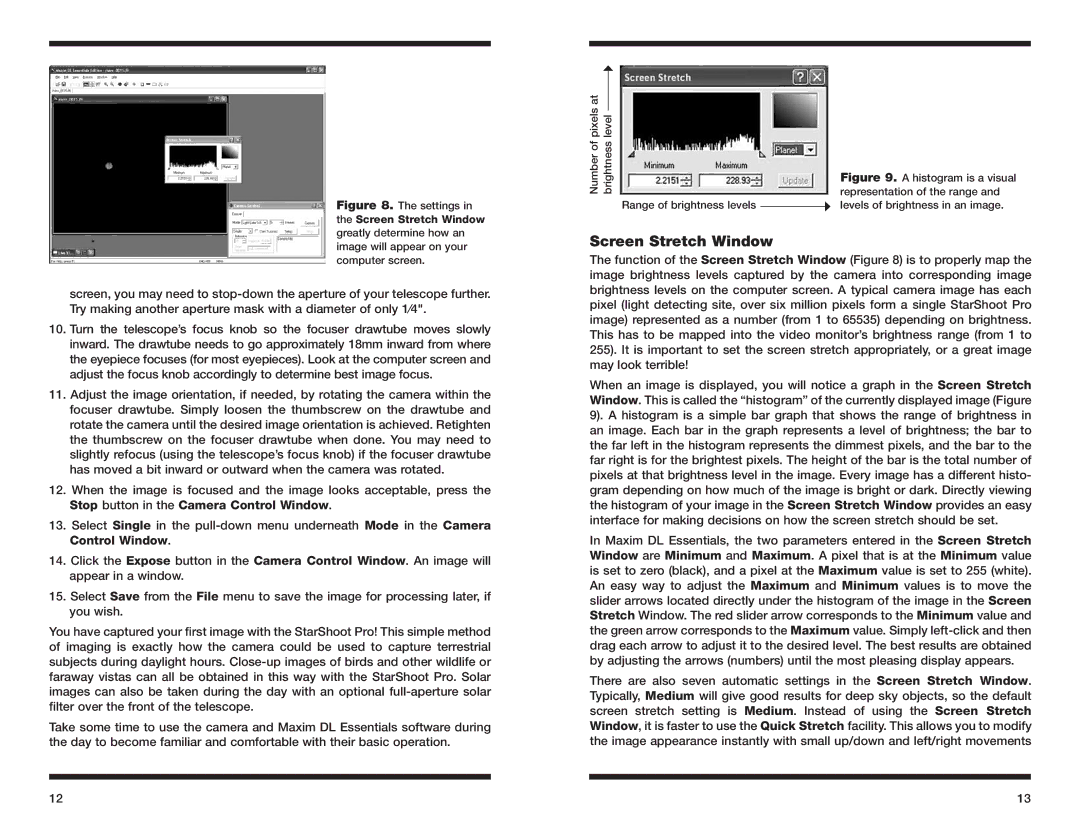
Figure 8. The settings in the Screen Stretch Window greatly determine how an image will appear on your computer screen.
screen, you may need to
10.Turn the telescope’s focus knob so the focuser drawtube moves slowly inward. The drawtube needs to go approximately 18mm inward from where the eyepiece focuses (for most eyepieces). Look at the computer screen and adjust the focus knob accordingly to determine best image focus.
11.Adjust the image orientation, if needed, by rotating the camera within the focuser drawtube. Simply loosen the thumbscrew on the drawtube and rotate the camera until the desired image orientation is achieved. Retighten the thumbscrew on the focuser drawtube when done. You may need to slightly refocus (using the telescope’s focus knob) if the focuser drawtube has moved a bit inward or outward when the camera was rotated.
12.When the image is focused and the image looks acceptable, press the Stop button in the Camera Control Window.
13.Select Single in the
14.Click the Expose button in the Camera Control Window. An image will appear in a window.
15.Select Save from the File menu to save the image for processing later, if you wish.
You have captured your first image with the StarShoot Pro! This simple method of imaging is exactly how the camera could be used to capture terrestrial subjects during daylight hours.
Take some time to use the camera and Maxim DL Essentials software during the day to become familiar and comfortable with their basic operation.
12
pixels at |
|
|
|
|
level |
|
| ||
Numberof | brightness |
| Figure 9. A histogram is a visual | |
|
|
|
| |
|
|
|
| representation of the range and |
|
| Range of brightness levels |
| levels of brightness in an image. |
|
|
| ||
Screen Stretch Window
The function of the Screen Stretch Window (Figure 8) is to properly map the image brightness levels captured by the camera into corresponding image brightness levels on the computer screen. A typical camera image has each pixel (light detecting site, over six million pixels form a single StarShoot Pro image) represented as a number (from 1 to 65535) depending on brightness. This has to be mapped into the video monitor’s brightness range (from 1 to 255). It is important to set the screen stretch appropriately, or a great image may look terrible!
When an image is displayed, you will notice a graph in the Screen Stretch Window. This is called the “histogram” of the currently displayed image (Figure 9). A histogram is a simple bar graph that shows the range of brightness in an image. Each bar in the graph represents a level of brightness; the bar to the far left in the histogram represents the dimmest pixels, and the bar to the far right is for the brightest pixels. The height of the bar is the total number of pixels at that brightness level in the image. Every image has a different histo- gram depending on how much of the image is bright or dark. Directly viewing the histogram of your image in the Screen Stretch Window provides an easy interface for making decisions on how the screen stretch should be set.
In Maxim DL Essentials, the two parameters entered in the Screen Stretch Window are Minimum and Maximum. A pixel that is at the Minimum value is set to zero (black), and a pixel at the Maximum value is set to 255 (white). An easy way to adjust the Maximum and Minimum values is to move the slider arrows located directly under the histogram of the image in the Screen Stretch Window. The red slider arrow corresponds to the Minimum value and the green arrow corresponds to the Maximum value. Simply
There are also seven automatic settings in the Screen Stretch Window. Typically, Medium will give good results for deep sky objects, so the default screen stretch setting is Medium. Instead of using the Screen Stretch Window, it is faster to use the Quick Stretch facility. This allows you to modify the image appearance instantly with small up/down and left/right movements
13