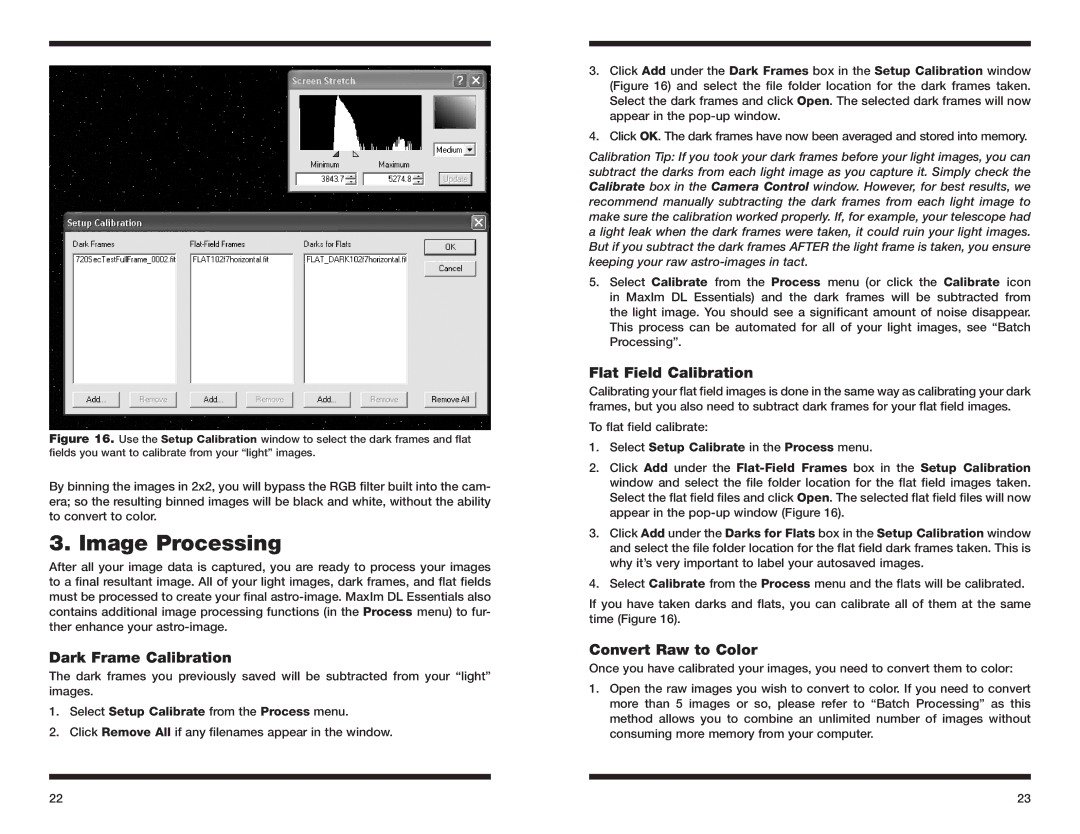
Figure 16. Use the Setup Calibration window to select the dark frames and flat fields you want to calibrate from your “light” images.
By binning the images in 2x2, you will bypass the RGB filter built into the cam- era; so the resulting binned images will be black and white, without the ability to convert to color.
3. Image Processing
After all your image data is captured, you are ready to process your images to a final resultant image. All of your light images, dark frames, and flat fields must be processed to create your final
Dark Frame Calibration
The dark frames you previously saved will be subtracted from your “light” images.
1.Select Setup Calibrate from the Process menu.
2.Click Remove All if any filenames appear in the window.
3.Click Add under the Dark Frames box in the Setup Calibration window (Figure 16) and select the file folder location for the dark frames taken. Select the dark frames and click Open. The selected dark frames will now appear in the
4.Click OK. The dark frames have now been averaged and stored into memory.
Calibration Tip: If you took your dark frames before your light images, you can subtract the darks from each light image as you capture it. Simply check the Calibrate box in the Camera Control window. However, for best results, we recommend manually subtracting the dark frames from each light image to make sure the calibration worked properly. If, for example, your telescope had a light leak when the dark frames were taken, it could ruin your light images. But if you subtract the dark frames AFTER the light frame is taken, you ensure keeping your raw
5.Select Calibrate from the Process menu (or click the Calibrate icon in MaxIm DL Essentials) and the dark frames will be subtracted from the light image. You should see a significant amount of noise disappear. This process can be automated for all of your light images, see “Batch Processing”.
Flat Field Calibration
Calibrating your flat field images is done in the same way as calibrating your dark frames, but you also need to subtract dark frames for your flat field images.
To flat field calibrate:
1.Select Setup Calibrate in the Process menu.
2.Click Add under the
3.Click Add under the Darks for Flats box in the Setup Calibration window and select the file folder location for the flat field dark frames taken. This is why it’s very important to label your autosaved images.
4.Select Calibrate from the Process menu and the flats will be calibrated.
If you have taken darks and flats, you can calibrate all of them at the same time (Figure 16).
Convert Raw to Color
Once you have calibrated your images, you need to convert them to color:
1.Open the raw images you wish to convert to color. If you need to convert more than 5 images or so, please refer to “Batch Processing” as this method allows you to combine an unlimited number of images without consuming more memory from your computer.
22 | 23 |