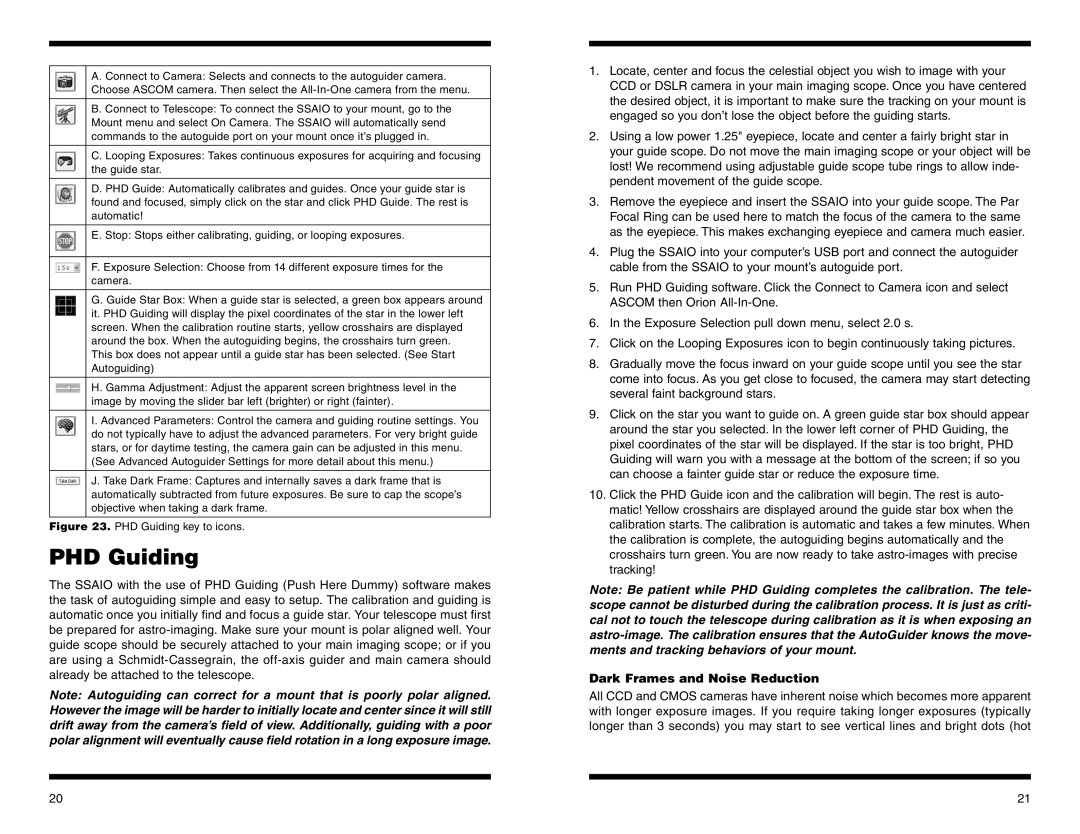
A. Connect to Camera: Selects and connects to the autoguider camera. Choose ASCOM camera. Then select the
B. Connect to Telescope: To connect the SSAIO to your mount, go to the Mount menu and select On Camera. The SSAIO will automatically send commands to the autoguide port on your mount once it’s plugged in.
C. Looping Exposures: Takes continuous exposures for acquiring and focusing the guide star.
D. PHD Guide: Automatically calibrates and guides. Once your guide star is found and focused, simply click on the star and click PHD Guide. The rest is automatic!
E. Stop: Stops either calibrating, guiding, or looping exposures.
F. Exposure Selection: Choose from 14 different exposure times for the camera.
G. Guide Star Box: When a guide star is selected, a green box appears around it. PHD Guiding will display the pixel coordinates of the star in the lower left screen. When the calibration routine starts, yellow crosshairs are displayed around the box. When the autoguiding begins, the crosshairs turn green.
This box does not appear until a guide star has been selected. (See Start Autoguiding)
H. Gamma Adjustment: Adjust the apparent screen brightness level in the image by moving the slider bar left (brighter) or right (fainter).
I. Advanced Parameters: Control the camera and guiding routine settings. You do not typically have to adjust the advanced parameters. For very bright guide stars, or for daytime testing, the camera gain can be adjusted in this menu.
(See Advanced Autoguider Settings for more detail about this menu.)
J. Take Dark Frame: Captures and internally saves a dark frame that is automatically subtracted from future exposures. Be sure to cap the scope’s objective when taking a dark frame.
Figure 23. PHD Guiding key to icons.
PHD Guiding
The SSAIO with the use of PHD Guiding (Push Here Dummy) software makes the task of autoguiding simple and easy to setup. The calibration and guiding is automatic once you initially find and focus a guide star. Your telescope must first be prepared for
Note: Autoguiding can correct for a mount that is poorly polar aligned. However the image will be harder to initially locate and center since it will still drift away from the camera’s field of view. Additionally, guiding with a poor polar alignment will eventually cause field rotation in a long exposure image.
1.Locate, center and focus the celestial object you wish to image with your CCD or DSLR camera in your main imaging scope. Once you have centered the desired object, it is important to make sure the tracking on your mount is engaged so you don’t lose the object before the guiding starts.
2.Using a low power 1.25" eyepiece, locate and center a fairly bright star in your guide scope. Do not move the main imaging scope or your object will be lost! We recommend using adjustable guide scope tube rings to allow inde- pendent movement of the guide scope.
3.Remove the eyepiece and insert the SSAIO into your guide scope. The Par Focal Ring can be used here to match the focus of the camera to the same as the eyepiece. This makes exchanging eyepiece and camera much easier.
4.Plug the SSAIO into your computer’s USB port and connect the autoguider cable from the SSAIO to your mount’s autoguide port.
5.Run PHD Guiding software. Click the Connect to Camera icon and select ASCOM then Orion
6.In the Exposure Selection pull down menu, select 2.0 s.
7.Click on the Looping Exposures icon to begin continuously taking pictures.
8.Gradually move the focus inward on your guide scope until you see the star come into focus. As you get close to focused, the camera may start detecting several faint background stars.
9.Click on the star you want to guide on. A green guide star box should appear around the star you selected. In the lower left corner of PHD Guiding, the pixel coordinates of the star will be displayed. If the star is too bright, PHD Guiding will warn you with a message at the bottom of the screen; if so you can choose a fainter guide star or reduce the exposure time.
10.Click the PHD Guide icon and the calibration will begin. The rest is auto- matic! Yellow crosshairs are displayed around the guide star box when the calibration starts. The calibration is automatic and takes a few minutes. When the calibration is complete, the autoguiding begins automatically and the crosshairs turn green. You are now ready to take
Note: Be patient while PHD Guiding completes the calibration. The tele- scope cannot be disturbed during the calibration process. It is just as criti- cal not to touch the telescope during calibration as it is when exposing an
Dark Frames and Noise Reduction
All CCD and CMOS cameras have inherent noise which becomes more apparent with longer exposure images. If you require taking longer exposures (typically longer than 3 seconds) you may start to see vertical lines and bright dots (hot
20 | 21 |