drawtube
Reflection of primary mirror clip
Reflective surface | Primary mirror |
of collimation | center mark |
cap |
|
b.c.
a. |
|
|
|
| e. | ||
d. |
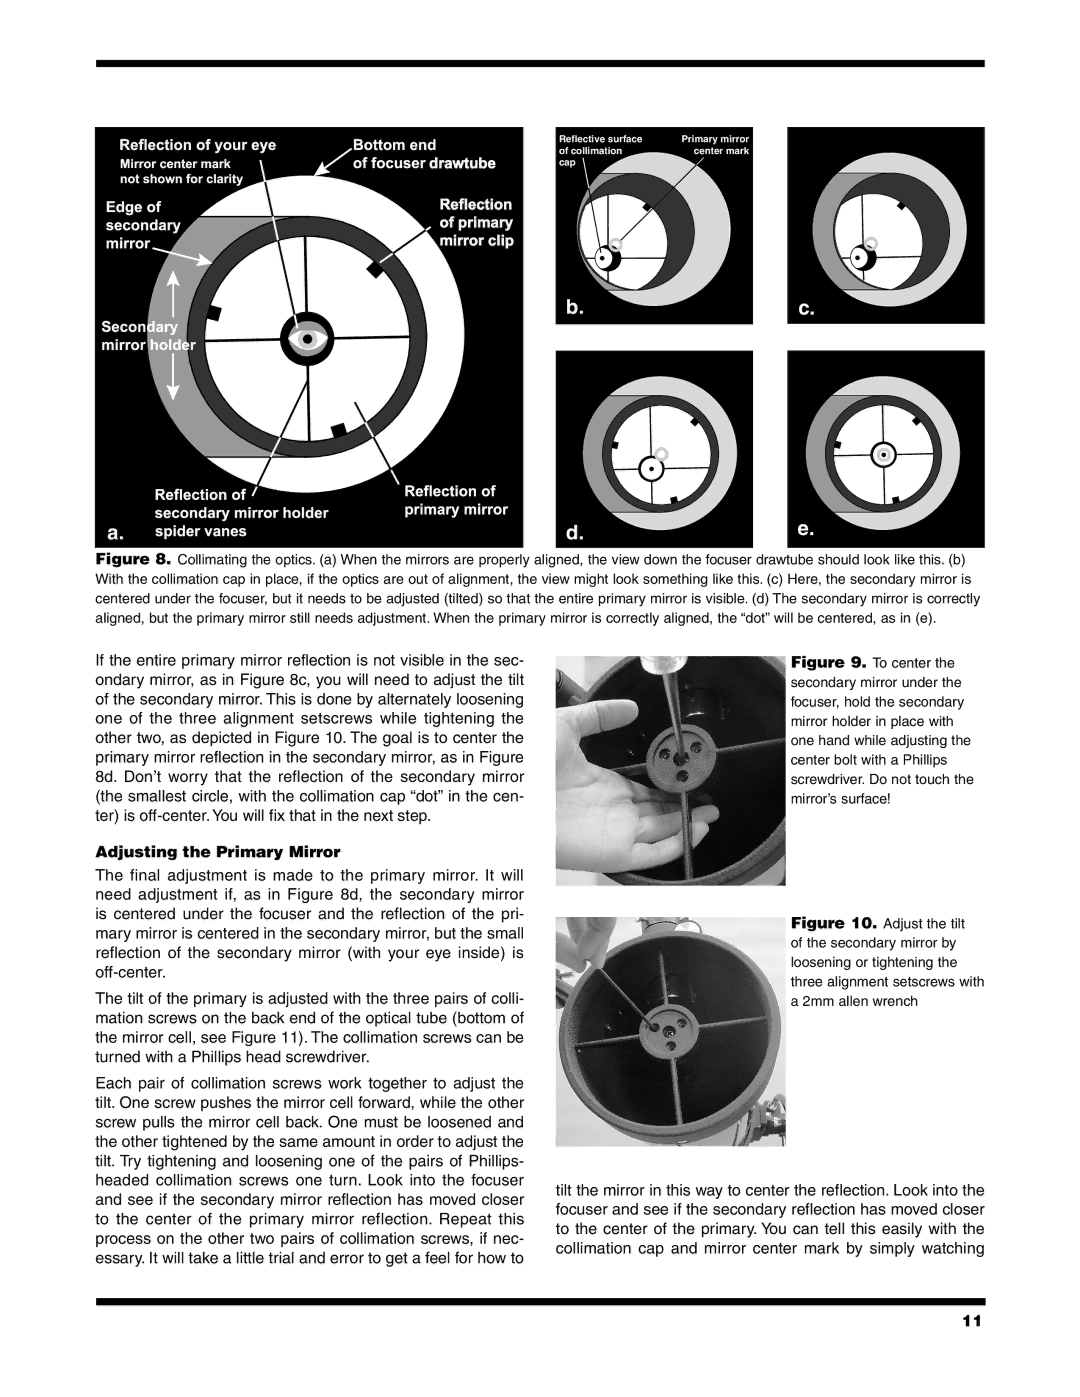
Figure 8. Collimating the optics. (a) When the mirrors are properly aligned, the view down the focuser drawtube should look like this. (b) With the collimation cap in place, if the optics are out of alignment, the view might look something like this. (c) Here, the secondary mirror is centered under the focuser, but it needs to be adjusted (tilted) so that the entire primary mirror is visible. (d) The secondary mirror is correctly aligned, but the primary mirror still needs adjustment. When the primary mirror is correctly aligned, the “dot” will be centered, as in (e).
If the entire primary mirror reflection is not visible in the sec- ondary mirror, as in Figure 8c, you will need to adjust the tilt of the secondary mirror. This is done by alternately loosening one of the three alignment setscrews while tightening the other two, as depicted in Figure 10. The goal is to center the primary mirror reflection in the secondary mirror, as in Figure 8d. Don’t worry that the reflection of the secondary mirror (the smallest circle, with the collimation cap “dot” in the cen- ter) is
Adjusting the Primary Mirror
The final adjustment is made to the primary mirror. It will need adjustment if, as in Figure 8d, the secondary mirror is centered under the focuser and the reflection of the pri- mary mirror is centered in the secondary mirror, but the small reflection of the secondary mirror (with your eye inside) is
The tilt of the primary is adjusted with the three pairs of colli- mation screws on the back end of the optical tube (bottom of the mirror cell, see Figure 11). The collimation screws can be turned with a Phillips head screwdriver.
Each pair of collimation screws work together to adjust the tilt. One screw pushes the mirror cell forward, while the other screw pulls the mirror cell back. One must be loosened and the other tightened by the same amount in order to adjust the tilt. Try tightening and loosening one of the pairs of Phillips- headed collimation screws one turn. Look into the focuser and see if the secondary mirror reflection has moved closer to the center of the primary mirror reflection. Repeat this process on the other two pairs of collimation screws, if nec- essary. It will take a little trial and error to get a feel for how to
Figure 9. To center the secondary mirror under the focuser, hold the secondary mirror holder in place with one hand while adjusting the center bolt with a Phillips screwdriver. Do not touch the mirror’s surface!
Figure 10. Adjust the tilt of the secondary mirror by loosening or tightening the three alignment setscrews with a 2mm allen wrench
tilt the mirror in this way to center the reflection. Look into the focuser and see if the secondary reflection has moved closer to the center of the primary. You can tell this easily with the collimation cap and mirror center mark by simply watching
11