Operating Instructions
Information for Your Safety
Dear Customer
Carefully observe copyright laws
FCC Note
Following Applies only in Canada
Following Applies only in the U.S.A
Declaration of Conformity
About the battery charger
About the battery pack
Battery pack Lithium ion battery pack
Battery charger
About Condensation When the lens is fogged up
This symbol is only valid in the European Union
Care of the camera
Contents
Film Grain Photo Frame
Display Dual Play
Quick Guide
Charge the battery. P12
Insert the battery and the card. P14
Turn the camera on to take pictures
Software Use it to install the software to your PC
Standard Accessories
Hand Strap Battery Case
DE-A59B
Slide switch is not a button
Names of the Components
Or Move
Card/Battery door P14 Release lever P14 DC coupler cover P15
Lens barrel AV OUT/DIGITAL socket P83, 85 Tripod receptacle
Charging the Battery
Detach the battery after charging is completed
Charge indicator a turns off after Approx min maximum
Battery life
When the Charge indicator flashes
Battery indication
Recording conditions by Cipa standard
Approx min
Inserting and Removing the Card optional/the Battery
Do not touch the connection terminals of the card
Card may be damaged if it is not fully inserted
Ensure that the card/battery door is closed
Open the DC coupler cover a
Card
About the Built-in Memory/the Card
Built-in Memory
Sdhc Memory Card 4 GB to
Mode MENU/SET button
Setting Date/Time Clock Set
Clock is not set when the camera is shipped
Turn the camera on
Select Clock SET in the REC or Setup menu, and move 1. P19
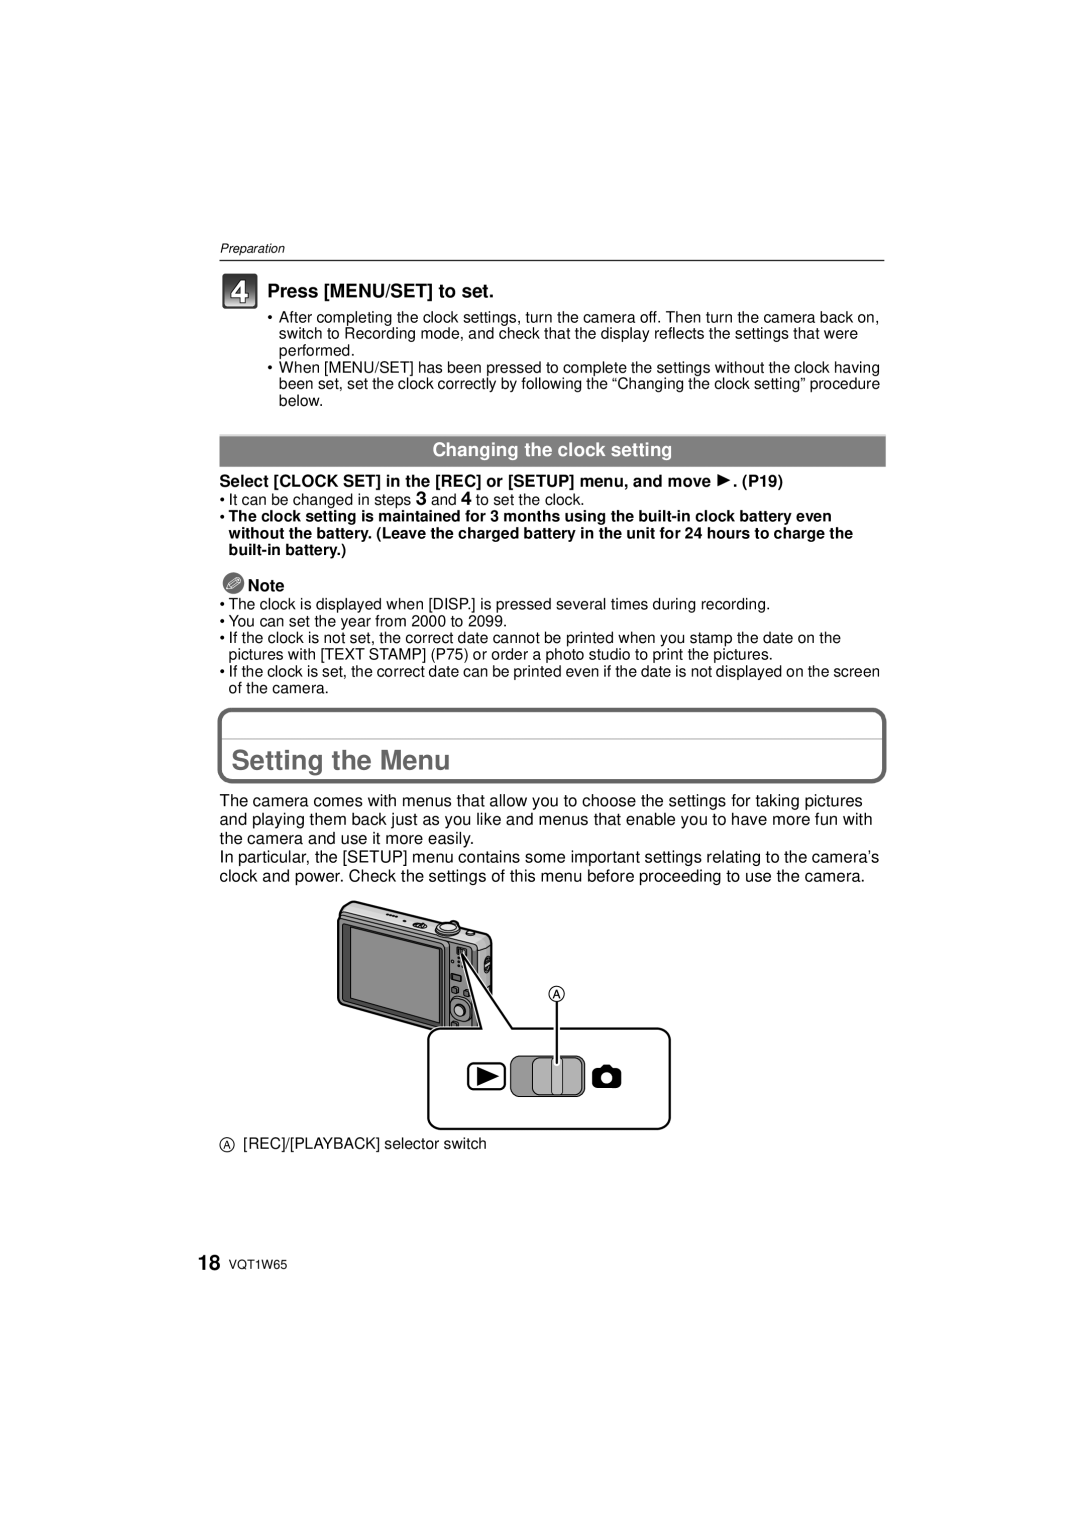
Setting the Menu
Changing the clock setting
Press MENU/SET to set
Setup menu P21 to
Setting menu items
Playback mode menu P73 to REC mode menu P59 to
MENU/SET button REC/PLAYBACK selector switch C Mode button
Move
Move Move 4 to select the Setup menu icon
Move 3/4 to select AF Mode
Move 3/4 to select š Press MENU/SET to set
Travel Setup Location OFF/SET
About the Setup Menu
Using the quick menu
Destination
Shutter VOL
OFF „ Auto Power LCD
… Power LCD
Beep Tone Shutter Tone
Auto LCD OFF
OFF
Reset the file number of the next recording to
Select on Connection
PictBridgePTP
ENGLISH/DEUTSCH¢/FRANÇAIS¢/ESPAÑOL/ ITALIANO¢/繁體中文¢/¢¢
JITTER, SUBJ. Move Demo
Auto Demo
Selecting the REC Mode
Focus indication 1 green lights when the subject is focused
Taking pictures using the automatic function
REC mode ñ
Press the shutter button halfway to focus
Scene detection
Face detection
Backlight Compensation
Settings in Intelligent auto mode
AF Tracking Function
About the flash
Mode button REC/PLAYBACK selector switch
Taking pictures with your favorite settings
REC mode ·
Move 3/4 to select Normal PICTURE, and then press MENU/SET
Focusing
Preventing jitter camera shake
Compose the picture
Rotate the zoom lever towards Tele T
Taking Pictures with the Zoom
Direction detection function
Rotate the zoom lever towards Wide W
Move 2/1 to select the picture
Slide the REC/PLAYBACK selector switch a to
Playing back Pictures Normal Play
Extended optical zoom mechanism
Rotate the zoom lever towards L W
Using the Playback Zoom
Displaying Multiple Screens Multi Playback
Rotate the zoom lever towards Z T
To delete a single picture
Switching the Playback mode
Deleting Pictures
Select the picture to be deleted, and then press ‚
To delete multiple pictures up to 50 or all the pictures
Delete ALL step
About the LCD Monitor
Recording mode
Playback mode
Press DISP. to change
Taking Pictures using the Built-in Flash
Switching to the appropriate flash setting
Move 1 ‰ Move 3/4 to select a mode
Available flash range to take pictures
Available flash settings by Recording mode
About the digital red-eye correction
ISO sensitivity Available flash range Wide Tele
30 to 1/2000
Shutter speed for each flash setting
Flash setting Shutter speed Sec
Or 1/8 to 1/2000¢1 Or 1/4 to 1/2000¢2
Zoom mode
Move 4 # Move 3/4 to select a mode Press MENU/SET
REC mode ·n
Taking Close-up Pictures
Taking Pictures with the Self-timer
Move 2 ë Move 3/4 to select a mode
You can also move 2 ë to select
Properly
Compensating the Exposure
Press MENU/SET to finish
Exposed
With Auto bracket d1 EV 1st picture 2nd picture
Taking Pictures using Auto Bracket
REC mode · ¿
D0 EV J1 EV I1 EV
Move 3/4/2/1 to select the Scene mode Press MENU/SET to set
Registering scenes in Scene mode My scene mode
Move 3/4/2/1 to select the Scene mode
Taking pictures that match the scene being
Initial setting for AF Mode is š
Selecting the Scene mode for each recording ¿ Scene mode
Technique for Portrait mode
Portrait
Scenery
Transform
Self Portrait
SET
Night Scenery
Sports
Night Portrait
Food
Party
Candle Light
BABY1/ BABY2
High Sens
PET
Sunset
3M 43, 2.5M 32 or 2M 169 is selected as the picture size
HI-SPEED Burst
Flash Burst
Picture size and aspect ratio
Starry SKY
Fireworks
Beach
Aerial Photo
Technique for Aerial photo mode
Snow
PIN Hole
Record the image with a frame around it
Film Grain
Photo Frame
Number of pixels is fixed to 2M
Changing the settings for the recording quality
Motion Picture Mode
REC mode n
Press the shutter button fully to stop recording
For details on the Setup menu settings, refer to P19
Useful Functions at Travel Destinations
Recording which Day of the Vacation You Take the Picture
Enter the location
Canceling the travel date
Move 4 to select SET and then press Menu
Press MENU/SET twice to close the menu Take a picture
Select World Time from the Setup menu, and then move
Applicable modes ñ· ¿ When the aspect ratio is
Using the REC Mode Menu
For details on REC mode menu settings, refer to P19
Move 3 to select Destination and then press MENU/SET to set
Quality
When the aspect ratio is Y
When the aspect ratio is W
? Aspect Ratio
Applicable modes ·
Intelligent ISO
Sensitivity
Applicable modes · AUTO/80/100/200/400/800/1600
= White Balance
Applicable modes · ¿n AWB
Auto white balance
AF AF Mode
Exposure
Applicable modes · OFF/ON
Frame, and move 4 to lock the subject
Setting up AF Tracking Bring the subject to the AF tracking
About š
Take the picture
˜ Burst
Max Depends on
Stabilizer
Color Mode
Digital Zoom
Applicable modes · ¿n OFF/ON
AF Assist Lamp
Clock SET
Press MENU/SET to end dual play
Playing Back Pictures on the Dual Display Dual Play
Move 3/4/2/1 to select a picture
Enlargement B Reduction
Playing Back Pictures in Sequence Slide Show
When ALL or Favorite has been selected in step
When Category Selection has been selected in step
Move 3 to select Start and then press Menu
Operations performed during slide show
Changing the slide show settings
Setup
Effect
Recording information
Selecting Pictures and Playing them Back
Category Play
Scene modes
Playing Back Motion Pictures
Favorite Play
CAL Calendar
Using the Playback mode menu
Select Calendar on the Playback mode menu. P19
Move 3/4/2/1 to select the date to be played back
Move 2/1 to select Move 3/4/2/1 to Picture
Setting is canceled when DISP. is pressed again
Title Edit
’ is displayed for pictures with titles already registered
AGE P49
Text Stamp
Shooting Date
If this is set to ON, AGE is stamped on the pictures
Resize Reducing the picture size number of pixels
Aspect ratio setting Picture size
Move 3 to select YES and then press Menu
Travel Date
Single
Select the picture and size
Trimming
Multi
Rotate Disp
Press MENU/SET Move 3 to select YES and then press Menu
Press ‚ to return to the menu screen
Reduction Enlargement
Favorite
Print SET
Select the picture, and then press MENU/SET
When Multi has been selected
Protect
To print the date
Copy
Connecting to a PC
Move 3/4 to select PC, and then press Menu
USB connection cable supplied
Disconnecting the USB connection cable safely
Double-click on Removable Disk in My Computer
Double-click Dcim folder
Printing the Pictures
Move 3/4 to select PictBridgePTP, and then press MENU/SET
Move 3 to select Print Start and then press MENU/SET
Selecting a single picture and printing it
Move 2/1 to select the picture and then press MENU/SET
Selecting multiple pictures and printing them
NUM. of Prints
Print Settings
Print with Date
You can set the number of prints up to
When printing different pictures on 1 sheet of paper
Paper Size
Layout Layouts for printing that can be set with this unit
Playing back pictures on a TV with an SD Memory Card slot
Playing back pictures using the AV cable supplied
Playing Back Pictures on a TV Screen
Align the marks, and insert. B AV cable supplied
Recording after settings
Screen Display
Motion picture recording time P72
Playback
Elapsed playback time P72 Picture number/Total pictures
Motion picture icon P72
About the LCD monitor
About the Lens
Do not press the lens with excessive force
Bring charged spare batteries when going out
Battery
Always remove the battery after use
Dispose of unusable battery
About the picture data
About the personal information
Disclaimer
About tripods
Message Display
Memory Card Parameter Error
Memory Card Error Format this CARD?
Please Turn Camera OFF and then on AGAIN/SYSTEM Error
Memory Card Error Please Check the Card
No Battery Power Remains
Troubleshooting
Battery and power source
This Battery Cannot be Used
Recorded picture is whitish
Area around where the pictures were taken becomes dark
Taking pictures using Auto bracket is not possible
Recorded picture is too bright or dark
LCD monitor
Flash
Playback
Thumbnail is Displayed appears on the screen
TV, PC and printer
Red part of the recorded image has changed color to black
Clicking sound is recorded in the motion pictures
Others
Zooming stops instantaneously
Clock is reset
Lens clicks
Zoom does not go up to maximum magnification
Number of Recordable Pictures and Available Recording Time
Number of recordable pictures
32 MB
256 MB
Available recording time when recording motion pictures
128 MB
512 MB
Specifications
AV OUT/DIGITAL
Charge 4.2
DMW-BCF10PP
Digital Camera Accessory System
Soft Case
Digital Camera Accessory Order Form
For USA and Puerto Rico Customers
Request for Service Notice For USA and Puerto Rico Only
One Panasonic Way, Secaucus, New Jersey
Rechargeable Battery
Pack Exchange for Defective Battery Pack
Except Items Listed Below
Carry-In or Mail-In Service
Customer Services Directory
Centralized Factory Service Center
Batterie batterie au lithium-ion
Précautions à prendre pour le Canada
Propos du bloc-batterie
Avertissement
Propos du chargeur de batterie
Chargeur de batterie
Index
Exposure Compensation Extended Optical Zoom
Recording Quality Setting
Number of Recordable Pictures
F0209MR0