KX-TG8012BX
Voice Mail Service
Caller ID Service
Introduction
Preparation
Model composition
Product information
KX-TG8011 series
Model No Base unit Handset
Feature differences
Accessory information
Supplied accessories
Model No Answering system Intercom
Expanding your phone system
Additional/replacement accessories
Handset optional KX-TGA800BX
For your safety
Battery
Important safety instructions
For best performance
Base unit location/avoiding noise
Routine care
Environment
Base unit
Controls
Handset
KX-TG8011/KX-TG8012 Charge contacts Locator
Display
Using the navigator key
Handset display items
Meaning
Time Settings*1
Ringer Setup
Handset Setup
Base Unit Setup
Charger
Connections
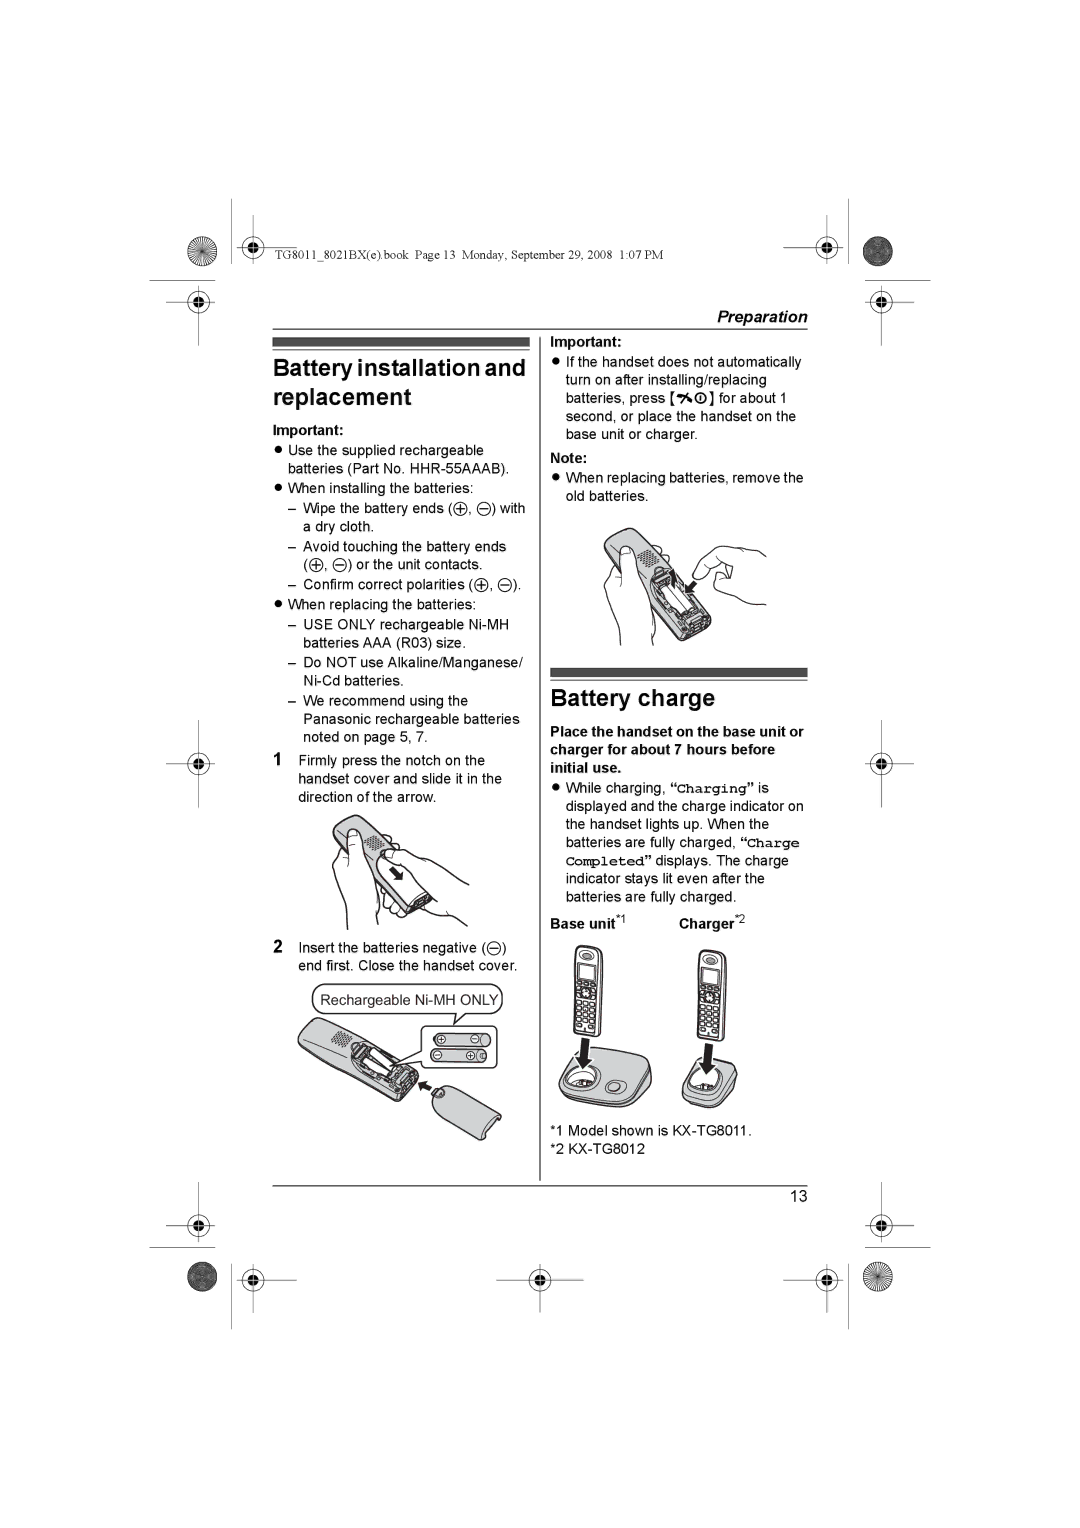
Battery charge
Battery installation and replacement
Base unit*1
Battery level Battery icon
Screen saver mode
Wall mounting
Operation Operating time
Display Setup Select Language
Turning the power on/off
Display language
Auto Talk
Time Settings Set Date & Time
Dialling mode
Date and time
Making calls
Temporary tone dialling for rotary/pulse service users
Useful features during a call
Answering calls
Mute
Handset voice enhancer
Key lock
Call share
Call privacy
Adding entries
Handset phonebook
Categories
Finding and calling a phonebook entry
Erasing entries
Editing entries
One touch dial
One Touch Dial
Chain dial
Copying phonebook entries
Copying an entry
Copying all entries
Ringtone*2, *3 Night Mode Start/End
Programmable settings
On/Off Ring Delay 60 sec Select Category
Programming by scrolling through the display menus
Medium
TG80118021BXe.book Page 25 Monday, September 29, 2008 107 PM
Time adjustment Caller ID subscribers only
Night mode
Selecting area codes to be deleted automatically
Registering a unit
Changing the base unit PIN Personal Identification Number
Operating additional units
Registration i M2 times
Registering a handset to a base unit
Select Base i M
Deregistration
Cancel Base i M
Cancelling a base unit
Setting the repeater mode
Increasing the range of the base unit
Caller ID features
Using Caller ID service
Category settings for phonebook
Viewing the caller list and calling back
Caller list
Editing a caller’s phone number before calling back
Erasing caller information
Turning the answering system on/off
Answering system
Greeting message
Listening to messages using the base unit
Settings menu
Listening to messages using the handset
Operating the answering system
Erasing all messages
Using the answering system remotely
Remote access code
Remote operation
Calling back Caller ID subscribers only
Remote commands
Answering system settings
Turning on the answering system remotely
Skipping the greeting message to leave a message
Caller’s recording time
For voice mail service subscribers
Number of Rings
Recording Time
Voice mail service
Making an intercom call
Intercom
Answering an intercom call
INT
Answering a transferred call
Handset locator
Base unit Press
Base unit Press Handset Press ih
Character entry
Characters available in each character entry mode
Character entry modes
Persian character table
Numeric entry table Arabic character table
Extended character table N
Error messages
General use Problem Cause/solution
Troubleshooting
Programmable settings Problem Cause/solution
Problem Cause/solution
Making/answering calls, intercom
Battery recharge Problem Cause/solution
Caller ID Problem Cause/solution
Unit does not record new
Liquid damage Problem Cause/solution
Specifications
Index
TG80118021BXe.book Page 53 Monday, September 29, 2008 107 PM
TG80118021BXe.book Page 54 Monday, September 29, 2008 107 PM
TG80118021BXe.book Page 55 Monday, September 29, 2008 107 PM
For your future reference
PNQX1396ZA CC1008DN0
Copyright