LC2H
Part names
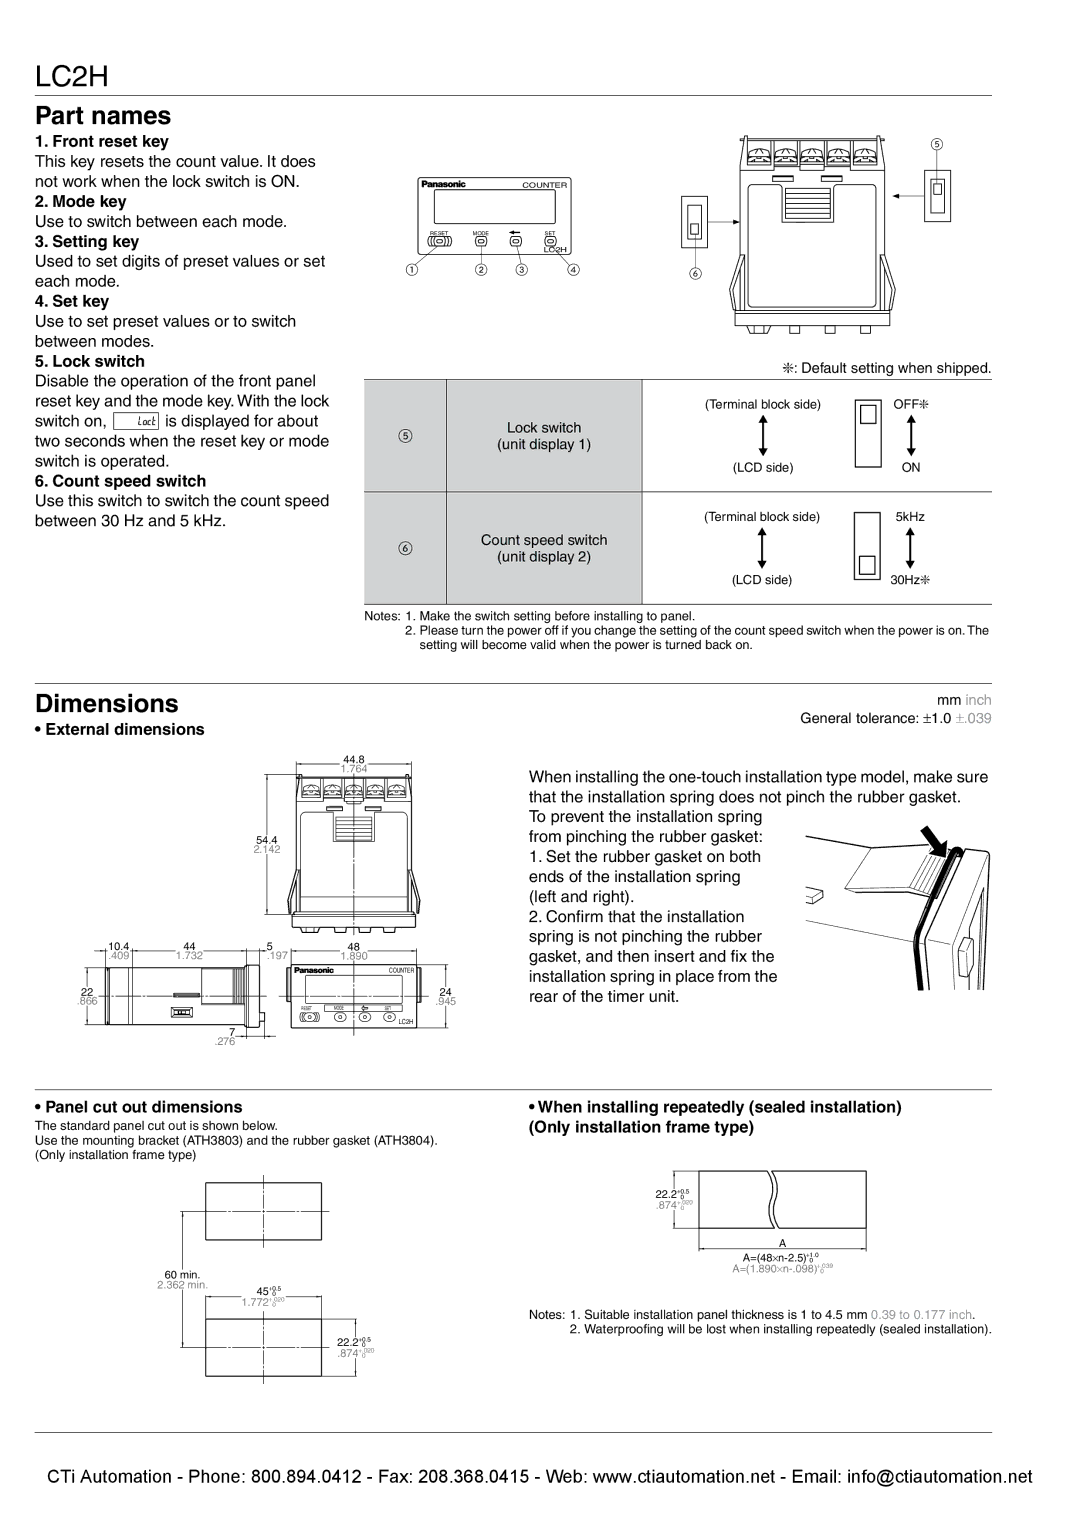
1. Front reset key
This key resets the count value. It does not work when the lock switch is ON.
2. Mode key
Use to switch between each mode.
3. Setting key
Used to set digits of preset values or set each mode.
4. Set key
Use to set preset values or to switch between modes.
5. Lock switch
Disable the operation of the front panel reset key and the mode key. With the lock
switch on, ![]()
![]()
![]()
![]()
![]()
![]()
![]()
![]()
![]()
![]()
![]()
![]()
![]()
![]() is displayed for about two seconds when the reset key or mode switch is operated.
is displayed for about two seconds when the reset key or mode switch is operated.
6. Count speed switch
Use this switch to switch the count speed between 30 Hz and 5 kHz.
5
COUNTER
RESET | MODE |
| SET |
|
|
|
| LC2H |
|
1 | 2 | 3 | 4 | 6 |
|
|
|
|
❇: Default setting when shipped.
(Terminal block side) |
|
|
| OFF❇ |
|
|
|
5 | Lock switch |
|
|
|
|
|
| |
(unit display 1) |
|
|
|
|
|
| ||
|
|
|
|
|
|
| ||
|
| (LCD side) |
|
|
| ON | ||
|
|
|
|
| ||||
|
|
|
|
|
|
|
|
|
6 | Count speed switch | (Terminal block side) |
|
|
| 5kHz | ||
|
|
| ||||||
|
|
|
|
|
|
| ||
|
|
|
|
|
|
| ||
(unit display 2) |
|
|
|
|
|
|
| |
|
|
|
|
|
|
|
| |
|
| (LCD side) |
|
|
| 30Hz❇ | ||
|
|
|
|
| ||||
|
|
|
|
|
|
|
|
|
Notes: 1. Make the switch setting before installing to panel.
2.Please turn the power off if you change the setting of the count speed switch when the power is on. The setting will become valid when the power is turned back on.
Dimensions
• External dimensions
44.8
1.764
54.4
2.142
10.4 | 44 | 5 | 48 |
|
.409 | 1.732 | .197 | 1.890 |
|
|
|
|
| COUNTER |
22 |
|
|
| 24 |
.866 |
|
| MODE | .945 |
|
| RESET | SET | |
|
| 7 |
| LC2H |
|
|
|
| |
|
| .276 |
|
|
mm inch General tolerance: ±1.0 ±.039
When installing the
To prevent the installation spring from pinching the rubber gasket:
1.Set the rubber gasket on both ends of the installation spring
(left and right).
2. Confirm that the installation spring is not pinching the rubber gasket, and then insert and fix the installation spring in place from the rear of the timer unit.
• Panel cut out dimensions
The standard panel cut out is shown below.
Use the mounting bracket (ATH3803) and the rubber gasket (ATH3804). (Only installation frame type)
•When installing repeatedly (sealed installation) (Only installation frame type)
22.2+00.5
.874+.0020
60 min.
2.362 min.45+00.5
1.772+.0020
22.2+00.5
.874+.0020
A
Notes: 1. Suitable installation panel thickness is 1 to 4.5 mm 0.39 to 0.177 inch.
2. Waterproofing will be lost when installing repeatedly (sealed installation).
108
CTi Automation - Phone: 800.894.0412 - Fax: 208.368.0415 - Web: www.ctiautomation.net - Email: info@ctiautomation.net