LC2H
Part names
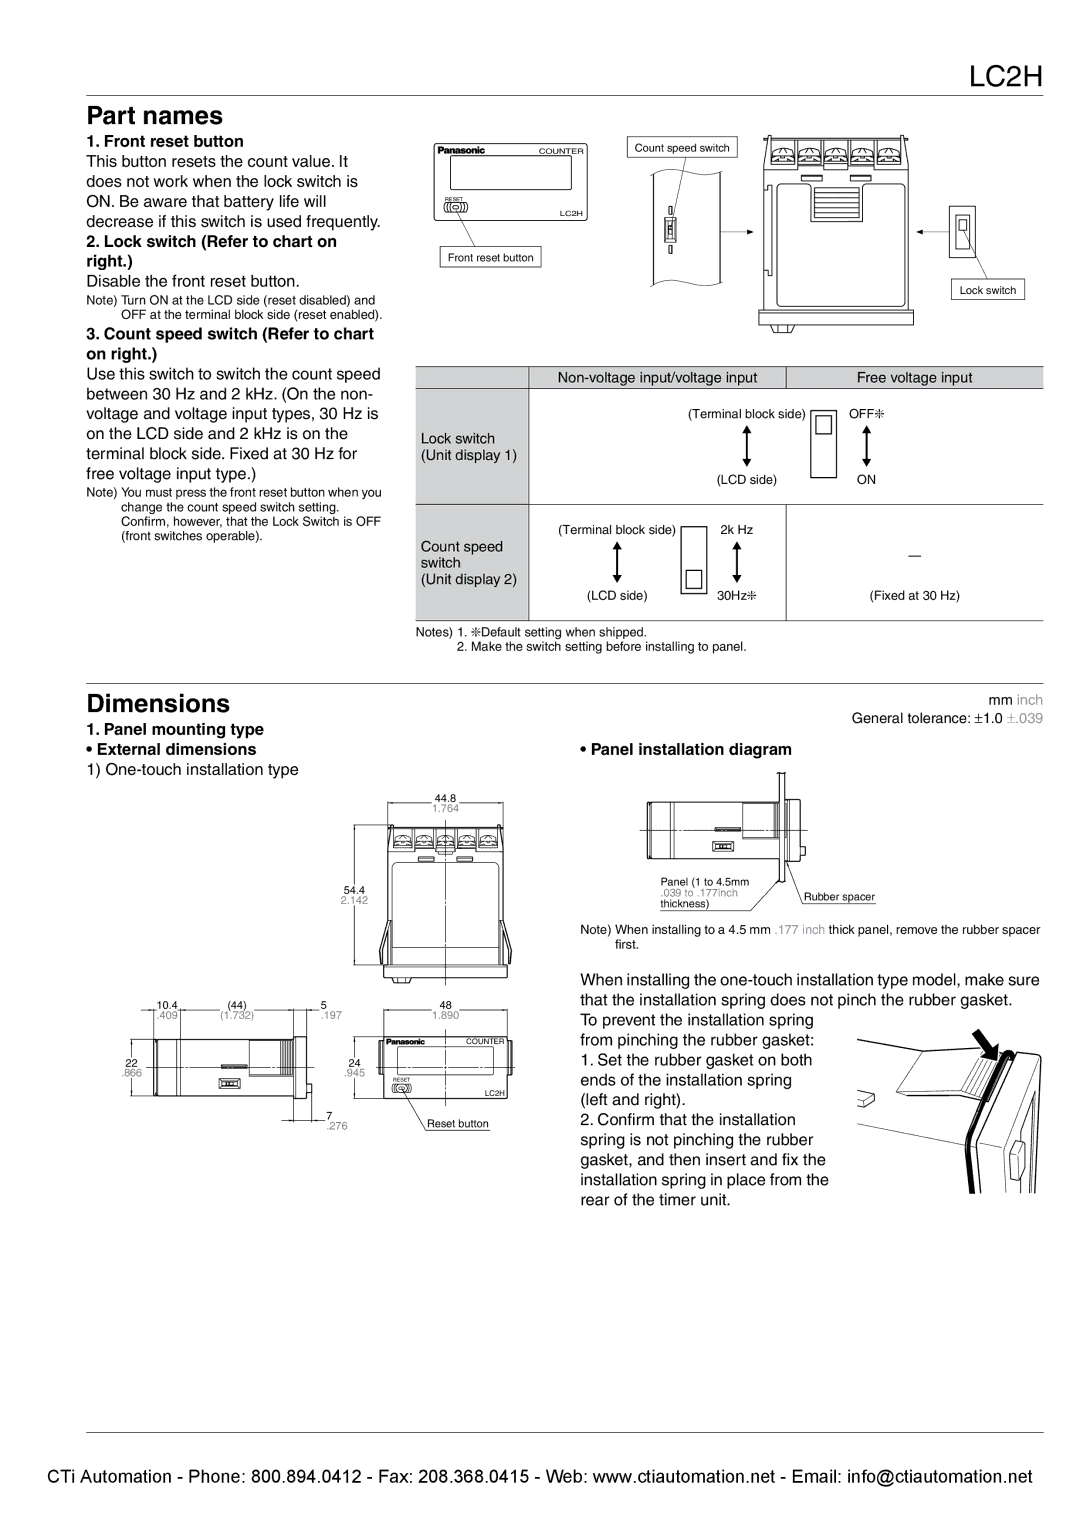
1. Front reset button
This button resets the count value. It does not work when the lock switch is ON. Be aware that battery life will decrease if this switch is used frequently.
2.Lock switch (Refer to chart on right.)
Disable the front reset button.
Note) Turn ON at the LCD side (reset disabled) and OFF at the terminal block side (reset enabled).
COUNTER
RESET
LC2H
Front reset button
Count speed switch
Lock switch
3.Count speed switch (Refer to chart on right.)
Use this switch to switch the count speed between 30 Hz and 2 kHz. (On the non- voltage and voltage input types, 30 Hz is on the LCD side and 2 kHz is on the terminal block side. Fixed at 30 Hz for free voltage input type.)
Note) You must press the front reset button when you change the count speed switch setting. Confirm, however, that the Lock Switch is OFF (front switches operable).
|
|
| Free voltage input | |||||||
Lock switch |
|
| (Terminal block side) |
| OFF❇ | |||||
|
|
| ||||||||
|
|
|
|
|
|
|
|
|
| |
|
|
|
|
|
|
|
|
|
| |
(Unit display 1) |
|
|
|
|
|
|
|
|
|
|
|
|
|
| (LCD side) |
| ON | ||||
|
|
|
| |||||||
|
|
|
|
|
|
|
|
|
|
|
Count speed | (Terminal block side) |
| 2k Hz |
|
|
| — | |||
|
|
|
| |||||||
|
|
|
|
|
|
|
|
| ||
|
|
|
|
|
|
|
|
| ||
switch |
|
|
|
|
|
|
|
|
| |
|
|
|
|
|
|
|
|
|
| |
(Unit display 2) |
|
|
|
|
|
|
|
|
|
|
(LCD side) |
| 30Hz❇ |
|
|
| (Fixed at 30 Hz) | ||||
|
|
|
|
| ||||||
|
|
|
|
| ||||||
|
|
|
|
|
|
|
|
|
|
|
Notes) 1. ❇Default setting when shipped.
2. Make the switch setting before installing to panel.
Dimensions
1.Panel mounting type
• External dimensions
1) One-touch installation type
44.8 |
1.764 |
54.4
2.142
10.4 | (44) | 5 | 48 |
.409 | (1.732) | .197 | 1.890 |
|
|
| COUNTER |
22 |
| 24 |
|
.866 |
| .945 | RESET |
|
|
| |
|
|
| LC2H |
|
| 7 | Reset button |
|
| .276 |
mm inch General tolerance: ±1.0 ±.039
• Panel installation diagram
Panel (1 to 4.5mm |
| |
.039 to .177inch | Rubber spacer | |
thickness) | ||
|
Note) When installing to a 4.5 mm .177 inch thick panel, remove the rubber spacer first.
When installing the
To prevent the installation spring from pinching the rubber gasket:
1.Set the rubber gasket on both ends of the installation spring
(left and right).
2. Confirm that the installation spring is not pinching the rubber gasket, and then insert and fix the installation spring in place from the rear of the timer unit.
101
CTi Automation - Phone: 800.894.0412 - Fax: 208.368.0415 - Web: www.ctiautomation.net - Email: info@ctiautomation.net
