!!

!!

!

!!

!!!

!

COOKING VEGETABLES AND ROOT VEGETABLES BY SENSOR COOK AND AUTO COOK (S) Å

Vegetables

(120 g - 500 g by Sensor Cook)

(120 g - 370 g by Auto Cook)

Suitable for cooking all types of leaf, green and soft varieties of vegetables, including broccoli, squash cauliflower, cabbage, asparagus, beans, celery, zucchini, spinach, capsicum or a mixture of these.

All vegetables should be trimmed or prepared and cut into evenly sized pieces.

Add 1 tablespoon to 14 cup of water to vegetables if dehydrated or a softer cooked texture is desired.

Place in a suitable size dish.

Butter, herbs, etc., may be added before heating, but do not salt vegetables until serving.

Cover dishes securely with plastic wrap or a fitted lid.

At the completion of heating, stir larger quantities of vegetables. Let stand, covered, for 2 to 3 minutes.

To Operate by Sensor Cook:

Select Vegetables, then press Start.

To Operate by Auto Cook:

Press Vegetables to select weight required, then press Start.

Potatoes

(250 g - 1.0 kg by Sensor Cook)

(250 g - 900 g by Auto Cook)

Suitable for cooking root vegetables such as potatoes, sweet potatoes, pumpkin, onions, swede, carrots, turnip and beetroot.

All vegetables should be trimmed or prepared and cut into even sized pieces.

Add 1 tablespoon to 14 cup of water to vegetables if dehydrated or a softer cooked texture is desired.

Place into an appropriate size dish and cover securely with plastic wrap or a fitted lid.

If desired, butter, herbs etc. may be added but do not add salt until after cooking.

During the cooking time, the oven will ‘beep’ and prompt you to rearrange the vegetables.

At the completion of cooking, stir larger quantities of vegetables. Let stand, covered, for 2 to 3 minutes.

To Operate by Sensor Cook:

Select Potatoes, then press Start.

To Operate by Auto Cook:

Press Potatoes to select weight required, then press Start.

Vegetables

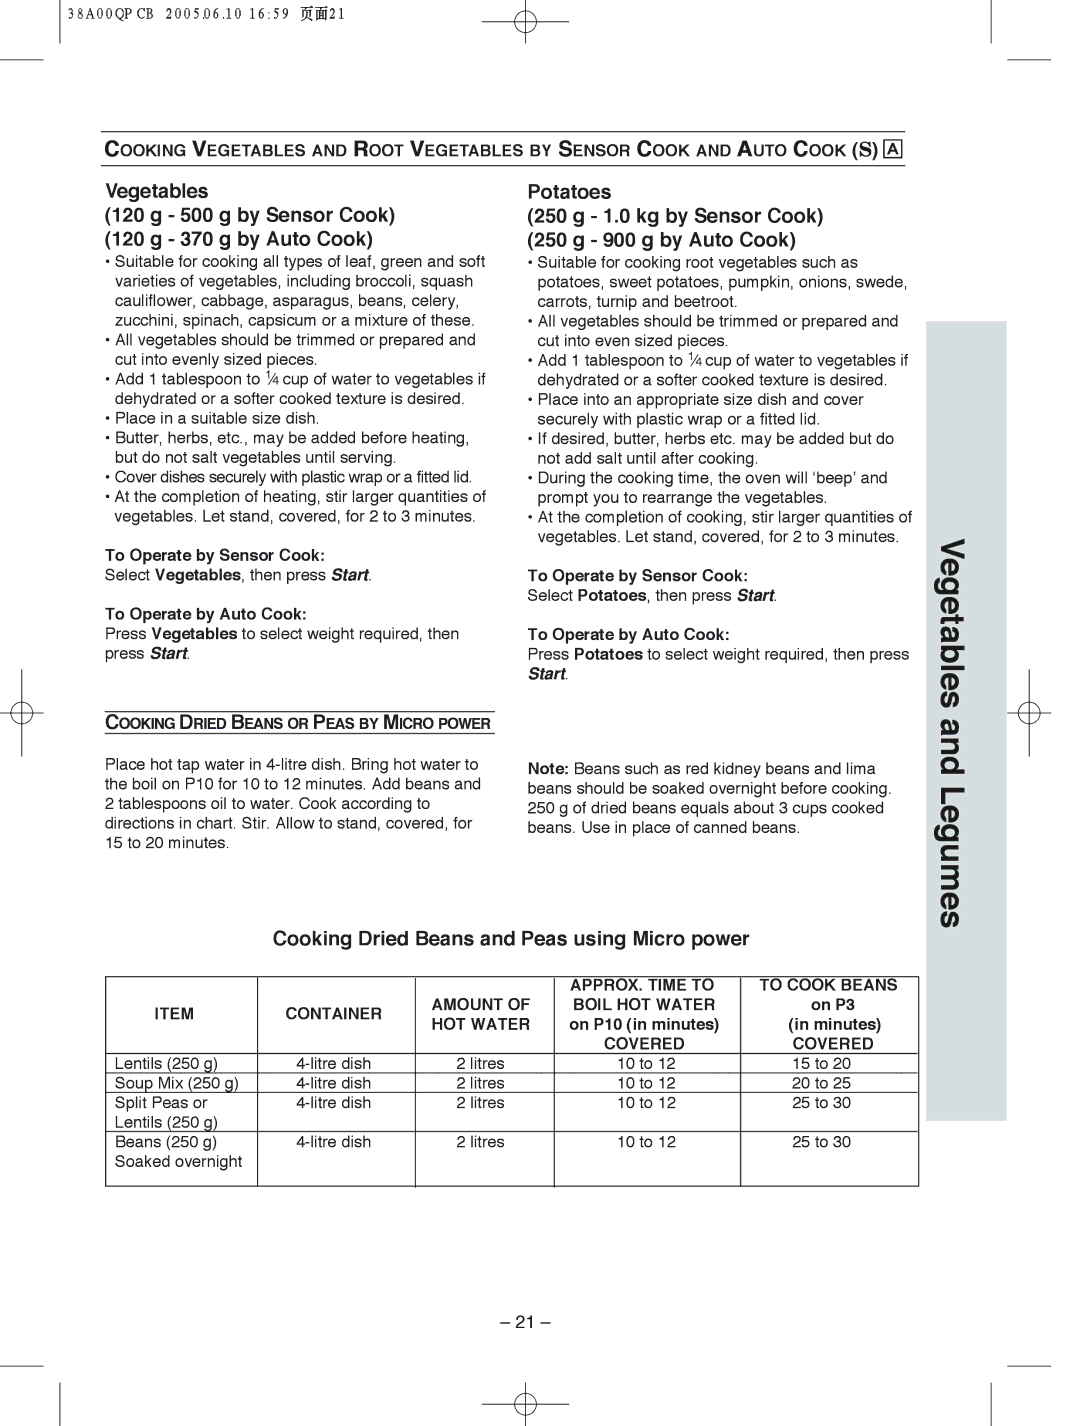
COOKING DRIED BEANS OR PEAS BY MICRO POWER


Place hot tap water in 4-litre dish. Bring hot water to

Note: Beans such as red kidney beans and lima

the boil on P10 for 10 to 12 minutes. Add beans and

beans should be soaked overnight before cooking.

2 tablespoons oil to water. Cook according to

250 g of dried beans equals about 3 cups cooked

directions in chart. Stir. Allow to stand, covered, for

beans. Use in place of canned beans.

15 to 20 minutes.


Cooking Dried Beans and Peas using Micro power


APPROX. TIME TO

TO COOK BEANS

ITEM

CONTAINER

AMOUNT OF

BOIL HOT WATER

on P3

HOT WATER

on P10 (in minutes)

(in minutes)


COVERED

COVERED

Lentils (250 g)

4-litre dish

2 litres

10 to 12

15 to 20

Soup Mix (250 g)

4-litre dish

2 litres

10 to 12

20 to 25

Split Peas or

4-litre dish

2 litres

10 to 12

25 to 30

Lentils (250 g)


Beans (250 g)

4-litre dish

2 litres

10 to 12

25 to 30

Soaked overnight


and Legumes

– 21 –

Page 43
Image 43
Panasonic NN-S555 Vegetables 500 g by Sensor Cook 370 g by Auto Cook, Potatoes 1.0 kg by Sensor Cook 900 g by Auto Cook

NN-S565, NN-S555, NN-S575 specifications

The Panasonic NN-S575, NN-S565, and NN-S555 are part of Panasonic's innovative line of microwaves, designed to enhance cooking efficiency while bringing modern technology to your kitchen. Each model boasts impressive features that cater to various cooking needs, making them popular choices for home chefs.

The NN-S575 is equipped with inverter technology, a hallmark of Panasonic’s microwaves that ensures even cooking throughout. This technology allows for precise temperature control, eliminating cold spots and ensuring that food is evenly heated. The NN-S575 also includes a powerful 1250-watt output, making it incredibly fast and efficient for reheating meals or defrosting. One of its standout features is the Genius Sensor, which automatically adjusts cooking time and power based on the moisture content of the food. This means users can simply place their meal inside, select the cooking program, and let the microwave do the rest.

Moving on to the NN-S565, this model also features inverter technology but comes with a slightly lower wattage of 1000 watts. The intuitive touch control panel allows for easy operation, and it is designed with multiple preset cooking options that make meal preparation effortless. The NN-S565 is particularly noted for its sleek design, which fits seamlessly into modern kitchens. Its compact size is perfect for smaller spaces without compromising on performance.

The NN-S555 model is the more budget-friendly option in this lineup, maintaining much of the same core technology as its counterparts. It offers a 900-watt output and is also equipped with inverter technology, which ensures a consistent cooking experience. Although it has fewer preset functions compared to the NN-S575 and NN-S565, it still provides essential capabilities that make it suitable for everyday microwave tasks. The simplicity of the NN-S555 appeals to users looking for straightforward functionality without the need for advanced features.

All three models feature a stylish design, with a smooth glass door and a modern stainless-steel finish. They are designed for easy cleaning and have spacious interiors that accommodate a variety of dishes. Key safety features, such as child lock mechanisms, are also integrated into the design, ensuring peace of mind for families.

In summary, whether you choose the NN-S575, NN-S565, or NN-S555, you are investing in high-quality microwave technology from Panasonic. Each model caters to different preferences and cooking requirements, ensuring that there is an option for everyone looking to enhance their culinary experience.