To Select the Recording Duration and Perform Timer Recording (OTR Recording)
OTR means
After the selected recording duration has elapsed, recording stops and the VCR automatically switches off.
To Perform an OTR Recording:
1Display the VCR picture on the TV.
2Insert a video cassette with an intact erasure prevention tab.
3Press the Channel buttons N to select the programme position on which the TV programme to be recorded will be broadcast.
4Press the REC/OTR button Z to start recording.
5Press the REC/OTR button Z repeatedly to select the desired recording duration.
–Every time you press this button, the recording duration indicated in the VCR display changes in the following order.
–For example, if you select [30], the VCR records a programme from that moment on for 30 minutes.
Counter display | 30 | 60 | |
(normal recording mode) | (min.) | (min.) | |
240 | 180 | 120 | 90 |
(min.) | (min.) | (min.) | (min.) |
To Stop the OTR Recording Before the End: Press the Stop button F.
Notes:
–The OTR function works during normal recording and Direct TV Recording.
–When the tape reaches its end during OTR recording, the VCR will turn itself off.
Recording from an external source
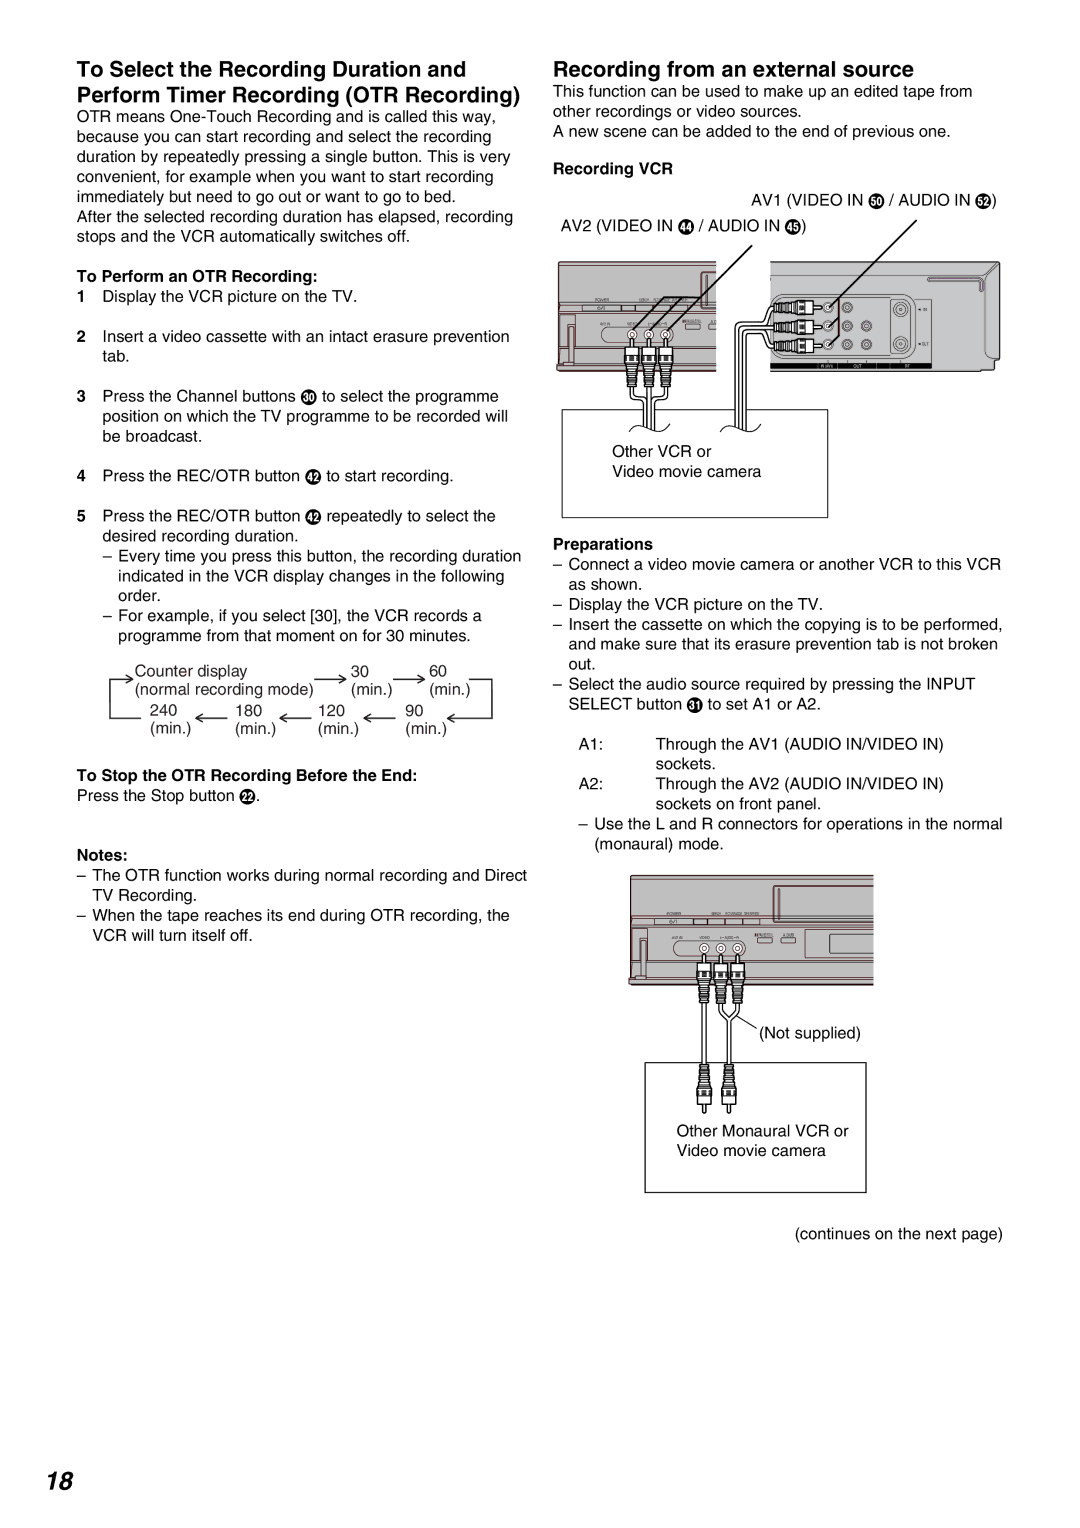
This function can be used to make up an edited tape from other recordings or video sources.
A new scene can be added to the end of previous one.
Recording VCR |
|
| |
|
|
| AV1 (VIDEO IN b / AUDIO IN d) |
AV2 (VIDEO IN \ / AUDIO IN ]) | |||
POWER | SERCH PICTURE MODE TAPE RIFRESH |
| |
|
|
| I N |
AV2 IN | VIDEO L AUDIO R | PAUSE/STILL | A.D |
|
| ||
|
|
| OUT |
|
|
|
|
|
|
|
|
|
|
|
|
|
|
| IN (AV1) |
| OUT |
| RF |
|
|
|
|
|
|
|
|
|
|
|
|
|
|
|
|
|
|
|
|
|
|
|
|
|
|
|
|
|
|
|
|
|
|
|
|
|
|
|
|
|
|
|
|
|
|
|
|
|
|
|
|
|
|
|
|
|
|
|
|
|
|
|
|
|
|
|
|
|
|
|
|
|
|
|
|
|
|
|
|
Other VCR or
Video movie camera
Preparations
–Connect a video movie camera or another VCR to this VCR as shown.
–Display the VCR picture on the TV.
–Insert the cassette on which the copying is to be performed, and make sure that its erasure prevention tab is not broken out.
–Select the audio source required by pressing the INPUT SELECT button O to set A1 or A2.
A1: | Through the AV1 (AUDIO IN/VIDEO IN) |
| sockets. |
A2: | Through the AV2 (AUDIO IN/VIDEO IN) |
| sockets on front panel. |
–Use the L and R connectors for operations in the normal (monaural) mode.
POWER |
| SERCH | PICTURE MODE | TAPE RIFRESH |
|
AV2 IN | VIDEO | L | AUDIO R | PAUSE/STILL | A.DUB |
|
|
(Not supplied)
Other Monaural VCR or
Video movie camera
(continues on the next page)
18
