Correcting keystone distortion
Adjusting the picture
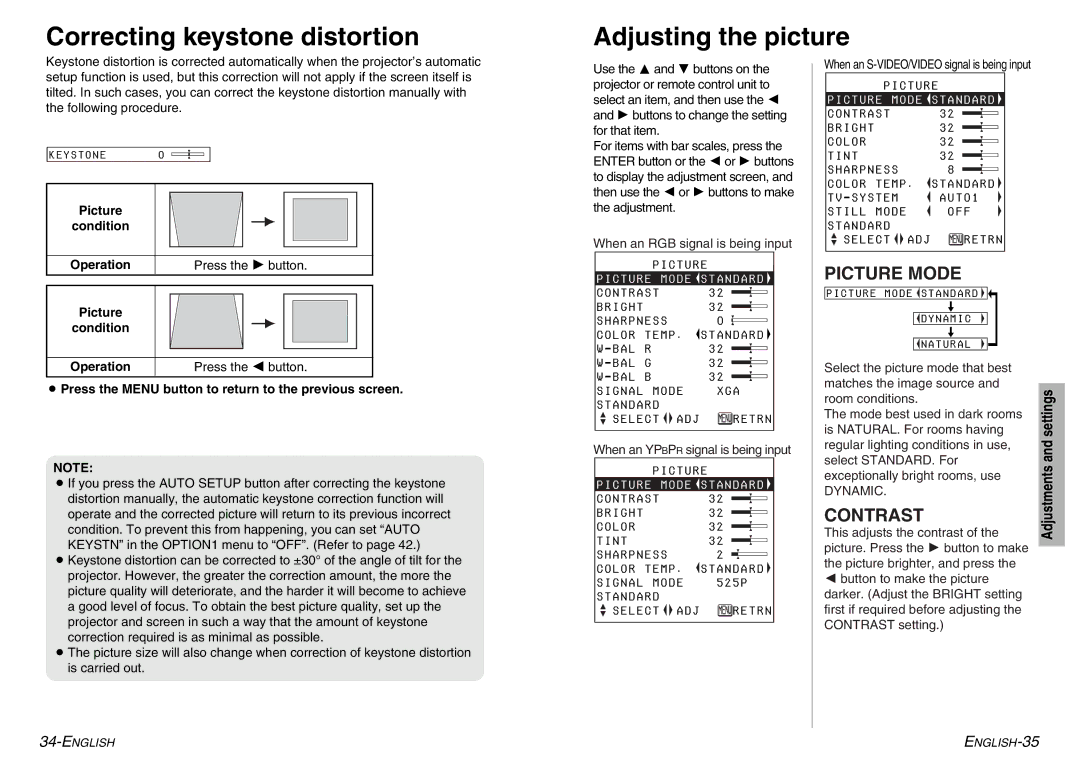
Keystone distortion is corrected automatically when the projector’s automatic setup function is used, but this correction will not apply if the screen itself is tilted. In such cases, you can correct the keystone distortion manually with the following procedure.
KEYSTONE 0
Picture
condition
Operation | Press the H button. |
Picture
condition
Operation | Press the I button. |
BPress the MENU button to return to the previous screen.
NOTE:
BIf you press the AUTO SETUP button after correcting the keystone distortion manually, the automatic keystone correction function will operate and the corrected picture will return to its previous incorrect condition. To prevent this from happening, you can set “AUTO KEYSTN” in the OPTION1 menu to “OFF”. (Refer to page 42.)
BKeystone distortion can be corrected to ±30° of the angle of tilt for the projector. However, the greater the correction amount, the more the picture quality will deteriorate, and the harder it will become to achieve a good level of focus. To obtain the best picture quality, set up the projector and screen in such a way that the amount of keystone correction required is as minimal as possible.
BThe picture size will also change when correction of keystone distortion is carried out.
Use the F and G buttons on the projector or remote control unit to select an item, and then use the I and H buttons to change the setting for that item.
For items with bar scales, press the ENTER button or the I or H buttons to display the adjustment screen, and then use the I or H buttons to make the adjustment.
When an RGB signal is being input
| PICTURE | |||
PICTURE | MODE | STANDARD | ||
CONTRAST |
|
| 32 | |
BRIGHT |
|
|
| 32 |
SHARPNESS | 0 | |||
COLOR | TEMP . | STANDARD | ||
W - BAL | R |
|
| 32 |
W - BAL | G |
|
| 32 |
W - BAL | B |
|
| 32 |
SIGNAL | MODE | XGA | ||
STANDARD |
|
|
| |
SELECT |
| ADJ | RETRN | |
| ||||
When an YPBPR signal is being input
PICTURE
PICTURE MODE | STANDARD |
CONTRAST | 32 |
BRIGHT | 32 |
COLOR | 32 |
TINT | 32 |
SHARPNESS | 2 |
COLOR | TEMP . | STANDARD | ||
SIGNAL | MODE | 525P | ||
STANDARD |
|
|
| |
SELECT |
| ADJ | RETRN | |
| ||||
When an S-VIDEO/VIDEO signal is being input
PICTURE
PICTURE | MODE | STANDARD | |
CONTRAST |
|
| 32 |
BRIGHT |
|
| 32 |
COLOR |
|
| 32 |
TINT |
|
| 32 |
SHARPNESS | 8 | ||
COLOR TEMP . | STANDARD | ||
TV - SYSTEM | AUTO1 | ||
STILL MODE | OFF | ||
STANDARD |
|
|
|
SELECT |
| ADJ | RETRN |
| |||
PICTURE MODE
PICTURE MODE ![]() STANDARD �
STANDARD �
[�
![]() DYNAMIC
DYNAMIC
[
![]() NATURAL
NATURAL
Select the picture mode that best matches the image source and room conditions.
The mode best used in dark rooms is NATURAL. For rooms having regular lighting conditions in use, select STANDARD. For exceptionally bright rooms, use
DYNAMIC.
CONTRAST
This adjusts the contrast of the picture. Press the H button to make the picture brighter, and press the
Ibutton to make the picture darker. (Adjust the BRIGHT setting first if required before adjusting the CONTRAST setting.)
Adjustments and settings