'Install the lamp unit cover, and then use a Phillips screwdriver to securely tighten the lamp unit cover fixing screws.
NOTE:
BBe sure to install the lamp unit and the lamp unit cover securely. If they are not securely installed, it may cause the protection circuit to operate so that the power cannot be turned on.
(Insert the power cord plug into the wall outlet and then press the MAIN POWER switch.
NOTE:
BIf the POWER indicator on the projector does not illuminate red when the MAIN POWER switch is turned on, turn the MAIN POWER switch off again, unplug the power cord from the electrical outlet, and check that the lamp unit and the lamp unit cover are securely installed. Then turn the MAIN POWER switch back on.
)Press the POWER button so that a picture is projected onto the screen.
*Press the MENU button to display the MAIN MENU screen, and then press the F and G buttons to move the cursor to select “OPTION2”.
MENU
![]() KEYSTONE
KEYSTONE
![]() PICTURE
PICTURE
![]() POSITION
POSITION
![]() INDEX WINDOW
INDEX WINDOW
![]() SHUTTER
SHUTTER
![]()
![]() VOLUME
VOLUME
![]() LANGUAGE
LANGUAGE
![]() OPTION1
OPTION1
![]() OPTION2
OPTION2
![]() SECURITY
SECURITY
![]() SELECT
SELECT ![]() ENTER
ENTER![]() EXIT
EXIT
+Press the ENTER button to display the OPTION2 screen, and then use the F and G buttons to select LAMP RUNTIME.
OPTION2
BACK COLOR ![]() BLUE
BLUE
FRONT/REAR ![]() FRONT
FRONT
DESK/CEILING ![]() DESK
DESK ![]() FAN CONTROL
FAN CONTROL ![]() STANDARD
STANDARD ![]()
LAMP | POWER | HIGH |
|
|
|
LAMP | RUNTIME | 1820H |
|
|
|
FUNC | 1 | INDEX |
CONTROL | KEY | ON |
|
|
|
AUTO POW | . OFF | DISABLE |
SELECT |
| RETRN |
,Press and hold the ENTER button for approximately 3 seconds.
OPTION2
BACK COLOR ![]() BLUE
BLUE
FRONT/REAR ![]() FRONT
FRONT
DESK/CEILING ![]() DESK
DESK
FAN CONTROL ![]() STANDARD
STANDARD ![]()
LAMP POWER ![]() HIGH
HIGH
TIME | RESET | [POWER OFF] |
|
|
|
FUNC | 1 | INDEX |
|
| |
CONTROL KEY | ON | |
| ||
AUTO POW . OFF DISABLE | ||
SELECT | RETRN | |
The “LAMP RUNTIME” will change to “TIME RESET [POWER OFF]”.
NOTE:
BIf the MENU button is pressed, the lamp time resetting screen will be cancelled.
-Turn off the power.
This will reset the cumulative usage time for the lamp unit to zero.
Refer to page 24 for details on how to turn off the power.
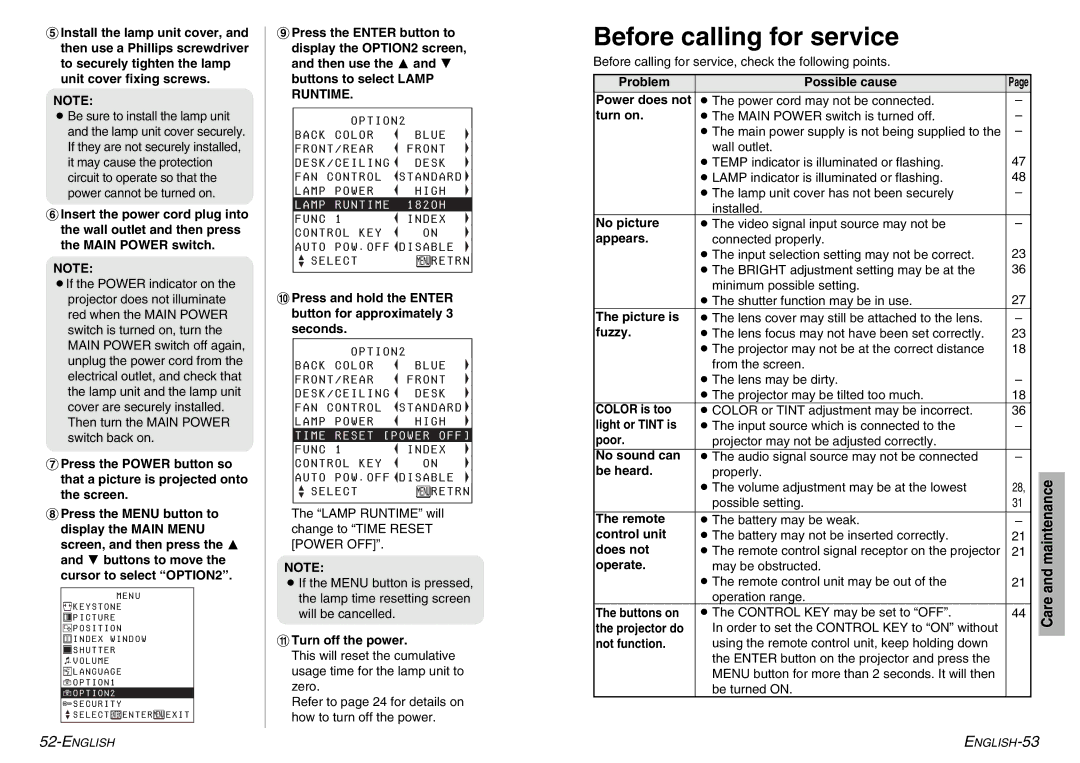
Before calling for service
Before calling for service, check the following points. |
|
|
| |
|
|
|
|
|
Problem | Possible cause | Page |
|
|
Power does not | BThe power cord may not be connected. | – |
|
|
turn on. | BThe MAIN POWER switch is turned off. | – |
|
|
| BThe main power supply is not being supplied to the | – |
|
|
| wall outlet. | 47 |
|
|
| BTEMP indicator is illuminated or flashing. |
|
| |
| BLAMP indicator is illuminated or flashing. | 48 |
|
|
| BThe lamp unit cover has not been securely | – |
|
|
| installed. |
|
|
|
No picture | BThe video signal input source may not be | – |
|
|
appears. | connected properly. | 23 |
|
|
| BThe input selection setting may not be correct. |
|
| |
| BThe BRIGHT adjustment setting may be at the | 36 |
|
|
| minimum possible setting. | 27 |
|
|
| BThe shutter function may be in use. |
|
| |
The picture is | BThe lens cover may still be attached to the lens. | – |
|
|
fuzzy. | BThe lens focus may not have been set correctly. | 23 |
|
|
| BThe projector may not be at the correct distance | 18 |
|
|
| from the screen. |
|
|
|
| BThe lens may be dirty. | – |
|
|
| BThe projector may be tilted too much. | 18 |
|
|
COLOR is too | BCOLOR or TINT adjustment may be incorrect. | 36 |
|
|
light or TINT is | BThe input source which is connected to the | – |
|
|
poor. | projector may not be adjusted correctly. |
|
|
|
No sound can | BThe audio signal source may not be connected | – |
|
|
be heard. | properly. |
|
|
|
28, |
| maintenance | ||
| BThe volume adjustment may be at the lowest |
| ||
|
|
| ||
| possible setting. | 31 |
|
|
|
|
|
|
|
The remote | BThe battery may be weak. | – |
|
|
control unit | BThe battery may not be inserted correctly. | 21 |
|
|
does not | BThe remote control signal receptor on the projector | 21 |
|
|
operate. | may be obstructed. |
|
| and |
| BThe remote control unit may be out of the | 21 |
| |
|
|
| ||
| operation range. |
|
| Care |
The buttons on | BThe CONTROL KEY may be set to “OFF”. | 44 |
| |
|
| |||
the projector do | In order to set the CONTROL KEY to “ON” without |
|
|
|
not function. | using the remote control unit, keep holding down |
|
|
|
| the ENTER button on the projector and press the |
|
|
|
| MENU button for more than 2 seconds. It will then |
|
|
|
| be turned ON. |
|
|
|